Halloween is just around the corner, and it’s the perfect time to spruce up your home with some spooky and festive decorations. One of the most prominent places in many homes is the mantle. If you’re searching for Halloween mantle ideas, you’ve come to the right place. Let’s dive into some of the most creative and enchanting ideas to make your mantle the talk of the town.
🕸️ Classic Spooky Elegance
When we think of Halloween, the first things that often come to mind are ghosts, witches, and spiders. Why not incorporate these elements into your mantle decor?
Ghosts: You can drape white cloth or use ghost figurines to create a ghostly ambiance. Remember, it’s all about placement. Having a few ghosts peeking out from behind other decorations can create a fun and spooky effect.
Witches: Consider placing a witch’s hat or broom on or near the mantle. You can also use silhouette cutouts of witches to add depth and intrigue.
Spiders: Spider webs are a must-have. Drape them across the mantle and let them hang down. Add some plastic spiders for that extra touch of creepiness.
Note: “When using cloth or webs, ensure they are safely away from any open flames if you plan to light candles.”
🎃 Pumpkin Paradise
Pumpkins are synonymous with Halloween. They’re versatile and can be used in numerous ways on your mantle.
Carved Pumpkins: The classic jack-o’-lantern can be placed on either end of the mantle. You can use LED lights inside them to ensure safety.
Painted Pumpkins: If carving isn’t your thing, painting pumpkins can be a great alternative. Use black paint for a silhouette effect or go wild with colors and patterns.
Mini Pumpkins: Scatter them across the mantle. They can fill in gaps and add a touch of whimsy.
💀 Skeleton Shenanigans
Skeletons can be both spooky and fun. Here are some Halloween mantle ideas involving our bony friends.
Full Skeleton: If you have a larger mantle, consider placing a full-sized skeleton lounging across it. Maybe it’s reading a book or sipping a drink!
Skull Decor: Skulls can be placed at various points on the mantle. Consider using candles with skull motifs as well.
Bony Hands: These can be used to hold other decorations or just as a creepy addition reaching out from behind other items.
📜 Vintage Halloween Vibes
There’s something incredibly eerie about old-timey Halloween decorations. They have a charm that’s both nostalgic and spooky.
Vintage Cards: Place old Halloween greeting cards or postcards on small easels.
Black and White Photos: Frame and place mysterious black and white photos, perhaps of people in old Halloween costumes.
Antique Items: Old keys, candles, and books can add to the vintage feel.
Decoration Type
Suggested Placement
Additional Props
Ghosts
Behind other items
White cloth
Witches
Center of the mantle
Witch’s broom
Spiders
Draped across
Plastic spiders
Pumpkins
Either end
LED lights
Skeletons
Lying down
Bony hands
Vintage Items
Scattered
Old books
🌌 Mystical and Magical
For those who prefer a more magical touch to their Halloween decor, consider these ideas.
Crystal Balls: Place one in the center of the mantle, perhaps with a light underneath for a glowing effect.
Tarot Cards: Scatter a few cards or place them in a fan shape.
Candles: Use candles of varying heights and colors. Remember to use candle holders for safety.
Important: “Always monitor lit candles to prevent any accidents.”
🍂 Autumnal Accents
Halloween is in the heart of fall, so why not incorporate some autumnal elements?
Leaves: Scatter some colorful fall leaves across the mantle.
Acorns and Pinecones: These can be placed in bowls or just scattered about.
Fall Flowers: Consider adding a vase with fall flowers like chrysanthemums.
In conclusion, your mantle can be the centerpiece of your Halloween decorations. Whether you prefer classic spooky elements, vintage vibes, or a more magical touch, there’s something for everyone. So, which of these Halloween mantle ideas will you be trying out this year? 🎃🍁🕸️
Whether you’re moving into a new home or redecorating your current abode, choosing the perfect color palette can be both exciting and daunting. With countless shades to choose from and the pressure to get it just right, it’s crucial to approach this task with some guidance. That’s why we’ve crafted this comprehensive guide to help you choose the perfect color palette for your home. Let’s dive in!
🌟 Why is Choosing the Right Color Palette Important?
Colors play a pivotal role in shaping our emotions, moods, and perceptions. The colors you choose can make a room feel cozy, spacious, vibrant, or tranquil.
Important Note: Colors not only impact aesthetics but also our well-being. The right color choice can influence your mood and the overall ambiance of a room.
🎨 The Basics of Color Theory
To master the art of color selection, you must first understand some foundational concepts of color theory.
The Color Wheel 🌈
The color wheel is a visual representation of colors arranged in a circle, showcasing their relationships.
Primary Colors: Red, blue, and yellow. They cannot be made by mixing other colors.
Secondary Colors: Created by mixing two primary colors. These are green, orange, and purple.
Tertiary Colors: Formed by mixing primary and secondary colors.
Harmonious Color Combinations
When choosing a color palette, aim for harmony. Here are three tried-and-true methods:
Analogous Colors: Use colors that are next to each other on the color wheel.
Complementary Colors: Pair colors from opposite sides of the color wheel.
Triadic Colors: Use three colors evenly spaced around the wheel.
Note: When using bold color combinations, balance them with neutrals to avoid overwhelming the space.
🛋️ Factoring in Furniture and Fixtures
Always consider the color of your furniture, flooring, and fixtures. These can help dictate the direction of your palette.
Pro Tip: Take photos of key rooms and their furniture. Use apps or online tools that allow you to virtually paint rooms with different colors, providing a visual aid.
🌞 Considering Natural Light
Natural light can dramatically affect the appearance of colors. Rooms with ample sunlight may make colors appear lighter or more vibrant, while dimly lit rooms can deepen colors.
North-facing rooms tend to have cooler, bluer light.
South-facing rooms receive warm, golden light.
East-facing rooms get bright morning light.
West-facing rooms are filled with afternoon light.
🖌️ Test Before You Commit
Before you paint your entire wall, test out a small section. Observe it at different times of the day to ensure you love the shade in all lighting conditions.
🔍 Tools to Help You Choose
Tool
Purpose
Color Wheel
To understand color relationships
Paint Swatches
To visualize color choices
Digital Apps
To virtually paint rooms
📝 Final Thoughts
Choosing the perfect color palette for your home doesn’t have to be daunting. With a solid understanding of color theory, consideration for your home’s fixtures, furniture, and lighting, and by making use of modern tools, you can create a harmonious and inviting space. Remember to trust your instincts and enjoy the process!
We hope this guide assists you in making your home the haven you’ve always dreamed of. If you found it helpful, don’t forget to share it with friends and family! 🏡❤️
Painting is not an easy job, at least for those who care about the long-lasting results instead of instant pretty look. Unless you have done DIY painting project before, you might not understand how frustrating it is to have your paint peeled in only weeks or days. To prevent this condition, you need to learn how to do it right, also we show you about how to paint wood furniture black and white.
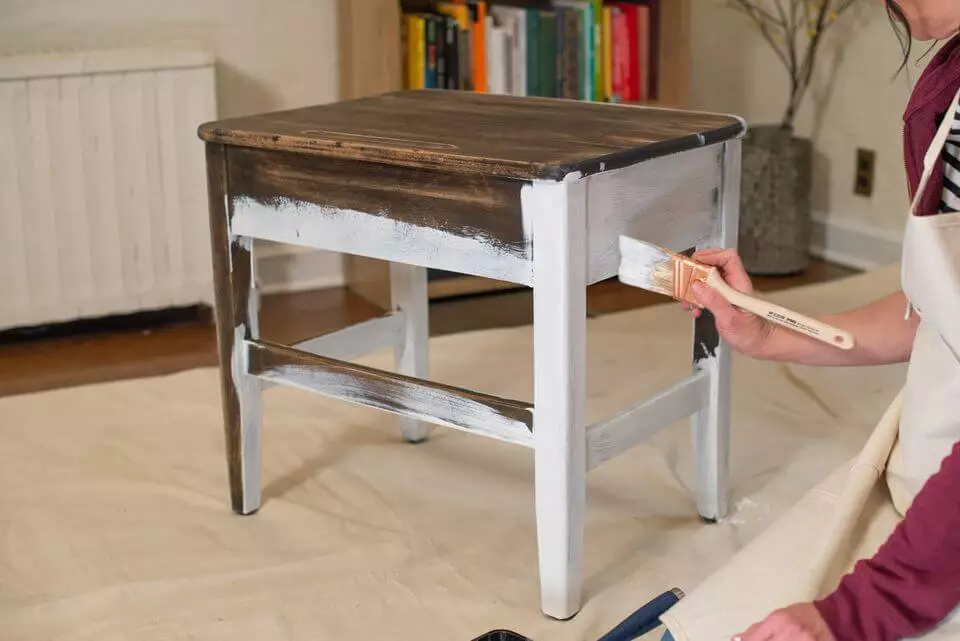
How to paint wood furniture black and white. Image: Pinterest.com
1. PREPARE THE FURNITURE
How many wood furniture do you have in the house? Which one you are going to paint? Take a look at your furniture. Is there any handles, hinges or other attached accessories? Before you start the painting, you need to remove these items first. Otherwise, your paint may stain the accessories.
Now that the handles, hinges and other accessories had been removed, you should inspect any damaged area. It could be a cracks or holes. Put wood filler to cover them, so you have even surface to work with. Don’t worry, this filler won’t be seen after you paint the furniture.
2. MOVE TO WELL-VENTILATED AREA
Working with paint means you could be messy. No matter how careful you are, there is still chance of getting paint splattered to any direction. You don’t want wood paint to stick on your sofa, rug or carpet. It will be difficult to clean. Moreover, paint usually have strong odour. Thus, working in well ventilated area is clearly better option.
3. LAY DROP CLOTH
You have moved to different area for painting. Does it mean you need no drop cloth? The answer is no. This cloth is still needed to cover the floor. If you don’t have drop cloth, you could replace it with used newspaper.
In some cases, you cannot move the wood furniture. It might happen when you paint door or windows. Since you need to protect other items in the room, lay drop cloth on top of them.
4. SAND THE SURFACE
One big mistake any beginner makes while painting wood furniture is skipping the sanding process. They argue that certain primer and paint brand promises that the result will be great. This magic doesn’t always work. Many paint jobs are not covering the surface well because it is not sanded before.
To sand wood furniture, you need 150 or 220 grit sandpaper. If you choose sandpaper, you will do the entire job by hand. You could also use orbital sander. Don’t forget to scoot closer to power outlet or bring cable extension to your work area. Using either tool, your goal is peeling the old paint layer. Should you see any knots, sand it until the surface is even with the grain.
5. WIPE IT OUT
How do you plan to wipe the sanded surface? There are plenty options; linen cloth, paper towel, tack cloth, clean cloth, vacuum, and many more. Surprisingly, not all of them could clean thoroughly. Linen cloth and paper towel only work for visible residue. You need to double check for the fine dust. In short, best cleaning tool for wiping is tack cloth or vacuum.
6. APPLY PRIME LAYER
Before the real painting, you need to apply prime layer first. It gives the furniture a base for paint to stick well. To do this job, you need two tools; foam roller and foam brush. Use foam roller to cover wide surface. For the tricky corners, you could use foam brush. Let the prime to dry. It takes more or less one hour. Use sand paper to remove any dripping prime on the furniture.
When you buy prime for wood furniture, you might find two finish options; shiny or flat. Unless you know how each of them will look on your furniture, it is safer to go with flat prime first. Later if you change your mind, you could apply second layer of shiny prime. Doing the other way is quite difficult.
One more thing; you should match the prime and paint type. If you want to use oil-based paint, then buy oil-based primer. Similar rule goes for latex paint; it should be paired with latex primer. Probably you ever heard about mixing the prime and paint type. To be specific, people often use oil-based prime and latex paint.
Oil-based prime is favoured for its perfect stain cover and adhesion. It helps the colour to stand out. There is also one disadvantage; it has strong odor.
7. PAINT IT
Finally, it is time for painting. Depending on your paint type, you might have different painting timeline. In order to get best result, you should do multiple layers. With latex painting, you usually need at least three layers. You should allow each layer to dry for about six to eight hours. It takes less layer if you work with oil-based paint.
Generally, latex and oil-based are great for wood furniture. However, one is superior for indoor purpose, while the other is doing better for outdoor furniture. Latex paint is sold in different sheens; semi-gloss, enamel and sheen. Each option gives different look and suits indoor concept well. On the other hand, oil-based paint presents glossy finishing and could handle weather change outside the room.
Lately, many people fall for unique painting technique. It is called shabby chic. The concept is letting small parts of the furniture bared, showing the natural wood grain. If you are interested, you could try this trick as well. Purchase two tones of Chalky Finish for furniture. Apply them on the wood and wait until dry. Grab fine grade sandpaper and rub on several spots.
8. PROTECT THE PAINT
After the paint is dried, you still have one last job; applying finishing wax. This final layer will serve as outer protector. Dust and stain won’t directly stick on the paint. To apply the finishing wax, you need mini roller. You could also use linen cloth. Keep in mind that you only need thin layer. There is no need to double coat the surface. Apply the finishing wax on all surfaces.
Just like the paint, finishing wax should be dried. It is probably the longest time compared to the other process. Finishing wax will dry within 72 hours or 3 days. If you try to use it before finishing wax completely dries, then you will sit on sticky surface. Be patient and give it enough time to dry. Later, you could clean it easily.
If you find the tips about how to paint wood furniture black, here are some important things that you should remember.
Black wood furniture can give your home a modern and sophisticated look. It can also be very stylish and elegant. If you are thinking about painting your wood furniture black, there are a few things that you need to keep in mind.
First, you need to make sure that the furniture is made of real wood. If it is not, then you may want to consider painting it a different color.
Second, you need to make sure that the furniture is not too old. If it is, then the paint may not stick to the wood very well.
Finally, you need to make sure that the furniture is in good condition. If it is not, then you may want to consider refinishing it before you paint it.
Step by step on how to paint wood furniture black:
1. Choose the right type of paint. You will want to use latex or oil-based paint for your wood furniture.
2. Prepare the surface of the furniture. You will want to sand down the furniture so that the paint will have something to adhere to.
3. Apply a primer to the furniture. This will help the paint to stick to the furniture better.
4. Paint the furniture with black paint. You will want to use several coats of paint so that the color is even.
5. Allow the paint to dry completely before you use the furniture.
How to paint wood furniture black
How to Paint Wood Furniture White
After you know about how to paint wood furniture black, next, if you want your wood furniture painting with white, here are some steps to do that:
1. Decide what color white you want to use. You can use either a primer or paint that is already white. If you use a primer, it will be easier to achieve a consistent white coat on your furniture.
2. Apply the primer or paint to the furniture using a brush or roller. Make sure to evenly cover all sides of the furniture.
3. Allow the primer or paint to dry completely before proceeding to the next step.
4. Once the primer or paint is dry, you can start painting the furniture with your chosen color white. Again, make sure to evenly cover all sides of the furniture.
5. Allow the paint to dry completely before using or placing anything on top of the furniture.
With these steps, you can easily paint your wood furniture white. Just make sure to take your time and be patient while doing so. Good luck!
Your old cabinets look tired and you want to upgrade the interior look. This is the most common story of how the project begins. Rather than ordering new cabinets that can cost a lot of money, you should consider to give it a new paint. If you follow this step, how to paint wood cabinet, you can achieve a pro-like result.
How to paint wood cabinet
Phase 1: Select Your Paint Carefully
First, you need to select the right paint for the wooden cabinets. There are important factors to consider while choosing:
You need to purchase the right supplies. Make sure to understand your cabinet. Is it laminate or solid wood?
Wooden cabinets are commonly able to be painted. To make sure that the entire surface is eligible, try scuffing it. If you can do it on the surface, it can be painted.
Check on your cabinet condition. If it is a laminated, it needs to be in good condition for a perfect repainting result.
While any paint will work great in wooden cabinets, it is recommended to buy paint with higher quality. It is also suggested for you to buy only latex based acrylic paint for the easy to clean cabinets.
While consider about the finish, it is recommended to use satin or semi gloss. It doesn’t expose mistakes and dings but it is still easy to clean later.
Phase 2: Preparation
Repainting wooden cabinets will take days. It is important for you to plan accordingly so you can really finish this project.
On this phase of how to paint wood cabinet, use appropriate safety gears, make sure to remove the doors and drawers first, and work on a well ventilated area. Then, follow these steps:
Check on Your Cabinet Condition.
If the existing painting is in good condition, it can be repainted. If it is in bad condition, you need to remove the paint first using stripping products and plastic stripper. You also need to check if there is any of the cabinet doors that needs to be fully replaced.
Disassemble the Cabinet
Remove the drawers and doors, empty the cabinet, and remove the hardware too. Don’t forget to label them, from drawers to hardware, so you can put it back to its place later when you are finished.
Clean and Fix
Using TSP cleaner, remove remaining dirt and grease. You can also fill any holes on your cabinet using wood filler. Use the putty knife to flat the surface. Make sure not to cover the hardware holes.
Protect and Sanding
If you don’t remove the cabinet from the place, it is important to protect and cover the surroundings. Cover and protect the appliances and countertop. Use painter tape for the walls surrounding the cabinet too. When you are ready, you can start sanding all surface.
Surface Cleaning
When you are done sanding, remove the dust with vacuum cleaner as well as tack cloth.
Like in makeup, primer is an integral part of repainting the cabinet. You can’t skip this phase because you need to cover the imperfections while preparing a perfect surface for the new paint. Follow these steps of how to paint wood cabinet for easy primer application.
Working the Cabinet Frame
Make sure to apply even stroke from the inside out or from the back to the front. Use brush with appropriate size to reach each corner.
Try Mini Roller
Mini roller will come in handy when you need to apply primer in a rather large and flat surface. Work on one area at a time for best result.
Laying Off
Whenever you are done covering one area with primer, take a dry brush or roller and stroke it on the surface. It will remove any buildup you make previously.
Prime the Doors and Drawers
You should remove the label you add previously but keep them nearby to prevent confusion. Start with the back and wait until it is dry. Then, you can work on the front side. Pay attention to the details, and try your best to prevent the primer from feathering out on the edges or pooling in the corners.
For drawers, painting the front part is often enough to prevent it from getting too sticky into the cabinet frame later.
Phase 4: Paint the Wooden Cabinets
If you aren’t very experienced in this type of project, you should consider applying paint using roller and brush, and leave alone the sprayer. Follow these steps for painting the cabinet:
1. Start with the Frame
You can repeat the same technique you use for applying primer on this step. Use a good quality sponge for the roller and for brushes for best application. Don’t forget to layoff the area to remove any buildup for smooth result.
2. Work with the Doors and Drawers
Do the same technique. Start with the back of the door. Leave it to dry first. Then, you can continue with the front part.
3. Second Coat
Repeat the entire same technique to give your cabinet second layer of paint. It gives better and smoother look. Make sure to do this when the previous paint is already dry entirely.
Phase 5: Refinish the Hardware
If you decide to reuse the old hardware, you may want to refinish it as well. Here are the simple steps:
You need to wash the hardware. Use dish soap and warm water, then pat with dry cloth.
Using good grade of steel wool, scuff the hardware lightly.
To make it easier for you to work with the hardware, attach it on a cupboard.
Using a sprayer, apply the primer to the hardware.
Wait until it is dry.
Apply the first coat of paint using sprayer, leave it to dry.
Reapply the paint for second layer.
It is always better to apply multiple thin layers because it gets smaller chance to create buildup.
Phase 6: Reassemble the Cabinets
Using the label, reattach the cabinet doors, drawers, and hardware to its place. Work on one cabinet at a time to make sure each one is done perfectly. Now you know about how to paint wood cabinet like a pro.
Who don’t want a piece of wood furniture in their house? It is fancy, and never gets old. Since the wood is often used as vocal point, you don’t want it to look shabby. Sadly, many people often forget to ask the type of finishing for the wood furniture and how to clean wood furniture with vinegar to make it look new. Don’t worry, you still have time to catch up.
How to clean wood furniture with vinegar
Basic Knowledge
Cleaning is not everyone’s favorite job. For this reason, many people tend to do unnecessary mistakes while trying to clean up something. You want to be delicate while dealing with wood material. While it has sturdy forms, its surface is prone to stains. Unless you don’t mind the dull and blots, it is better to use proper tools.
When you go to cleaning item aisle in the market, find microfiber cloth. It absorbs water well yet has smooth surface. Using this cloth to clean up the wood will leave no scratch mark. Don’t just grab any used clothes unless you are sure that the fiber is soft enough.
Another thing; never take all-purpose cleaner to your shopping bag. It works only on wood surface covered by plastic. If you are not sure about the finishing, the all-purpose cleaner will not work well. You might also want to buy some furniture polish. It is essential to make your old wood new.
Cleaning Steps
How often do you clean your wood furniture? If you cannot remember well, then be ready to do all the steps needed for your wood furniture.
Dusting
To start your cleaning, dust of the wood furniture. You could pick one of the following options to do the job.
1. Feather Duster
It works perfectly well for delicate surface such as lampshade, picture frame and any other fragile items. You might want to feel the surface to check its smoothness. Frequently used feather duster might have some sharp cuts.
2. Used Clothes
If you notice that the dust layer is quite thick, then the best tool for dusting is used cloth. It could sweep all the dust layer smoothly. Apply slight pressure while cleaning. You could also dip it in water and wring it nicely before use.
3. Terry Towel
As the final stage in dusting steps, you want the wood surface to dry. Thus, having a terry towel on your hand will be handy.
Deep Cleaning
In some houses, wood furniture has a lot of functions. They are also exposed to constant temperature change. As the result, the wood surface might have more than dust on it. Make sure to perform deep cleaning routine.
Easiest homemade cleaner for grime would be oil soap and water. Mix them well. You could either dip cloth on the mixture or splash the mixture on the surface. Either way, you should clean and dry up immediately. If the surface is not cleaned up yet, you need stronger cleaner to help.
There is a commercial product made specifically to clean wood surface. Some of them are formulated to clean only solvent-based or oil-based residues. If possible, find one that could eliminate both. You could tell the difference; the liquid has milky texture and color. Resist the idea of applying linseed oil or white vinegar! They are calling for dusts.
Polishing
Now it is time to bring back the shine of your wood furniture. As mentioned before, you should grab one commercial polishing product. It helps to protect the wood furniture. There are two kinds of polishing; paste wax and liquid wax. It is easier to apply liquid wax, but you might need to apply it periodically. Paste wax last longer, but it depends on how well you apply the wax.
The rule of applying polish liquid is simple. You need to damp the cloth, not spraying the liquid on the surface. Then apply the polish in circular motion, starting from the edge. Repeat the process until all surface is covered. For perfect result, you could use lamb’s wool pad attached to power drill for final touch.
Freshening Up
You have done all the cleaning steps. Now you get a better-looking wood furniture. However, something smells and you cannot figure out why. Don’t worry, it is normal for vintage furniture. There are simple ways to fix these problems.
First, bring the furniture out in a warm day. Make sure it is not raining. Also, you cannot let direct sunlight shines on the wood. Put on some shades or better, just put the wood furniture on the terrace. If it doesn’t help, pour some talcum powder to absorb the funny smell. Rub it softly on the surface then clean up the powder.
The smell on your furniture might come from the drawer. To fix this, you could put charcoal briquettes inside the drawers. Make sure to pour them on top of a lid or plate.
How to Clean Wood Furniture With Vinegar
Using vinegar, you can clean your wood furniture and get rid of dirt, dust, and grime build-up quickly and easily. All you need is a cloth or sponge, some vinegar, and some water.
First, mix equal parts vinegar and water in a bowl. Then, dip your cloth or sponge into the mixture and wipe down your furniture.
For tough stains, you may need to scrub a bit harder. But be careful not to damage the finish on your furniture.
Once you’re finished cleaning, rinse the vinegar off with some clean water and dry your furniture with a soft cloth. And that’s it! Your wood furniture will be looking like new in no time.
Thanks to vinegar, cleaning wood furniture is now easier than ever. Try it for yourself and see!
Simple tips how to clean wood furniture with vinegar. Image
Cleaning Tips For Special Surfaces
Not all wood surface is made from real wood. Some of them are made rom fabricated materials. Of course, they need special treatment.
1. Laminate
In case you don’t know, laminate products are usually using 100% synthetic materials. You need to clean it on daily basis and also pay attention to its surface. The use of commercial cleaning product on laminate surface is 100% prohibited. It will leave stain you cannot remove. Moreover, these products tend to create layers on laminate furniture.
The best way to clean laminate products is using damp clothes dipped in warm water. Before you wipe down the surface, make sure that you already clean the surface from any debris. If you want your laminate products to last longer, don’t leave it under direct sunlight. This condition will make the color fades quickly.
2. Wood Veneer
You could buy wood furniture for cheap price if you choose wood veneer. It is not made from real wood; at least not all of them. The surface is thin wood. The rest is composed of particle board. Just like laminate furniture, it cannot stand heat and moisture. Make sure to install it on shady area.
It is also important to lay a cover on the surface. You are not suggested to use any chemical products to clean wood veneer. Stay safe by using warm fiber cloth to clean up the mess. To cover any scratch mark, you could apply wax or polishing product.
How to clean wood furniture with vinegar to make it look new
Before knowing how to stain wood furniture darker, maybe you need to know some tips about how to stain wood furniture here. To make wood furniture darker, you need to know some tricks to make sure the result will be satisfying.
Even those who do not take part in DIY wood projects could tell that staining is not a simple task. Before you start the process, you need to determine which stain to take. Then you need to prepare the wood and paint the surface. One mistake in either step might leave a clear stain. Are you ready for some tips?
How to stain wood furniture darker
Best Tips On How to Stain Wood Furniture
1. Choose the Paint
When you go to the paint store, the staff might ask which product you want to buy. If you cannot answer right away, then the question will go to water based or oil-based paint. Each of them has advantages and disadvantages. With oil based, you will need more time to finish the project. It offers a glossy finish and better coverage than a water-based product. This paint could also cover the previous paint.
On the other hand, water-based paint is better in terms of odor. It has a neutral scent and you can work in an indoor setting. Be careful when painting with this product, as it dries quickly. Calculate your brushstroke carefully. Also, you might need a second or third coating to get the intended color.
2. Sanding Wood
One tip before you start painting; wood pores need to be opened before applying any stain. If you work with a finished surface, then you need to sand it. You could grab the sand-grid paper or turn on the grid machine. The point is getting the outer layer peeled so you could see the wood grain. If you do it by hand, then start with 120 options then to 220.
Another tip for the sanding process; it is better to sand according to the grain direction. If you go against the grain, the result won’t be great. You might also have spindles on chairs. Instead of regular grid sand, you could use a foam sanding block.
3. Applying Wood Conditioner
Have you heard of wood conditioners? This item helps the paints to stick better. It also decreases the chance of getting blotches. Before applying the wood conditioner, the previously sanded wood should be cleaned up properly. Double check for any debris or fine dust on the surface.
Later in the process, you will need to alternate brush types depending on the surface you are working with. For wood conditioner, you can use any paintbrush. There is no need to buy a special brush for the job. Leave the wood for approximately 15 minutes. If the conditioner is not absorbed yet, then wait a little longer.
4. Applying First Layer
Think you are ready for the staining process? Do small preparations before doing the job. Grab your chosen paint and the brush. You could use a bristled paintbrush but be prepared for thorough cleaning later. Stain is not the easiest to clean. If you want something more functional, then pick the foam brush. It could be thrown away after use.
Previously you have to choose between oil-based or water-based paint. For oil-based paint, you need to stir well before dipping the brush. This type of paint is made from mineral spirit, pigment, and dyes. When the paint sits still for some time, the pigment is often buried at the bottom. Some professional workers even bring a new basket to pour the paint and stir it again.
How to Stain Wood Furniture Darker
Wood furniture can be stained to achieve different colors, depending on the type of wood and the desired effect. How to stain wood furniture darker? To stain wood furniture darker, you will need a dark wood stain, a cloth, and a piece of sandpaper.
First, identify the type of wood you are working with. Different types of wood take different types of stains differently. If you are not sure what type of wood your furniture is made from, you can test a small area by applying a light coat of stain to it. If the wood is light colored, the stain will be absorbed; if the wood is dark colored, the stain will be less visible.
Once you have identified the type of wood, select a dark wood stain that matches or contrasts with the color of the wood. Apply the stain to a cloth and rub it into the surface of the wood using circular motions. Be sure to apply the stain evenly and to get into all the cracks and crevices.
Let the stain dry completely before moving on to the next step. If there are any areas where the stain has not been absorbed or if there are any streaks or blotches, use a piece of sandpaper to lightly sand them down until they are even with the rest of the surface. Be careful not to sand too much or you may damage the surface of the furniture.
Different types of wood might require different painting techniques. Here are some tips to handle popular wood types.
1. Oak
This wood is probably the favorite among all woods. It has big pores, so the stain will be absorbed well without any blotches. For an even better result, you are suggested to apply the stain in a circular motion, following the grain.
2. Alder and Alphen
Those who complain about blotches are more likely to use either wood type. Despite their light wood, easy affordability, and handling, you need to be extra careful while staining. It is a must to apply wood conditioner beforehand. If you forget, then the stain absorption won’t be even.
3. Ash And Chestnut
These two are loved for their hardwood nature. It is guaranteed to serve for a long time before breaking down. As for the characteristic, it possesses a similar quality to oak. You also need to apply the stain in a circular motion.
4. Birch
People often use this to compensate for the expensive hardwood layer. It could be found on the kitchen counter and furniture surfaces. One warning for you; birch wood doesn’t match with a dark stain. It also has a problem absorbing stains. The best way to handle it is by applying a wood conditioner and choosing a light tone.
5. Cherry And Mahogany
It is rare for people to stain these woods. The cherry type has a distinct color that inspires its name. Also, cherry wood has very tiny pores. You would spend a lot of time and effort for nothing. Mahogany wood is known for its dark tone and needs no more staining. Even carpenter only applies to finish layer on them.
6. Hard Maple
The characteristic of this wood is similar to cherry wood. It has tiny pores that cannot absorb stains well. As expected, this variant is doing great with stain. To make things worse, you will see how the grain is not balanced. If you insist to stain it, then you have to apply wood conditioner then pick neutral to medium light only.
Just like sanding, you should go with the wood grain direction. Aim to have an even coat rather than a pretty layer. You could fix that on the next layer. To work on a vertical surface, there is one product called gel stain. It won’t drip and stick nicely on a wooden surface. Allow the stain to dry for about three hours for water-based paint and 24 hours for oil based before adding another layer.
Have you thought about the shade and wood color you want? Depending on the wood type and dark tone, you will re-coat the wood surface again. For your information, normal shade could be seen after one or two layers only. It applies to both oil-based and water-based paint. If you are not sure, try double coating before adding another layer.
Keep in mind that the stain is not finished. You still have another job to apply sealant on the furniture surface. It is important to apply this layer after the stain completely dries. Popular options for the finishing touch are wax, polyurethane, and oil. Each of them has different look once applied. Ask some experts for their opinion or you could ask the staff in the paint shop.
Here is about bathroom sink plumbing: the parts, how it’s working, the diagram of assembly, and how to install the plumbing of bathroom sink drain. I hope this information help you. Check it out.
Shutoff valves is metal or plastic. The size is small. It is located between the supply hoses or tubes (this part is connected with the tailpieces on the sink faucet) and the incoming water supply pipes.
The shape of the handle shutoff valves in oval or sometimes spherical. The handle is work for open or close the valves. So, this shutoff valves are often called Stop Valves.
With this part, you no need to shutting off supply the water to the whole house. Because you only need use this shutoff valves to turn off the water supply at the sink only.
The shutoff valves are pairs. One for hot waters, and one for cold water. The installation is easy, because use compression fittings, so you install onto the water pipes without soldering. But, if you want to replace shutoff valve, you need to turn off the water to the house.
2. Supply Tubes
Usually, supply tubes made of chromed copper, solid plastic (gray), plastic mesh (usually white), or braided wire mesh. For supply tubes position, you can see from the sink faucet tailpieces then down to stop valves.
Supply tubes connected to shutoff valves and tailpieces with attached nuts. Sometimes, supply tubes fail. If that happen, you need replace it.
3. DrainTailpiece
Drain tailpiece also called sink tailpiece is the straight part of pipe, and it’s connects to the sink drain fitting bottom. If you have pop-up drain sink, you can find on the back tailpiece to check the drain assembly.
Drain tailpiece using a slip nut to attached with drain fitting. It’s easy to controls. Under the nut you can find a tapered plastic washer that make a watertight seal.
If you drop item into the drain sink, you can open these slip-nut joints. Then you can take the item.
4. P-Trap
P-Trap have 2 parts, U-bend and trap arm. These parts make your sink connected to the sewer line. The curved trap allows your sink safety from holds standing water, also prevents the sewer gasses rising up and out to the sink.
The U-bend bottom always filled with water, so the gasses can not back to sink. If you run water to the drain, you always change the water in the U-bend with new water.
The P-trap easy to replace because using slip-nut joints to assemble it. But old design using solvent-glued, so better for you to change with trap with slip-nut joint.
5. DrainPipe
This part is connected with the household plumbing system. Drain pipe connects to trap arm with slip-nut joint. So, the sink drain pipe easy to repairs.
The size of drain pipe is 1½ inch in diameter, but it can be larger or sometimes smaller.
Usually, bathroom sink has 3 fixture holes: 4, 6, or 8 Inch centers. The larger size used to receive a split set faucet that faucet handles and the spout separated. 4 or 6 Inch for a center set faucet or a single lever faucet. The water flow from supply tubes to shutoff valves then to tailpieces on base of faucet.
Besides that, Pop-up stopper at the drain pipe bathroom sink plumbing that raises and lowers if you pull up or down on knob/handle that located behind the faucet body. The knob is head of lift rod that tied to a clevis (connecting bar).
Clevis connects to pivot rod and ball assembly, that consist of rod through rubber pivot ball. This part is slightly up to the tailpiece of stopper.
If you push the knob, the lift rod will down, and it cause pivot rod push the stopper will up. And the opposite will happen, if you pull the knob, you make the stopper down.
Because some reason, if you want to remove or replace assembly, you can pull it right out. Or, you maybe should to twist it to remove it from the clevis.
Bathroom sink drain has a flange. With plumber’s putty, the flange was sealed to the sink hole and screwed into drain body. And with a lock nut, it’s tightened to under the sink bowl.
And then how to P-Trap works, I explained above. Including how water is trapped and hinders the return of gases to the top.
Then, by observing the following bathroom sink plumbing diagram, it may be easier for you to understand how it works as a whole.
Generally, Installing bathroom sink plumbing is need two phases: rough-in and finishing phase. The rough-in is more difficult phase. It depends on the system’s configuration overall.
Bathroom sink no need high water volumes. So, we must be able to branch the ½ inch supply lines from the tub or shower.
After that, we can tie the 2-inch drain line into an existing one. Remember too about sink vent. If not, maybe it will not drain properly. We have to raise the 1 ½ or 2-inch vent from the drain within 5 feet of the sink trap. And don’t forget to tie into an existing vent or to the roof.
1. Installing the Bathroom Sink Plumbing Pipes
Important to know is the position of the supply tubes and drain pipes. Drain pipes and sink drain should be lined up, and straight between the supply stub outs.
Uncover the wall to pass the pipe out. The water must be off when the tees soldered onto the pipes.
The drain slope is ¼ inch per foot toward the sewer, and so does the vent in its incline toward its tie-in point.
After that, allow the stub-outs lengthwise a few inches from the wall, then close it after you install the sink.
2. The Stub-Outs Prepare
Install shutoff valves on the supply stub-outs before hook up the sink. Solder slip-joint valves to pipes or with a wrench, tighten on compression valves.
Gluing on the valves is the options if you using CPVC plastic pipes instead of copper ones. But, if you don’t glue the P-Trap to the waste pipe, you can glue on a P-Trap adapter.
3. Connecting the Sink
Install the faucet and the drain onto the sink before install the sink. It’s will be easier for you. Install tailpiece with same lever as the top of the drain. It’s makes the trap connects easily.
Connect the faucet supply hoses to the shutoff valves and faucet inlets. Then tighten with adjustable pliers. The connectors must be right at size to fit, so better you check before you buy it. If the pop-up stopper was connected, the sink ready to use.
Finally, its all of information for you about bathroom sink plumbing. If you want us to discuss further, please write in the comments column below.
Originally posted 2021-09-24 06:24:00.
Manage Cookie Consent
To provide the best experiences, we use technologies like cookies to store and/or access device information. Consenting to these technologies will allow us to process data such as browsing behavior or unique IDs on this site. Not consenting or withdrawing consent, may adversely affect certain features and functions.
Functional
Always active
The technical storage or access is strictly necessary for the legitimate purpose of enabling the use of a specific service explicitly requested by the subscriber or user, or for the sole purpose of carrying out the transmission of a communication over an electronic communications network.
Preferences
The technical storage or access is necessary for the legitimate purpose of storing preferences that are not requested by the subscriber or user.
Statistics
The technical storage or access that is used exclusively for statistical purposes.The technical storage or access that is used exclusively for anonymous statistical purposes. Without a subpoena, voluntary compliance on the part of your Internet Service Provider, or additional records from a third party, information stored or retrieved for this purpose alone cannot usually be used to identify you.
Marketing
The technical storage or access is required to create user profiles to send advertising, or to track the user on a website or across several websites for similar marketing purposes.