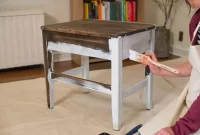
Your old cabinets look tired and you want to upgrade the interior look. This is the most common story of how the project begins. Rather than ordering new cabinets that can cost a lot of money, you should consider to give it a new paint. If you follow this step, how to paint wood cabinet, you can achieve a pro-like result.

Phase 1: Select Your Paint Carefully
First, you need to select the right paint for the wooden cabinets. There are important factors to consider while choosing:
- You need to purchase the right supplies. Make sure to understand your cabinet. Is it laminate or solid wood?
- Wooden cabinets are commonly able to be painted. To make sure that the entire surface is eligible, try scuffing it. If you can do it on the surface, it can be painted.
- Check on your cabinet condition. If it is a laminated, it needs to be in good condition for a perfect repainting result.
- While any paint will work great in wooden cabinets, it is recommended to buy paint with higher quality. It is also suggested for you to buy only latex based acrylic paint for the easy to clean cabinets.
- While consider about the finish, it is recommended to use satin or semi gloss. It doesn’t expose mistakes and dings but it is still easy to clean later.
Phase 2: Preparation
Repainting wooden cabinets will take days. It is important for you to plan accordingly so you can really finish this project.
On this phase of how to paint wood cabinet, use appropriate safety gears, make sure to remove the doors and drawers first, and work on a well ventilated area. Then, follow these steps:
- Check on Your Cabinet Condition.
If the existing painting is in good condition, it can be repainted. If it is in bad condition, you need to remove the paint first using stripping products and plastic stripper. You also need to check if there is any of the cabinet doors that needs to be fully replaced.
- Disassemble the Cabinet
Remove the drawers and doors, empty the cabinet, and remove the hardware too. Don’t forget to label them, from drawers to hardware, so you can put it back to its place later when you are finished.
- Clean and Fix
Using TSP cleaner, remove remaining dirt and grease. You can also fill any holes on your cabinet using wood filler. Use the putty knife to flat the surface. Make sure not to cover the hardware holes.
- Protect and Sanding
If you don’t remove the cabinet from the place, it is important to protect and cover the surroundings. Cover and protect the appliances and countertop. Use painter tape for the walls surrounding the cabinet too. When you are ready, you can start sanding all surface.
- Surface Cleaning
When you are done sanding, remove the dust with vacuum cleaner as well as tack cloth.
Read also: How to make wooden furniture more durable
Phase 3: Prime the Wooden Cabinets
Like in makeup, primer is an integral part of repainting the cabinet. You can’t skip this phase because you need to cover the imperfections while preparing a perfect surface for the new paint. Follow these steps of how to paint wood cabinet for easy primer application.
- Working the Cabinet Frame
Make sure to apply even stroke from the inside out or from the back to the front. Use brush with appropriate size to reach each corner.
- Try Mini Roller
Mini roller will come in handy when you need to apply primer in a rather large and flat surface. Work on one area at a time for best result.
- Laying Off
Whenever you are done covering one area with primer, take a dry brush or roller and stroke it on the surface. It will remove any buildup you make previously.
- Prime the Doors and Drawers
You should remove the label you add previously but keep them nearby to prevent confusion. Start with the back and wait until it is dry. Then, you can work on the front side. Pay attention to the details, and try your best to prevent the primer from feathering out on the edges or pooling in the corners.
For drawers, painting the front part is often enough to prevent it from getting too sticky into the cabinet frame later.
Phase 4: Paint the Wooden Cabinets
If you aren’t very experienced in this type of project, you should consider applying paint using roller and brush, and leave alone the sprayer. Follow these steps for painting the cabinet:
1. Start with the Frame
You can repeat the same technique you use for applying primer on this step. Use a good quality sponge for the roller and for brushes for best application. Don’t forget to layoff the area to remove any buildup for smooth result.
2. Work with the Doors and Drawers
Do the same technique. Start with the back of the door. Leave it to dry first. Then, you can continue with the front part.
3. Second Coat
Repeat the entire same technique to give your cabinet second layer of paint. It gives better and smoother look. Make sure to do this when the previous paint is already dry entirely.
Phase 5: Refinish the Hardware
If you decide to reuse the old hardware, you may want to refinish it as well. Here are the simple steps:
- You need to wash the hardware. Use dish soap and warm water, then pat with dry cloth.
- Using good grade of steel wool, scuff the hardware lightly.
- To make it easier for you to work with the hardware, attach it on a cupboard.
- Using a sprayer, apply the primer to the hardware.
- Wait until it is dry.
- Apply the first coat of paint using sprayer, leave it to dry.
- Reapply the paint for second layer.
It is always better to apply multiple thin layers because it gets smaller chance to create buildup.
Phase 6: Reassemble the Cabinets
Using the label, reattach the cabinet doors, drawers, and hardware to its place. Work on one cabinet at a time to make sure each one is done perfectly. Now you know about how to paint wood cabinet like a pro.

Originally posted 2022-10-03 22:39:56.


