Blog

  • 6 DIY Front Porch Bench Ideas that Make Awesome Changes to Your Porch

    6 DIY Front Porch Bench Ideas that Make Awesome Changes to Your Porch

    Filling your front porch with a decorative porch bench will surely make your front porch looks more attractive and beautiful.

    Therefore, if you are looking for some ideas or plans of front porch bench, then these 6 awesome porch bench ideas will get into your inspiration.

    BEST DIY FRONT PORCH BENCH DESIGN IDEAS THAT YOU CAN ADOPT

    1. Crib Style Outdoor Bench

    You may find a gorgeous looking porch bench with this Crib Style Outdoor Bench. In order to achieve its gorgeousness, then you need to find a proper space area in your porch or garden area.

    It is quite simple to construct the bench because what you need to do is to place the wood in crib pattern or style.

    Moreover, adding a crib design planter can be more attractive to your bench if you have extra time.

    2. Cedar Wood Corridor Bench

    If you are quite fond of cedar wood, then you may want to consider constructing a porch bench made from cedar wood.

    The Cedar Wood Corridor Bench is a type of planter bench that can perfectly fit on your front porch. You can add a place where you can put plants or flowers in the bench, so your porch bench should look awesome.

    3. Boot Bench

    Most of you must have asked how to make a bench that requires less effort to construct. If you are looking for it, then this Boot Bench is a perfect choice for you.

    You can simply utilize some of your time and buying the wood for making the bench. Therefore, you should be able to accomplish the goal without any problem.

    4. Lumber Garden Bench Seat

    Lumber Garden Bench Seat is the next idea for your front porch bench. You may use either brand new lumber or recycled one to construct this simple garden bench.

    This bench will not even occupy much space, however the bench itself can provide space to accommodate up to two people. Also, don’t forget to stain or paint it to give more appealing look.

    5. DIY Wooden Bench

    This DIY Wooden Bench is a very inexpensive porch or park bench that becomes popular choice as well for those who are really looking for DIY furniture.

    You just need to spend around $20, then you will be able to get this comfortable and easy to handle wooden bench. You can paint or stain it if you want to increase its appeal as well.

    6. Colorful Slat Bench Seat

    If you have kids around who love to spend time outdoor, then it is better to have this Colorful Slat Bench Seat. You will need to work on this simple slat bench seat in order to increase its appeal. You can build this bench against the wall.

    Those are some ideas that you can try to make DIY front porch bench. By using those ideas, hopefully you can make or construct your own DIY front porch bench with decorative, attractive, and awesome looking. Since the ideas are all homemade designs, then it is important to know that it is require handy skill.

    Front Porch Bench Ideas Gallery:

    Originally posted 2020-01-03 01:18:49.

  • Why Choosing Outside Bamboo Blinds?

    Why Choosing Outside Bamboo Blinds?

    Enjoying your afternoon on porch could be a little bit overwhelming when you have too much lights on your table.

    You need something to block the lights without skipping the exotic view. For this case, people usually install a blind on the ceiling.

    Since you share similar problem, why don’t you try this option?

    THE REASON WHY USING OUTSIDE BAMBOO BLINDS

    Bamboo Roman Shade Vs Blinds

    When you first see it, you might not know which is which. Both are made from dried bamboo, with almost similar choice of colors: tan, light brown to golden hue.

    If you take a look at it closely, roman shades take bamboo as its frame, while the whole structure is covered by soft bamboo fiber. It is usually installed inside the house: on the window to be exact.

    Bamboo roman shades allow the sun light to pass. Bamboo blinds, on the other hand, is composed from several thin bamboo layers. It completely blocks the light, but you can adjust its height by pulling the attached strings.

    Read also: How to install outside mount blinds with window trim

    The Reasons to Choose Bamboo Blinds

    There is no need to explain the reason if you are a nature and DIY person. For those who need convincing logic, the following facts might be some in the list.

    • Green Choice

    A bamboo plant is easy to get. It is quite durable if you consider the fact that it is a natural product. Also, the plant will regrow the other bamboo shoots that will grow tall in no time.

    • Cheap Price

    You could buy the raw material and the finished product in the store for quite low price. This way, you will have more time to save money. Thus, planning for your big renovation project.

    • Easy Installation

    You don’t need luxurious tool to start the installation. The standard tools like hammer and nails will do. You just need to make sure the roll is not in the frontier.

    • Simple Maintenance

    Don’t forget about this point. You could brag about those hundred dollars items, but you could only sigh when the care cost too much. Bamboo blinds only need simple dusting or occasional wiping.

    Porch bamboo roll up blinds

    Tips To Buy the Blinds

    Before you grab your jacket and head to the nearest store, you need one last thing: tips to choose the best product. Since a lot of manufacturers offer different prices for one item, some must have the top hand. Learn how you could tell the difference.

    • Durability

    Check the weather in your area for the whole year. Make sure you buy the one that could stand the whole year. Some brands should be unmounted during winter.

    • Installation Area

    Read the manual or ask the staff where the blinds should be installed. Several blinds factories set their products to be installed on screened porch. It must be a burden if don’t have the screened porch yet.

    • Weather Resistant Rail And Pulley

    You are looking for outdoor stuff, so don’t forget to ask for the weather resistant products. For rail products, pick the one with treated tropical hardwood label. For the pulley, ask for the one made from combination of nylon plastic and brass.

    Among all choices, you could say that bamboo blinds is almost perfect. It accommodates more than half of of great items criteria: affordable price, easy installation, nature friendly, and easy operation. Not to mention, its color and shape that could fit almost any porch exterior. What more could you ask?.

    Porch blinds bamboo

    Originally posted 2020-01-02 02:57:30.

  • How to Install Outside Mount Blinds with Window Trim

    How to Install Outside Mount Blinds with Window Trim

    Outside mount blind is a good option if your windows are out of square or the window opening has no break. Outside mount blind is able to be adjusted for irregular sizes.

    However, determine first how wide the blind to be so it has enough space for the mounting brackets.

    Here are some steps on installing the outside mount blinds.

    Read also: How to keep rain out of screened in porch windows.

    HOW TO INSTALL OUTSIDE MOUNT BLINDS WITH WINDOW TRIM EASILY

    Measuring and Determining the Mount

    1. Measure the windows

    It is very important as the basic information before buying the blind. You can measure the windows by using measuring tape and then measure the outside of the window.

    The outside is important too because it should fit the outside mount blinds. Outside mount blinds make the window and blind look larger.

    For measuring the outside mount, measure all the casing around the window and then measure it from the top to the bottom.

    2, Purchase the blind based on the correct measurement

    Many options of blinds that you can choose such as PV, wood, vinyl, and aluminum. The choice is based on your own preference.

    3. Make the mounting marks

    Hold the blind up so the top part of the blind will be centered and leveled with the casing of the window. Mark below the head rail by using pencil on both side of the casing. Put the mark ¼ of an inch on the end of each head rail.

    Outside blinds for windows

    Attaching the Brackets

    1. Open the bracket door and hold the end brackets in the place

    Place the bracket on the pencil mark that has been already made. There are two spots for bracket, the one towards you and the other towards the window center.

    2. Mark where you will be drilling

    Mark the bracket spot by using pencil. Choose two diagonal holes for the brackets and then make a hole by drilling it. The brackets must be placed on the outside of the window casing on each side of window.

    3. Drill the holes for the screws

    Each bracket needs two screws. Make sure that the screws are smaller than the screw for securing the bracket. Then, replace the bracket and then screw it into the proper spot. Besides, use the proper screw for the proper wall.

    Installing the Head Rail and Valance

    1. Snap the valance clips in place

    Attach the head rail to the valance by using valance clips. The valance itself is the cover of the head rail and something that makes it more decorative.

    Moreover, the valance clips must be snapped over the front of the head rail before it is inserted to the bracket.

    2. Put the head rail to the brackets

    After finishing drill the bracket in its place, the bracket doors should be wide opened. After that, put the head rail into it. Then, close the bracket doors.

    3. Attach the valance

    Put the valance based on your preference along the head rail. After that, press it down so the valance clips will snap to the valance and hold it in place.

    Installing the outside mount blinds by yourself is quite easy to be done. Those tips above should help you to do it properly. If you are careful in every step, you will even make a final professional look.

    Outside window blinds

    Originally posted 2020-01-01 10:48:21.

  • Front Porch Glider: Tips to Make and to Replace

    Front Porch Glider: Tips to Make and to Replace

    Putting a glider on your front porch is a fabulous idea. It provides you comfortable seat while enjoying the front view.

    If you don’t have one, you can make it easily using any porch bench you already have.

    Glider tends to have good durability due to the material commonly used, yet you still need to manage to replace the hardware from time to time.

    Here are several tips you will find beneficial regarding on glider.

    See also: Porch Glider Swings Ideas.

    How to Make Porch Glider

    Front porch glider swing

    1. Select and refurbish the bench for the glider seat

    If you want to save your money, you may use a bench that you already have at home to be the glider. Refinish and sand the bench so that it looks new and fresh. Polish it with polyurethane or weather-resistant varnish to make it durable.

    2. Build the glider base

    First of all, measure the distance of the hind legs and forelegs bench. Then, cut two planks of the same type wood.

    Make it into two inches wide and two inches long, greater than the distance of the rear bench legs and front legs. Create the glider support stand by using two dowels then cut it into the same height for the arm part of the glider.

    Then, attach the horizontal dowel by measuring the same length. For the central glider support, lay both down.

    3. Attach pivot hinges to form the glider movement

    Attach four dowels to the side of the bench legs. Measure and then trim the dowels into the suitable size. Then, drill the holes in the dowels and legs.

    Put the pivot hinges into the holes by attaching eight of pivot hinges. After that, test the glider and straighten the glider for checking the loose dowels and screws or even replace it.

    Finish the glider sand then polish it with varnish, stain or polyurethane.

    Read also: How to make your own outdoor glider cushions.

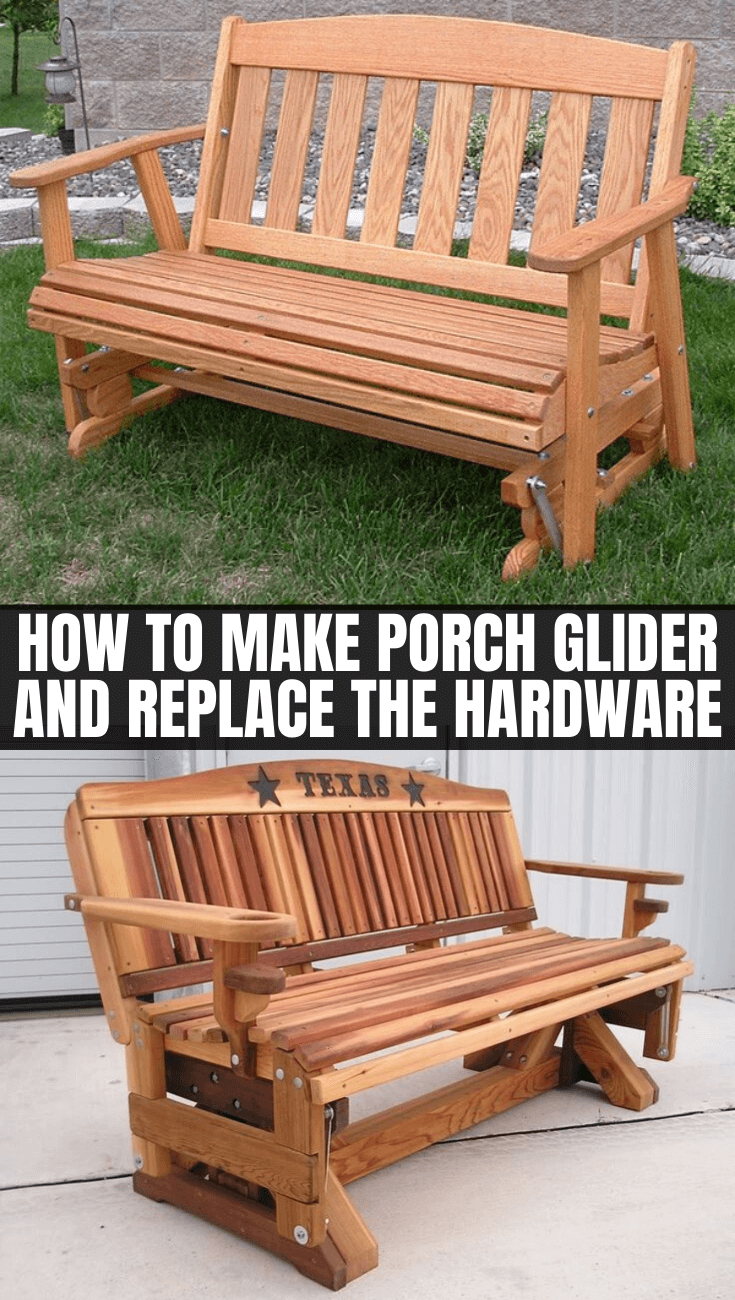
    HOW TO MAKE PORCH GLIDER AND REPLACE THE HARDWARE

    How to Replace the Hardware in the Porch Glider

    1. Remove the old hardware

    Turn the glider upside down, and then use the ratchet to remove all the nuts which connects the chair to the base. You may ask your friend to hold the glider up so that it will not fall or break.

    Then, while it is held by your friend, remove the long bolts. After it is done, lift the base from the glider.

    2. Replacing the hardware

    Make sure that the screws and bolts are fit properly before replacing the gliding hardware. Sometimes, it is necessary to use the larger size of screw and bolt once the old one is worn out.

    Then, attach the new hardware and arms as the previous way. It is better to have second person to hold the base of the glider while installing the new hardware.

    Then, put the bolt through the holes of the glider. After that, slide another washer into the bolt. Before it is done, tighten the nut for the bolt.

    3. Finish and fine-tune

    Check again to make sure the tightness of the screws on the bracket for the metal chair or wicker. If it is needed, tighten the nuts. Then, it’s all done.

    It is pretty easy to create a porch glider using a bench. In addition to it, the tips above should help in keeping your old front porch glider durable and safe to use. It saves money yet you still get the same sophistication.

    Gray front porch glider bench with cushions

    Originally posted 2020-01-01 01:42:46.

  • 4 Porch Glider Plans

    4 Porch Glider Plans

    Some people need a relaxation spot in their house, and they choose porch glider. Glider is different with swing; it is a bench that is mostly found in garden, yard, or park.

    More than just a bench, it is suspended from the base by a pair of arm-like brackets. There are many plans that you can choose for your porch glider.

    Here is a list of porch glider designs plans that may be suitable for yours.

    Read also: Porch Glider Swings.

    1. Freestanding Arbor Swing

    Freestanding Arbor Swing

    Freestanding arbor swing can be considered for the porch that does not have the structure for a porch swing. You can place the freestanding arbor swing in your yard.

    However, you should consider the shade, sun, placement and space that you will be set for swinging. To have the freestanding arbor swings, you need hoe, ladder, power auger, 4×4 posts, carriage bolts, and nuts.

    Here are the steps for making freestanding arbor swing.

    1. Dig deep holes for each post. Make sure that each post can be put well in each hole.
    2. Fill the surrounding of the hole with concrete until its level is the same with the ground.
    3. After the concrete is dry, measure each post then make sure that the posts levels are similar with each other. Then, cut the posts based on the mark.
    4. Set the crossbeams by leveling it to the top of the posts. You have to make sure that the levels of the beams are similar and lined up. Repeat this step for the other crossbeams. Then, place the trim vertical to the beams.
    5. Add swing supports and hardware.
    6. Measure and cut the lumber for the swing seat.

    2. Hanging Porch Swing

    Hanging porch swing bed

    Hanging porch swing is very familiar glider that most people use. It has the classic taste which is suitable for up to two people.

    It practically hangs on the ceiling or its frame. Today, this design is wildly adapted to a more revolutionized design with certain level of sophistication.

    You can actually get the same kind of glider on many styles from classic to extra modern. Added with cushioned seat, it is a perfect piece for relaxation.

    3. Fancy Swing Structure with Trellis for Flowers

    Porch or outdoor garden Fancy swing with with Trellis for Flowers

    This kind of glider has the magical feeling that makes you feel like it is the best place to spend your time with. It gives you a real touch of the outdoor while remains aesthetic.

    It will take a long time to make it by yourself because you need a lot of things to be done with.

    For instance, you need the pattern and you have to deal with paintbrush which is hard to deal with. It is better to order or buy one.

    4. The Four-Seater Canopied Glider

    Outdoor glider with canopy for 4

    This plan may have high cost because you need to pay at least more than $1,000 to have this kind of porch glider.

    However, it may worth the price because it can accommodate more than one people with even all the members of a small family in it.

    All those four glider plans may be your options in choosing the glider for your porch. Make sure that you have the space and make sure that you choose based on your needs and preference.

    MOST POPULAR PORCH GLIDER PLANS

    Originally posted 2019-12-31 01:14:07.

  • Outdoor Glider with Canopy Overview

    Outdoor Glider with Canopy Overview

    Outdoor glider with canopy is an excellent option to add on your outdoor space at the house. It protects you from heat and direct sunlight.

    However, choosing a glider with canopy is a little trickier than finding the usual one.

    Check out the following details for factors to consider and tips to add a frame on this furniture.

    See also: Porch Glider Swings Ideas.

    OUTDOOR GLIDER WITH CANOPY OVERVIEW BUYING GUIDE AND HOW TO BUILD

    Things to Consider before Buying

    1. Comfort

    The purpose of having porch glider or outdoor glider is not only for decoration but also for relaxing. Therefore, comfort must be considered before buying the porch gliders with canopy.

    Choose the porch glider which combines comfortable material such as hardwood, aluminum, or cotton for the puffs.

    1. Material

    The material of porch glider is related to your own style and home decoration. If you like the traditional decoration, you may choose the wooden-base porch glider such as cypress, cedar, ash and oak.

    If you prefer to the modern one, you may choose the porch with the waterproof sealant so that it will resist from water damage.

    1. Durability

    It is also important for paying attention the durability of the glider because the outdoor glider will be in intense contact with the weather-changing. Make sure that the material is high quality and easy to clean.

    1. Cost

    If you want to buy the outdoor glider with the best material and good quality, the cost will be high. But it is worth the price. Therefore, it is better to save the money rather than change it every year.

    1. Style

    Porch glider with canopy is a perfect choice for modern look in the outdoor part of your house. By choosing the porch glider with canopy, it will be protected from the sun light.

    It is also completed with cup holders which make you be more comfortable with it. The canopy can be fit everywhere and anywhere.

    Patio glider with canopy


    See also: Outdoor Glider Cushions Ideas

    How to Build the Frame for the Porch Glider with Canopy

    The canopy on the porch glider will cover the glider itself from rain and sun. It will be complete the frame. So, how do we build or make the frame for the porch glider with canopy?

    First of all, you need 4-inch stove bolts, 2 1/4 –inch round pine dowels and tape for measurement. After preparing the material, let’s take a look to these steps.

    1. First, measure the porch glider’s length across the back. After that, measure the canopy cross rails length. Using the measurement, obtaining around 25 dowels both for the long and short dowels.
    2. Second, put the stove bolts to the ends of the dowels then connect it together as the frame which looks quite similar with the table frame.
    3. Last, put the cross rail dowels to the frame so that the frame is supported with it. When the frame is already constructed, you may slide the canopy of the porch gliders and wrench it over the glider.

    Having porch glider with canopy is good for preventing yourself from sun light and rain. However, there are several things that you should pay attention to before buying it and you may build your own frame for porch gliders with canopy.

    Outdoor glider rocker with canopy

    Originally posted 2019-12-30 00:49:35.

  • Outdoor Glider Loveseat Buying Tips

    Outdoor Glider Loveseat Buying Tips

    You must find a hard time when you want to afford a glider loveseat in the market because the variety of the glider loveseat is huge.

    Then, before you head to the market or store you have to come up with some considerations. What considerations should you take?

    Therefore, for further information, check out the following buying tips on glider loveseat.

    Read also: Porch glider swings.

    OUTDOOR GLIDER LOVESEAT BUYING TIPS

    Define Your Needs

    First thing first, you should define why you need to buy a glider loveseat. This is very essential as people often regret their decision when they buy one but it doesn’t match with the house environment. Therefore, it is important to answer these questions to make your choice falls to the right one.

    1. What will this glider be used for?

    The first question is aimed to decide why you need this glider. If you afford this glider only to decor your outdoor environment rather than to be used to other need like relaxing or family gathering, then you have to re-consider buying the glider.

    2. How much space will it take up?

    Space is what matter most for you to pay attention to. It is because if you accidentally buy a big glider loveseat while your outdoor porch is narrow, then the glider will eat up the porch’s space. In result, your porch will not be decorative as it looks. Make sure to do a measurement to your outdoor porch.

    Outdoor wicker glider loveseat

    About Resistance and Comfort of a Glider Loveseat

    The next thing you should consider is about the resistance and comfort of the glider. There are things you should check in as follows.

    1. Structure

    If you need an outdoor glider, then what you need to do is to choose the right structure. A quality wood material will be the perfect choice for a glider loveseat, such as cedar or mahogany.

    Those wood materials are really durable and can withstand to any severe weather. However, you can choose metal or plastic structures as well if you find that the price for wooden glider is too expensive.

    2. The Padding

    Some people prefer a softer seat, but others prefer a firm one. Then, it is up to you to decide whether you want a glider that has cushions or one without cushions.

    Outdoor metal glider loveseat

    See also: Outdoor Glider Cushions

    Elements to Check in a Glider Loveseat

    Other elements in a glider loveseat should be paid attention as well.

    1. Easy Maintenance

    Choose a glider loveseat that is easy to maintain. Easy to maintain means that the glider is easy to wash, clean, or repair when it is damaged.

    However, the ease of maintenance depends on the type of upholstery you choose. Normally, vinyl or plastic material offers easy maintenance than wood material.

    2. Comfort

    This is the last thing you should check to complete your consideration, which is about comfortable. To make sure of its comfort, what you need to do is to simply try sitting on it. Once you find out a glider that provides comfort as well as all the mentioned aspects, then you are ready to buy it.

    In conclusion, buying a glider loveseat requires some considerations if you really need the right choice for your outdoor porch. By buying the right one, the glider loveseat will provide more comfort to both environment and its own feature. These buying tips will definitely help you out deciding the right choice for your glider loveseat.

    Originally posted 2019-12-28 11:49:55.

  • Make Your Own Outdoor Glider Cushions

    Make Your Own Outdoor Glider Cushions

    For those who love to relaxing should love to spend their time sitting on their porch glider.

    The glider will be more comfortable if it has glider cushions add-on. Cushions will provide comfort and style as well to your glider.

    While they are can be quite expensive to buy, you can actually make them by yourself.

    Read also: Maintaining Porch Glider Swings.

    HOW TO MAKE YOUR OWN OUTDOOR GLIDER CUSHIONS

    1. Measure the Area of Your Glider

    First of all, you need to measure the area of your glider, so that you can know the exact size of fabric and how much foam to purchase.

    Moreover, you should do this by measuring separate seat area as well as the back of the glider if you need to make cushions up to the back of the chair. Measure the width by length to get exact measurements.

    2. Select the Fabric You Want to Use

    After that, head to fabric supplier to purchase the fabric that you want to use. Select the fabric according to your preference and don’t forget about the thickness of the foam.

    The thicker the foam, the more comfortable the cushions will be. Thick cushions take longer to dry than thinner ones as well. So, decide wisely!

    3. Measure and Cut the Fabric

    After you get all the materials you need, you need to measure and cut the fabric. To do this, lay down the fabric over the foam and add a half inch to one inch clearance for the seams on each side of the fabric.

    You have to make sure to keep in mind about the thickness of the sides of the foam as well.

    Porch glider with cushions

    4. Sewing Time!

    Then, it comes to sewing time. The two sides for the back and front of the cushion need to be sewn together.

    Make sure to sew them inside out on three sides and leave a seam allowance of a half inch to one inch, just like you sew a pillow. To complete the cushions, you also need to sew the zipper.

    The zipper gives benefit from double stitching the seams and to add durability because the cushions often take a lot of tear and wear.

    5. Stuff the Foam into the Cover

    Finally, it comes to the final step which is stuffing the foam into the cover. To do this, you need to turn the fabric right-side out, then fill it with the foam.

    You may need to use a long object as well in order to make sure the corners of the covers are pushed, so that the foam can fill each side of the covers.

    Moreover, you may need to make clean edges on the corners by cutting off some of the seam allowance. Then, zip up the open side.

    Making your own glider cushions can actually be the most fun and rewarding experience. Besides, you can choose your own materials according to your likeness, such as the fabric style, the thickness or thinness of the foam, and etc. Moreover, by following this tutorial you don’t have to look somewhere else to make your own porch glider cushions.

    Outdoor metal glider cushions

    Originally posted 2019-12-27 01:43:10.

  • Maintaining Porch Glider Swings

    Maintaining Porch Glider Swings

    Porch glider is one of the outdoor furniture that can be used to relaxing. You can either build it by yourself or afford porch glider in the furniture shop.

    However, if you ever happen to do some maintenance to your old porch glider, then you have to look for the instructions to do proper maintenance.

    Therefore, here is an easy way to do that. Just keep reading!

    Read also: The Types of Porch Swings.

    SIMPLE TIPS BEFORE MAINTAINING PORCH GLIDER SWINGS

    Restoring Old Porch Glider

    If you have an old porch glider and it needs to be inspected and re-finished, here are things you should do.

    1. Identify the Kind of Glider

    The first step you should do is to identify the kind of glider you have. Most of porch gliders are made of some weather-resistant wood, such as mahogany or cedar.

    However, some older wooden gliders were made of quality balsa wood. The reason why you have to identify the kind of glider you have is to make sure you do proper maintenance to it.

    2. Re-finish the Old Glider

    If you have identified the glider, such as it is made of quality balsa wood, then your glider is still durable enough to be refinished.

    Refinishing the glider can be done by stripping or sanding to remove old stain and paint. After that, you just need to refinish the weather-resistant stain, colored varnish, or paint of your preference.

    3. Advanced Repair to Be Used Safely

    If your glider needs to be repaired because there are several damages on it, then you can easily rebuild the main elements to repair the glider.

    Cut new slats for arms and back, the seat, replace damaged or cracked legs, and make sure to strengthen the gliding joints. However, you may want to consider to match the wood type as well.

    Front porch glider swing decoration with table and flower pots

    Additional Tips: Replacing Porch Glider Hardware

    There are some additional tips regarding to replacing porch glider hardware. Here are things you should know.

    1. Removing the Old Hardware

    First, turn the glider upside down. Then, in order to remove the old hardware, you need to use a ratchet to remove all of the nuts that connect the chair to the base. Remove the long bolts followed by the arms. Finally, lift the glider’s base from the chair.

    2. Replace the Hardware

    Make sure that the screws and bolts fit correctly to the gliding mechanism. Attach the hardware and the new arms in the same way to the original place. You will need a second person to help you when installing the new hardware.

    3. Finish the New Glider

    With your screwdriver, screw the bearings into place. Make sure to check the tightness of the screws. Also, tighten the nuts and finally you can turn the chair back over.

    Maintaining your porch glider is quite easy task to do. You don’t have to own specific skill to do that because most of porch gliders were made of quality wood materials.

    Moreover, these instructions on how to maintain your porch gliders will make your day easier and you can relax on your beloved glider in no time.

    Wooden porch glider swings suitable for outdoor or garden

    Originally posted 2019-12-26 07:20:43.