Tag: Guide

  • How to Choose Bathroom Vanity Cabinets For Small Spaces

    How to Choose Bathroom Vanity Cabinets For Small Spaces

    Having small space is bad enough, but a proper pair of vanity could make things a lot better. It is going to be a challenging project for you.

    Don’t be panic; as long as you know how to pick the best vanity for a limited space bathroom, you are good to go.

    Basically, you have two best options to meet the requirement of limited space bathroom. They are cabinet and wall vanity.

    One could guarantee spaces to store items, and the other help you to clear up some spaces in the bathroom. Each also comes with various advantages and types that worth to learn.

    HOW TO CHOOSE BATHROOM VANITY CABINETS FOR SMALL SPACES

    1. Cabinet Vanity

    This is probably the most common style you will see in the store. Some people dislike its bulky and space consuming appearance.

    However, cabinet vanity takes space just as much as it could give. Those who pick this vanity should note the measurement of the available space carefully.

    It would be even better if you could custom made your own cabinet according to your style and need.

    A cabinet vanity is originally manufactured for small living place like apartment. Therefore, you might not find it difficult to get the one that suit your bathroom.

    The drawers above the sink provides more space for you to store things like personal care and cleaning product. There are some variations of cabinet vanity in the market.

    • Simple Model

    This one really lives as its name. The shape resemble old iron table. It has sink on the top, a single drawer under the sink, and empty space with single board as the bottom.

    • Open Side

    This design is on the contemporary side. It usually has ceramic top, and one big drawer with several levels. On the other side, there are several open shelves. It helps you to grab anything without opening the drawer.

    • Sink and Board

    You could have this peculiar design if you love the idea. A simple sink is paired with simple towel hanger and slender board to put dry towels and bathing needs.

    Contemporary bathroom vanity cabinets only with mirror
    Image: houzz.com

    2. Wall Vanity

    Just like how you read the name, this vanity is closely attached on the wall. You will have extra space under this vanity. Many people love this design because of its modern look.

    Moreover, the designers recommend it for airy bathroom. Believe it or not, wall vanity doesn’t not back off too far from pedestal or console sink.

    Some types of wall vanity has no drawer under the sink. It simply consists of faucet and sink. Some others are still being generous by providing shelves to keep your things safe.

    Recently, several manufacturers develop the standard design into something more interesting.

    • Side Facing Faucet

    How to look fancy without removing the basic need of faucet? Install a simple sink on the wall with side facing faucet. It could be used to wash hand only. Under the sink, you will find simple two doors cabinet to keep the hand wash and towel.

    • Clear Sink

    Taking clear concept is not a bad idea. Try the transparent sink with simple faucet, towel hanger and wing board to put on soap and cologne. It will seem like you take no space for the sink.

    How do you know that the vanity you have chosen is a good value? See how it fits the available space without being overwhelming. You have plenty of spaces to store things and to move around. The above tricks could help you. What you need to do is to give it a try.

    Small bathroom vanity cabinet 24 inch

    Read also: How to choose bathroom vanity with glass top

    Originally posted 2020-01-07 15:42:14.

  • Bathroom Vanities with Granite Tops Maintenance

    Bathroom Vanities with Granite Tops Maintenance

    Look at your new granite top vanities! Your bathroom has new shining jewel. Without doubt, you want the stone vanity to sparkle as long as possible.

    There are several things you have to know about the way to maintain the luxurious vanity. It is not difficult, but you have to do it regularly.

    HOW TO CARE BATHROOM VANITIES WITH GRANITE TOPS

    Regular Maintenance

    The frequency to clean your granite top actually depends on how often you use it. For bathroom, most people will use it every day. Therefore, you are going to invest some minutes each day to clean the vanity top.

    • Daily Routine

    Dip a sponge in a hot water to remove any dust and spill. After that, you can spray the commercial product especially made for stone. Wipe once again with clean cloth.

    • Weekly Cleaning

    It is time to a little bit thorough cleaning. Move all the items on your bathroom vanity. Wipe the surface from any debris or crumb. Peek into all corners to make sure you have no dust or stain left.

    • Monthly Care

    In the end of every month, you are going to grab the stone polisher liquid and spread it on the bathroom vanity. This product helps to pull out the shine out of the stone. However, you cannot expect it to fix any kind of damage on the stone.

    • Yearly Check

    In the end of the year, you have to check the seal. It is good to be able to predict when you are going to change the seal. Pour water on the surface. If there is any part that turn into darker color, it means the seal on that part is torn.

    Double bathroom vanities with granite tops pictures

    Granite Care Tips

    Any first time owner will have tons of worries about the maintenance of the granite tops. Some of them end up damaging instead of caring the stone. Learn some tricks that nurture the stone.

    • Cleaning Cloth

    It is recommended to use sponge or soft cloth to clean the granite tops. Avoid using any sharp materials such as steel sponge to wipe the bathroom vanity. It will tear the seal.

    • Cleaning Product

    Stone is sensitive to strong chemical solution such as lemon, ammonia, and vinegar. Therefore, you should not use anything with bleaching material.

    Dish soap is not good either. It will dull the color of your granite. The best choice is to pick the stone cleaning product.

    • Putting a Layer

    If you plan to put anything with sharp edges on top of your vanity, then you should lay a coaster on the granite. Then you can place the item on the coaster. It will prevent any scratch on the seal.

    • Keeping It Clear

    The bathroom vanity is a great place to store things. Those who don’t have much time in the morning usually put cologne, lotion, and hair products on the top. This habit may damage the granite, because the personal care items are tend to spill without you noticing.

    Maintain your granite vanity to have a long lasting shine. As the first step, make sure that you seal the stone to prevent the stone from absorbing any water or moisture. Continue the steps by cleaning the granite tops vanity daily, weekly, monthly and yearly. If you have any concern, run your finger on the tips list to find the answer.

    Bathroom vanities with top image gallery:

    Originally posted 2020-01-06 03:01:03.

  • How to Make Your Own Bathroom Vanities without Tops

    How to Make Your Own Bathroom Vanities without Tops

    Making all of your households by yourself is always a pleasure. So does in making your own bathroom vanity without tops.

    Since you are the designer of your vanity, you will have the freedom in deciding the material, size or the design. In case you have never made one.

    Here try some steps below to make you easier in executing the project.

    THE TIPS ABOUT BATHROOM VANITIES WITHOUT TOPS

    1. Setting Up

    The concept of making your own vanity doesn’t mean you have to start it from zero since you still need to buy one from the store.

    Once you choose your vanity, you can contemplate whether you are going to repaint the vanity or just go with the available color.

    After contemplating the color, it’s recommended for you to add some smooth top on your vanity in case it doesn’t have one, to ease you for the cleaning. Then after that you can look deal with the seating and make it as comfortable as possible.

    2. Adding the Necessities

    When it comes to the necessities, the first thing that you’ll have to do first in this kind of project is choosing what kind of mirror that you are going to use.

    It’s always suggested to choose a mirror with a sturdy and thick frame that will match with your vanity or the color of your bathroom wall.

    Then if you are sure with the mirror you choose, hang it properly, which is at the same level of your eyes while you are sitting down to get the proper view. Make it even perfect by adding small lamps near the mirror to help you with the lighting.

    Read also: How to Decorate a Bathroom Vanity to Be More Elegant.

    Design idea for custom bathroom vanities without tops

    3. Organizing the Space

    If you are done with the mirror, it means you’ll go for the half rest of the project, which is organizing the detail space on your vanity.

    It will take totally different steps for men and women in organizing the space since women have more stuff to be organized. The point of organizing the space is arranging the placement of your toiletries or other stuff on the vanity, so that you can always find the thing that you are looking for immediately.

    Place the stuff that you mostly used on the top of your vanity while you can place the rest inside the drawers to maximize the rooms of your vanity.

    4. Decorating the Vanity

    Finally, the last and probably your favorite step is decorating your vanity. When it comes to décor, you can always put anything you want or anything that is relatable to you on the vanity.

    The aim of decorating the vanity is to make it look more interesting or feel fresher based on your taste. For example, you can add some flowers for the sake of freshness or put some candles to give some ambience.

    It’s always a pleasure to create or design the place that you use to take a bath every day. By creating it by yourself, it’s hoped that you will get more positive energy and produce some god things because of your own creation.

    Wooden antique bathroom vanities without countertops design ideas

    Originally posted 2020-01-05 10:33:16.

  • How to Make Your Own Retractable Porch Shades

    How to Make Your Own Retractable Porch Shades

    No one wants to sit outside when the sun glares at noon, therefore people tend to install a porch shade in order to protect them from the scorching sunlight.

    However, the typical retractable porch awnings are expensive and unpleasing.

    If you are quite handy with tools and furniture-making, then you can try to make your own retractable porch awning.

    HOW TO MAKE RETRACTABLE PORCH SHADES

    1. Things You Need to Prepare

    Here are some things and tools you need to prepare first before you jump to make the retractable awning:

    1. 4 eye screws
    2. Cable
    3. Canvas sheet(s)
    4. Shower curtain rings
    5. Scissors
    Pergola retractable outdoor shades
    Image: houzz.com

    Read also: Tips for maintaining quality outside porch sun shades

    2. How to Make It

    After you are finished preparing the tools needed to build the porch shade, then you can follow these instructions below.

    1. First thing first, you should decide which rectangular or square you would like to be shaded. The two corners under the eaves should be against the house. The other two corners, if possible, should make use of existing house structures, such as fence posts. However, if there is no structure available, you can dig two holes with 2 feet deep and stick a post in each holes.
    2. After that, screw the eye screws right into the four corners. Make sure that the size of the eyes should fit with the cable to get through.
    3. Then, run the cable through all the eyes of the screws. Securely tie the cable together at any one of the screws, then cut off any cable excess. Be sure that the cables are taut enough to hold the canvas sheet.
    4. Measure the width and length of the cable, then multiply those numbers to get the area. It is done in order to know how long the canvas that covers the area. Canvas will likely sag, therefore you should make some extra yards from the material.
    5. Choose the canvas sheet you would like to use. Moreover, you can also choose some patterns to join in together in a patchwork.
    6. Then, the canvas sheets should be attached to one another. Then run a ring for the shower curtain through one of the provided holes in that sheet and a proximal hole in another one. The entire sheets must be connected by the entire three rings, one in the middle, one in the corner, and one in the other corner.
    7. Make holes along the entire three edges of the canvas surface, the sides that extend away from the house and the edge against the house.
    8. Put shower curtain rings through the holes in the edges of the canvas, then attach them. The first attachment is into the length of cable along the house and the other one to the cables that extend away from the house.
    9. Finally, fold the canvas against the house. Then, unfurl it by pulling the canvas away from the house.

    Reed also: 5 Benefits of Outdoor Porch Shades and Blinds.

    In conclusion, it is quite simple to make your own retractable porch awning or shades.

    By making one by your own, you can save money from affording a porch shade that is expensive and unpleasing. So, what are you waiting for? Go make one for yourself.

    Contemporary patio design with retractable outdoor shade screen
    Image: houzz.com

    Originally posted 2020-01-05 00:03:31.

  • Tips for Maintaining Quality Outside Porch Sun Shades

    Tips for Maintaining Quality Outside Porch Sun Shades

    It is known that quality porch sun shades are designed using good manufacturing and excellent materials.

    However they still need to be maintained regularly. Regular maintenance will ensure the sun shades work and functions well.

    In order to do the proper maintenance, check out these following tips for maintaining your sun shades.

    OUTSIDE PORCH SUN SHADES MAINTAINING TIPS

    1. Install Porch Sun Shade Properly

    Sun shades come in different sizes as well as different ways to install them properly. When you buy a new sun shade, it is provided with a manual so you can install it on your own.

    However, there is a reason why professional sun shade should be hired which is to ensure that your sun shade is installed securely and properly.

    2. Clean Regularly

    Sun shades can get dirty over time because of many things, such as bird droppings and wet leaves. Therefore, whenever you see these things, make sure to remove them immediately because the longer the dirt stay on the sun shade’s surface, the faster the stains will seep into the threads and fabric.

    This tips goes the same for mildew and moulds. Be sure to clean the sun shades with low to medium pressure water from the hose.

    Front porch sun shades
    Image: houzz.com

    3. Always Avoid Strong Detergents

    When you find out stains that are harder to remove, then you may need to use detergents. However, make sure to avoid using strong detergents that have harsh chemicals like halogens or sulphur.

    Also, you should avoid using chlorine treated water. Instead, you should use mild dish-washing liquid as it is good to remove dirt and stains without causing damage to the fabric.

    4. Check for Damaged Fabric

    It is good to always check the fabric for signs of weak patches or spots. These patches refers to specific part of the sun shade that is starting to wear out and can become big tears or holes.

    Therefore, when you spot these patches, it is advised to contact your supplier so they can help fixing the problem.

    5. Keep Away from Fire

    Please take a note that sun shades are not fire-resistant. Therefore, it is advised to keep away grills or outdoor stoves from your sun shades.

    When having barbeques, it is better to do it away from the sun shade. Sparks from the grills will not only bore holes into the shade, but the smoke can cause soot on the fabric as well.

    6. Take it Down

    It is known that a sun shade can withstand the heat of the sun, however even if it can protect you from gentle rains, the sun shade is designed to hold of strong rain and winds. Therefore, when strong rain, winds, or storm is approaching, make sure to take your sun shade down.

    Quality porch sun shades surely need regular maintenance in order to keep its best functions and the appeal as well. Doing a regular maintenance means you enhance the live of your sun shade. Be sure to follow these tips for maintaining your own sun shades.

    Porch shades outdoor

    Outside Porch Sun Shades Gallery:

    Originally posted 2020-01-04 05:37:57.

  • How to Install Outside Mount Blinds with Window Trim

    How to Install Outside Mount Blinds with Window Trim

    Outside mount blind is a good option if your windows are out of square or the window opening has no break. Outside mount blind is able to be adjusted for irregular sizes.

    However, determine first how wide the blind to be so it has enough space for the mounting brackets.

    Here are some steps on installing the outside mount blinds.

    Read also: How to keep rain out of screened in porch windows.

    HOW TO INSTALL OUTSIDE MOUNT BLINDS WITH WINDOW TRIM EASILY

    Measuring and Determining the Mount

    1. Measure the windows

    It is very important as the basic information before buying the blind. You can measure the windows by using measuring tape and then measure the outside of the window.

    The outside is important too because it should fit the outside mount blinds. Outside mount blinds make the window and blind look larger.

    For measuring the outside mount, measure all the casing around the window and then measure it from the top to the bottom.

    2, Purchase the blind based on the correct measurement

    Many options of blinds that you can choose such as PV, wood, vinyl, and aluminum. The choice is based on your own preference.

    3. Make the mounting marks

    Hold the blind up so the top part of the blind will be centered and leveled with the casing of the window. Mark below the head rail by using pencil on both side of the casing. Put the mark ¼ of an inch on the end of each head rail.

    Outside blinds for windows

    Attaching the Brackets

    1. Open the bracket door and hold the end brackets in the place

    Place the bracket on the pencil mark that has been already made. There are two spots for bracket, the one towards you and the other towards the window center.

    2. Mark where you will be drilling

    Mark the bracket spot by using pencil. Choose two diagonal holes for the brackets and then make a hole by drilling it. The brackets must be placed on the outside of the window casing on each side of window.

    3. Drill the holes for the screws

    Each bracket needs two screws. Make sure that the screws are smaller than the screw for securing the bracket. Then, replace the bracket and then screw it into the proper spot. Besides, use the proper screw for the proper wall.

    Installing the Head Rail and Valance

    1. Snap the valance clips in place

    Attach the head rail to the valance by using valance clips. The valance itself is the cover of the head rail and something that makes it more decorative.

    Moreover, the valance clips must be snapped over the front of the head rail before it is inserted to the bracket.

    2. Put the head rail to the brackets

    After finishing drill the bracket in its place, the bracket doors should be wide opened. After that, put the head rail into it. Then, close the bracket doors.

    3. Attach the valance

    Put the valance based on your preference along the head rail. After that, press it down so the valance clips will snap to the valance and hold it in place.

    Installing the outside mount blinds by yourself is quite easy to be done. Those tips above should help you to do it properly. If you are careful in every step, you will even make a final professional look.

    Outside window blinds

    Originally posted 2020-01-01 10:48:21.

  • Front Porch Glider: Tips to Make and to Replace

    Front Porch Glider: Tips to Make and to Replace

    Putting a glider on your front porch is a fabulous idea. It provides you comfortable seat while enjoying the front view.

    If you don’t have one, you can make it easily using any porch bench you already have.

    Glider tends to have good durability due to the material commonly used, yet you still need to manage to replace the hardware from time to time.

    Here are several tips you will find beneficial regarding on glider.

    See also: Porch Glider Swings Ideas.

    How to Make Porch Glider

    Front porch glider swing

    1. Select and refurbish the bench for the glider seat

    If you want to save your money, you may use a bench that you already have at home to be the glider. Refinish and sand the bench so that it looks new and fresh. Polish it with polyurethane or weather-resistant varnish to make it durable.

    2. Build the glider base

    First of all, measure the distance of the hind legs and forelegs bench. Then, cut two planks of the same type wood.

    Make it into two inches wide and two inches long, greater than the distance of the rear bench legs and front legs. Create the glider support stand by using two dowels then cut it into the same height for the arm part of the glider.

    Then, attach the horizontal dowel by measuring the same length. For the central glider support, lay both down.

    3. Attach pivot hinges to form the glider movement

    Attach four dowels to the side of the bench legs. Measure and then trim the dowels into the suitable size. Then, drill the holes in the dowels and legs.

    Put the pivot hinges into the holes by attaching eight of pivot hinges. After that, test the glider and straighten the glider for checking the loose dowels and screws or even replace it.

    Finish the glider sand then polish it with varnish, stain or polyurethane.

    Read also: How to make your own outdoor glider cushions.

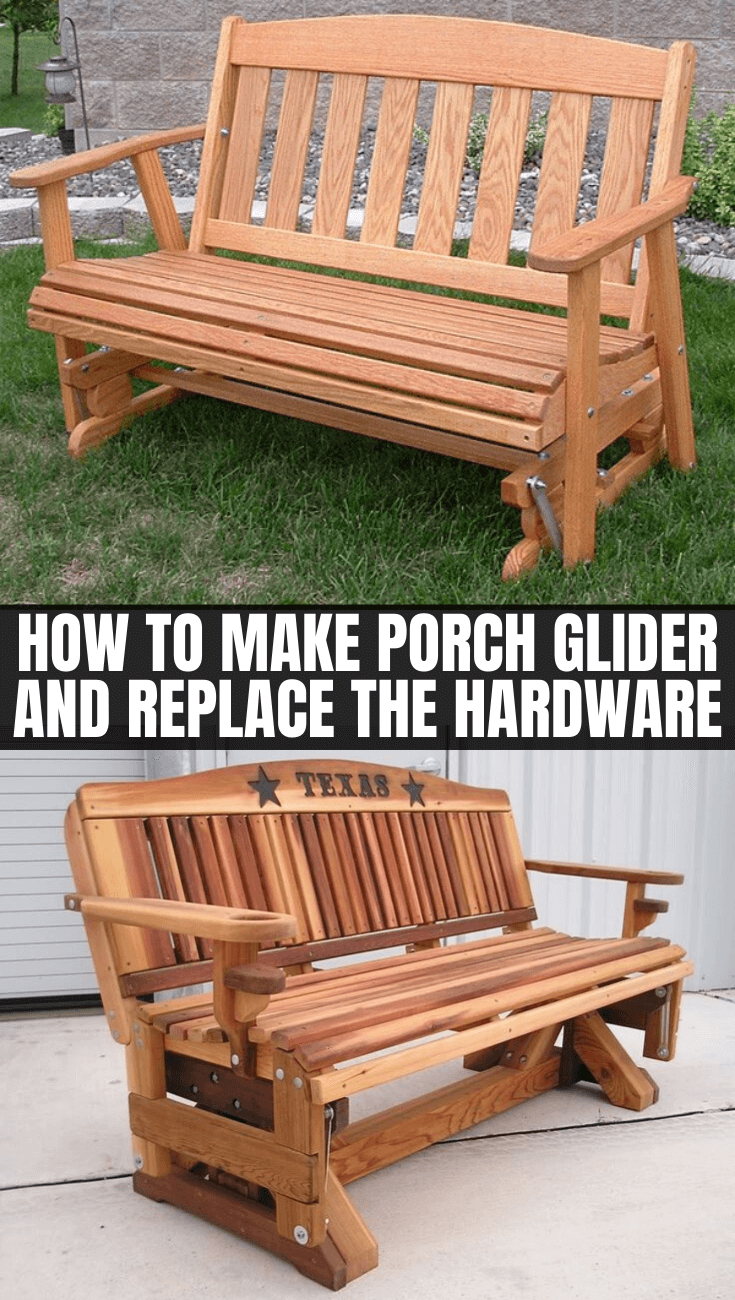
    HOW TO MAKE PORCH GLIDER AND REPLACE THE HARDWARE

    How to Replace the Hardware in the Porch Glider

    1. Remove the old hardware

    Turn the glider upside down, and then use the ratchet to remove all the nuts which connects the chair to the base. You may ask your friend to hold the glider up so that it will not fall or break.

    Then, while it is held by your friend, remove the long bolts. After it is done, lift the base from the glider.

    2. Replacing the hardware

    Make sure that the screws and bolts are fit properly before replacing the gliding hardware. Sometimes, it is necessary to use the larger size of screw and bolt once the old one is worn out.

    Then, attach the new hardware and arms as the previous way. It is better to have second person to hold the base of the glider while installing the new hardware.

    Then, put the bolt through the holes of the glider. After that, slide another washer into the bolt. Before it is done, tighten the nut for the bolt.

    3. Finish and fine-tune

    Check again to make sure the tightness of the screws on the bracket for the metal chair or wicker. If it is needed, tighten the nuts. Then, it’s all done.

    It is pretty easy to create a porch glider using a bench. In addition to it, the tips above should help in keeping your old front porch glider durable and safe to use. It saves money yet you still get the same sophistication.

    Gray front porch glider bench with cushions

    Originally posted 2020-01-01 01:42:46.

  • Outdoor Glider with Canopy Overview

    Outdoor Glider with Canopy Overview

    Outdoor glider with canopy is an excellent option to add on your outdoor space at the house. It protects you from heat and direct sunlight.

    However, choosing a glider with canopy is a little trickier than finding the usual one.

    Check out the following details for factors to consider and tips to add a frame on this furniture.

    See also: Porch Glider Swings Ideas.

    OUTDOOR GLIDER WITH CANOPY OVERVIEW BUYING GUIDE AND HOW TO BUILD

    Things to Consider before Buying

    1. Comfort

    The purpose of having porch glider or outdoor glider is not only for decoration but also for relaxing. Therefore, comfort must be considered before buying the porch gliders with canopy.

    Choose the porch glider which combines comfortable material such as hardwood, aluminum, or cotton for the puffs.

    1. Material

    The material of porch glider is related to your own style and home decoration. If you like the traditional decoration, you may choose the wooden-base porch glider such as cypress, cedar, ash and oak.

    If you prefer to the modern one, you may choose the porch with the waterproof sealant so that it will resist from water damage.

    1. Durability

    It is also important for paying attention the durability of the glider because the outdoor glider will be in intense contact with the weather-changing. Make sure that the material is high quality and easy to clean.

    1. Cost

    If you want to buy the outdoor glider with the best material and good quality, the cost will be high. But it is worth the price. Therefore, it is better to save the money rather than change it every year.

    1. Style

    Porch glider with canopy is a perfect choice for modern look in the outdoor part of your house. By choosing the porch glider with canopy, it will be protected from the sun light.

    It is also completed with cup holders which make you be more comfortable with it. The canopy can be fit everywhere and anywhere.

    Patio glider with canopy


    See also: Outdoor Glider Cushions Ideas

    How to Build the Frame for the Porch Glider with Canopy

    The canopy on the porch glider will cover the glider itself from rain and sun. It will be complete the frame. So, how do we build or make the frame for the porch glider with canopy?

    First of all, you need 4-inch stove bolts, 2 1/4 –inch round pine dowels and tape for measurement. After preparing the material, let’s take a look to these steps.

    1. First, measure the porch glider’s length across the back. After that, measure the canopy cross rails length. Using the measurement, obtaining around 25 dowels both for the long and short dowels.
    2. Second, put the stove bolts to the ends of the dowels then connect it together as the frame which looks quite similar with the table frame.
    3. Last, put the cross rail dowels to the frame so that the frame is supported with it. When the frame is already constructed, you may slide the canopy of the porch gliders and wrench it over the glider.

    Having porch glider with canopy is good for preventing yourself from sun light and rain. However, there are several things that you should pay attention to before buying it and you may build your own frame for porch gliders with canopy.

    Outdoor glider rocker with canopy

    Originally posted 2019-12-30 00:49:35.

  • Outdoor Glider Loveseat Buying Tips

    Outdoor Glider Loveseat Buying Tips

    You must find a hard time when you want to afford a glider loveseat in the market because the variety of the glider loveseat is huge.

    Then, before you head to the market or store you have to come up with some considerations. What considerations should you take?

    Therefore, for further information, check out the following buying tips on glider loveseat.

    Read also: Porch glider swings.

    OUTDOOR GLIDER LOVESEAT BUYING TIPS

    Define Your Needs

    First thing first, you should define why you need to buy a glider loveseat. This is very essential as people often regret their decision when they buy one but it doesn’t match with the house environment. Therefore, it is important to answer these questions to make your choice falls to the right one.

    1. What will this glider be used for?

    The first question is aimed to decide why you need this glider. If you afford this glider only to decor your outdoor environment rather than to be used to other need like relaxing or family gathering, then you have to re-consider buying the glider.

    2. How much space will it take up?

    Space is what matter most for you to pay attention to. It is because if you accidentally buy a big glider loveseat while your outdoor porch is narrow, then the glider will eat up the porch’s space. In result, your porch will not be decorative as it looks. Make sure to do a measurement to your outdoor porch.

    Outdoor wicker glider loveseat

    About Resistance and Comfort of a Glider Loveseat

    The next thing you should consider is about the resistance and comfort of the glider. There are things you should check in as follows.

    1. Structure

    If you need an outdoor glider, then what you need to do is to choose the right structure. A quality wood material will be the perfect choice for a glider loveseat, such as cedar or mahogany.

    Those wood materials are really durable and can withstand to any severe weather. However, you can choose metal or plastic structures as well if you find that the price for wooden glider is too expensive.

    2. The Padding

    Some people prefer a softer seat, but others prefer a firm one. Then, it is up to you to decide whether you want a glider that has cushions or one without cushions.

    Outdoor metal glider loveseat

    See also: Outdoor Glider Cushions

    Elements to Check in a Glider Loveseat

    Other elements in a glider loveseat should be paid attention as well.

    1. Easy Maintenance

    Choose a glider loveseat that is easy to maintain. Easy to maintain means that the glider is easy to wash, clean, or repair when it is damaged.

    However, the ease of maintenance depends on the type of upholstery you choose. Normally, vinyl or plastic material offers easy maintenance than wood material.

    2. Comfort

    This is the last thing you should check to complete your consideration, which is about comfortable. To make sure of its comfort, what you need to do is to simply try sitting on it. Once you find out a glider that provides comfort as well as all the mentioned aspects, then you are ready to buy it.

    In conclusion, buying a glider loveseat requires some considerations if you really need the right choice for your outdoor porch. By buying the right one, the glider loveseat will provide more comfort to both environment and its own feature. These buying tips will definitely help you out deciding the right choice for your glider loveseat.

    Originally posted 2019-12-28 11:49:55.