This concept is for the one who like the simple and traditional but fashionable atmosphere. If you want to install the high-end door, use the door made by wood.
For example, use Parson Collection for the sophisticated accent with solid design of luxury. If you like American style uses the Ponderosa collection to evoke the spirit, while you can use the Villa Madre collection to capture the elegance and romantic effect.
But if you want to choose the wood as your door, just remember to handle it with care. You also can use steel as your panels.
It is stronger and become very popular because it can imitate the look of wood. Add swing-style to the garage door to make it more open.
2. Make it Contemporary
In this approach, you can use glass, aluminum and wood composite. Make a minimalistic view by using the unconventional material.
Allow the light transmission by use the Glass door. Do not forget to pay attention to the windows.
When you design the garage, the existence of a window is optional, but if you want to feel the natural light, you can use window.
Make the window outstanding by applying the architectural details like the texture and colors. If you like glass, use satin glass to make the harmony.
Image: workdon.com
3. Go with Barn-style garage
Do you want to apply the craftsman style into your house? You can do it with one simple way, use the Carriage way door. Add the superior insulted steel to blend the elegance in your gate.
A wood-grain texture will become the classic outlook, while a double wide garage will optimize the performance and its appeal.
Use polystyrene as the door insulation and make it almond or white, it will be the right features to make the people impress.
Show the simplicity in your garage door. Live in the busy and modern society, you have to make the design simple if you do not want to give a lot of effort in the maintenance.
Use Pergola will make your home look clean and artistic; it will represent your lifestyle. Use vinyl material, it will last long. When you want to paint the Pergola, mix it with the color of the house. The colors will make the garage pop, and the advantage of Pergola is it can make every color look good.
Nowadays, the exterior plays an important role in the house representation. The garage door takes the outlooks first. You can apply your style and taste when decorates the garage door, but remember you have to blend it with the house atmosphere.
Do not go overboard. Use the right design to light the performance and sense the sensation of the dramatic view in your own front door.
If the room could have small ornaments, why don’t you install some on your garage door?
This small knick knack is called decoration hardware. Enough with the color! Elaborate more things for better appearance.
But first, you need to know the types and what kind of view it could make.
1. Carolina
Just like the name, this decorative hardware is pretty. It has a spade tip as the characteristic. The handle has beautiful curves, perfect for hand size. The knocker is adorable, with two spades facing the opposite direction and a ring attached in the middle.
It goes well for overhead garage door as it has several sections. Install the hardware on the bottom of the second section and on the top of the third section. The handle goes in the middle, and the knocker is just above the handle.
This one has complicated design. It appears pretty, but it requires thorough cleaning. Its unique symbol resembles an onion, The strap has decoration on both edges.
The handle is straight with twisting iron to hold. The enchanting knocker looks like a compass: pointing to four directions of the wind. A ring hanging on the knocker has grips for firmer handling.
It works best for two side garage door. You could install the straps inside or outside the door. The beautiful knocks take center point, but a little lower.
If you love pointy tips, then choose this hardware. The special mark from this decorative hardware is its arrow like edges.
The door handle is available in two options: the curved one or the straight line. Both are aesthetic, you only need to consider which one that makes your hand comfortable. It is suitable for sliding garage door.
Install the strap on both sides of the door, taking position near the top and near the bottom part. Give space from the floor and the ceiling.
Modern garage door designs, image: wallhome.net
4. Barcelona
The design of this hardware resembles a hanging ivy. If you need something beautiful with less to none maintenance, pick this one.
The knocker works the best because it does not scratch the door. The ring will hit the iron itself, creating even clearer sound. The garage door that will be the match for this hardware is a standard square door.
Arched door will not work with this item. Embellish the strap on the bottom and top part of the door. Do not forget to provide adequate space between the straps.
This one is especially designed for the fan of medieval era. The straps look like an iron net. There are two kinds of door handle you can pick: the bar or the scroll one. Both handles are unique because they resemble belt.
The straps do not belong to the door. It is designed for the windows on the door. Thus, wooden material is the best pair for this decorative hardware.
Color and material of the garage door is important. No one doubted that. However, it does not deny the fact that little frilly ornament like decorative hardware could bring out the best potential of the door. You already know the types and what magic it could perform. The only thing left is for you to pick your favorite item and install it to the garage door.
Embarking on a home decoration journey can be overwhelming, but with the right guidance, it can be an exciting process. We’ve assembled a host of expert advice and insider tricks to help you reimagine your home. Regardless of whether you’re a seasoned decorator or a novice, these tips will equip you with the knowledge and confidence to transform your space into your dream home.
Embrace Your Personal Style 🕺💃
Remember, the most critical element of your home decor is you. Your space should reflect your personality, taste, and lifestyle. Rather than merely copying a design from a magazine, infuse your home with pieces that have personal significance. Mix and match styles, periods, colors, and textures to create a unique look that says “you.”
Important Note: Be patient with your home decor journey. It takes time to curate pieces and design a space that truly reflects your personality and style.
Light Matters: The Magic of Lighting 🌞💡
In the world of interior design, lighting is a key player. It doesn’t just illuminate our homes; it can significantly affect the mood and aesthetic appeal. For a quick and effective refresh, consider varying your light sources. Use a combination of overhead lights, floor lamps, and table lamps to create a warm, inviting atmosphere.
Important Note: The color temperature of your lights can impact the ambiance. Cooler temperatures (3000K – 4000K) create an energetic, modern environment, while warmer tones (2700K – 3000K) provide a cozy, relaxed atmosphere.
Maximize Your Space: Smart Furniture Choices 🪑🛋️
The right furniture can transform a small, crowded space into a roomy sanctuary. Consider multi-functional pieces like ottomans that double as storage or a sleek, modern console that can also serve as a desk.
Furniture Type
Advantages
Ideal For
Ottoman
Multi-purpose, space-saving
Small spaces
Wall-mounted desk
Utilizes vertical space
Home offices
Nesting tables
Versatile, easy to move
Living rooms
Color Palette: The Power of Paint 🎨🖌️
A new color scheme can work wonders for your space. Whether you choose to be bold with contrasting hues or subtle with calming neutrals, paint has the power to completely transform your space.
Important Note: Colors have psychological effects. For instance, blues are calming, reds are energizing, and greens create a sense of balance.
Textiles and Accessories: The Finishing Touches 🖼️🛍️
Curtains, rugs, cushions, art pieces – these are the elements that add texture and depth to your room. They’re the finishing touches that bring everything together. Remember to keep them in line with your color scheme and overall design.
Plant Power: Bring the Outdoors In 🌱🌿
Introducing indoor plants to your space doesn’t just add a splash of color – they can also improve your air quality and boost your mood. Even if you don’t have a green thumb, there are plenty of hardy plants like snake plants or pothos that can thrive indoors with minimal care.
Important Note: Some plants are toxic to pets. Always research your indoor plants to ensure they’re safe for your furry friends.
Reimagining your home decor is a personal and rewarding journey. Remember, the most beautiful homes are those that make you feel good. Follow these tips and tricks to transform your space into a reflection of you. Happy decorating! 🎉🎈
Your living room is the heart of your home. It’s the place where we unwind, entertain, and create memories. However, giving it a makeover can be an expensive venture. Fear not, for there are various ways to add style, charm, and individuality to your living space, all without breaking the bank. Here are ten affordable ways to transform your living room:
1. Bring the Outdoors In with Indoor Plants 🌿
Indoor plants can bring a breath of fresh air into your living room, both literally and figuratively. Not only do they add a dash of nature to your interior decor, but they also improve air quality. You can opt for low-maintenance indoor plants like succulents, snake plants, or pothos if you’re not quite the green thumb.
Note: Experiment with different types of pots and planters to add an extra layer of design.
2. Statement Lighting 💡
Swapping out a dull, old light fixture for a statement piece can dramatically change the mood and ambiance in your living room. Look for inexpensive vintage pieces at thrift shops or garage sales.
3. Decorate with Thrift Store Finds 🛍️
Thrift stores and second-hand shops are treasure troves for affordable and unique home decor items. From vintage furniture to quirky wall art, these places have it all.
Note: Don’t shy away from items that might need a little love; a fresh coat of paint or new upholstery can do wonders!
4. DIY Wall Art 🎨
Creating your own wall art not only saves money but also allows you to put a personal touch on your living room. You can frame photos, paint a canvas, or even create a gallery wall with a mix of artwork, prints, and photos.
5. Invest in Versatile Furniture 🪑
Purchasing furniture that can double up in function is a great way to save money and space. Look for coffee tables with storage or a sofa bed for overnight guests.
6. Jazz Up Your Walls with Removable Wallpaper or Decals 🖼️
Wallpaper and wall decals can make a dramatic difference in your living room. Removable options are perfect for renters or anyone who likes to change their decor frequently.
7. Incorporate Rugs for Texture and Color 🧡
An area rug can tie a room together, add texture, and introduce new colors or patterns. Look for sales or discount stores for affordable options.
8. Add Personality with Throw Pillows and Blankets 💙
You can quickly and affordably transform your living room by swapping out throw pillows and blankets. Choose different patterns, colors, and textures to add depth and personality to your space.
9. Rearrange Your Existing Furniture 💪
Sometimes, the most significant transformation doesn’t require buying anything new. Experiment with the layout of your furniture – you might be surprised at how different your space can feel.
Note: Remember to balance out your room by distributing the furniture evenly, and ensure there’s a clear path to move around.
10. Show Off Your Books 📚
Books are not just for reading – they can serve as wonderful decor pieces too. Display your favorite books on a shelf, coffee table, or even stack them on the floor.
Budget Breakdown 📊
Here’s a simple budget breakdown to give you an idea of the potential costs associated with each transformation method:
Transformation Method
Potential Cost (USD)
Indoor Plants
$10 – $50
Statement Lighting
$25 – $100
Thrift Store Finds
$5 – $50
DIY Wall Art
$10 – $30
Versatile Furniture
$50 – $200
Removable Wallpaper or Decals
$20 – $100
Rugs
$20 – $150
Throw Pillows and Blankets
$10 – $50
Rearrange Existing Furniture
$0
Books
$5 – $20
Transforming your living room doesn’t have to be a costly endeavor. With a bit of creativity, planning, and elbow grease, you can create a beautiful and comfortable space that truly feels like home. Happy decorating! 🎉
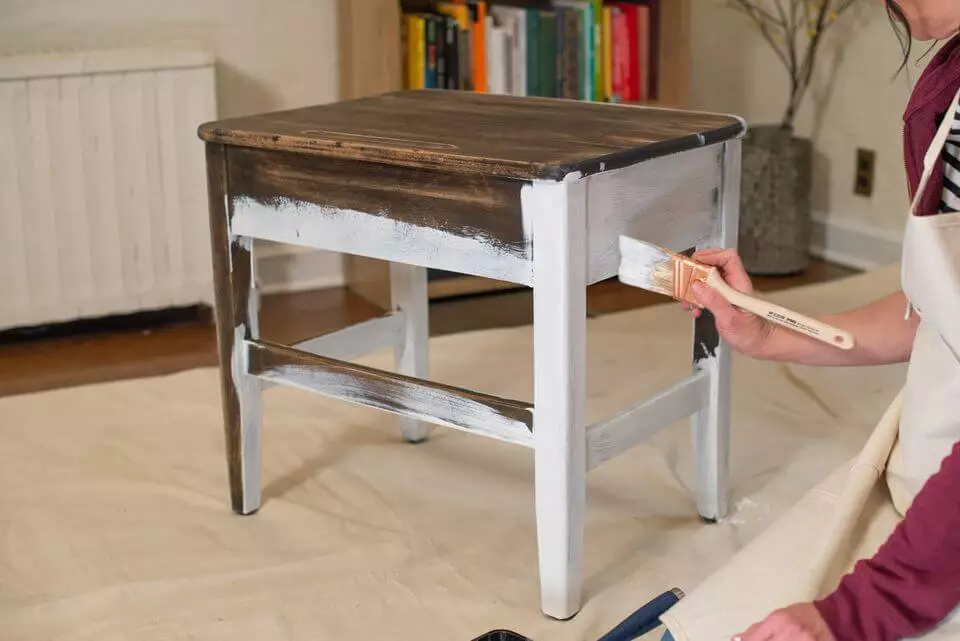
Painting is not an easy job, at least for those who care about the long-lasting results instead of instant pretty look. Unless you have done DIY painting project before, you might not understand how frustrating it is to have your paint peeled in only weeks or days. To prevent this condition, you need to learn how to do it right, also we show you about how to paint wood furniture black and white.
How to paint wood furniture black and white. Image: Pinterest.com
1. PREPARE THE FURNITURE
How many wood furniture do you have in the house? Which one you are going to paint? Take a look at your furniture. Is there any handles, hinges or other attached accessories? Before you start the painting, you need to remove these items first. Otherwise, your paint may stain the accessories.
Now that the handles, hinges and other accessories had been removed, you should inspect any damaged area. It could be a cracks or holes. Put wood filler to cover them, so you have even surface to work with. Don’t worry, this filler won’t be seen after you paint the furniture.
2. MOVE TO WELL-VENTILATED AREA
Working with paint means you could be messy. No matter how careful you are, there is still chance of getting paint splattered to any direction. You don’t want wood paint to stick on your sofa, rug or carpet. It will be difficult to clean. Moreover, paint usually have strong odour. Thus, working in well ventilated area is clearly better option.
3. LAY DROP CLOTH
You have moved to different area for painting. Does it mean you need no drop cloth? The answer is no. This cloth is still needed to cover the floor. If you don’t have drop cloth, you could replace it with used newspaper.
In some cases, you cannot move the wood furniture. It might happen when you paint door or windows. Since you need to protect other items in the room, lay drop cloth on top of them.
4. SAND THE SURFACE
One big mistake any beginner makes while painting wood furniture is skipping the sanding process. They argue that certain primer and paint brand promises that the result will be great. This magic doesn’t always work. Many paint jobs are not covering the surface well because it is not sanded before.
To sand wood furniture, you need 150 or 220 grit sandpaper. If you choose sandpaper, you will do the entire job by hand. You could also use orbital sander. Don’t forget to scoot closer to power outlet or bring cable extension to your work area. Using either tool, your goal is peeling the old paint layer. Should you see any knots, sand it until the surface is even with the grain.
5. WIPE IT OUT
How do you plan to wipe the sanded surface? There are plenty options; linen cloth, paper towel, tack cloth, clean cloth, vacuum, and many more. Surprisingly, not all of them could clean thoroughly. Linen cloth and paper towel only work for visible residue. You need to double check for the fine dust. In short, best cleaning tool for wiping is tack cloth or vacuum.
6. APPLY PRIME LAYER
Before the real painting, you need to apply prime layer first. It gives the furniture a base for paint to stick well. To do this job, you need two tools; foam roller and foam brush. Use foam roller to cover wide surface. For the tricky corners, you could use foam brush. Let the prime to dry. It takes more or less one hour. Use sand paper to remove any dripping prime on the furniture.
When you buy prime for wood furniture, you might find two finish options; shiny or flat. Unless you know how each of them will look on your furniture, it is safer to go with flat prime first. Later if you change your mind, you could apply second layer of shiny prime. Doing the other way is quite difficult.
One more thing; you should match the prime and paint type. If you want to use oil-based paint, then buy oil-based primer. Similar rule goes for latex paint; it should be paired with latex primer. Probably you ever heard about mixing the prime and paint type. To be specific, people often use oil-based prime and latex paint.
Oil-based prime is favoured for its perfect stain cover and adhesion. It helps the colour to stand out. There is also one disadvantage; it has strong odor.
7. PAINT IT
Finally, it is time for painting. Depending on your paint type, you might have different painting timeline. In order to get best result, you should do multiple layers. With latex painting, you usually need at least three layers. You should allow each layer to dry for about six to eight hours. It takes less layer if you work with oil-based paint.
Generally, latex and oil-based are great for wood furniture. However, one is superior for indoor purpose, while the other is doing better for outdoor furniture. Latex paint is sold in different sheens; semi-gloss, enamel and sheen. Each option gives different look and suits indoor concept well. On the other hand, oil-based paint presents glossy finishing and could handle weather change outside the room.
Lately, many people fall for unique painting technique. It is called shabby chic. The concept is letting small parts of the furniture bared, showing the natural wood grain. If you are interested, you could try this trick as well. Purchase two tones of Chalky Finish for furniture. Apply them on the wood and wait until dry. Grab fine grade sandpaper and rub on several spots.
8. PROTECT THE PAINT
After the paint is dried, you still have one last job; applying finishing wax. This final layer will serve as outer protector. Dust and stain won’t directly stick on the paint. To apply the finishing wax, you need mini roller. You could also use linen cloth. Keep in mind that you only need thin layer. There is no need to double coat the surface. Apply the finishing wax on all surfaces.
Just like the paint, finishing wax should be dried. It is probably the longest time compared to the other process. Finishing wax will dry within 72 hours or 3 days. If you try to use it before finishing wax completely dries, then you will sit on sticky surface. Be patient and give it enough time to dry. Later, you could clean it easily.
If you find the tips about how to paint wood furniture black, here are some important things that you should remember.
Black wood furniture can give your home a modern and sophisticated look. It can also be very stylish and elegant. If you are thinking about painting your wood furniture black, there are a few things that you need to keep in mind.
First, you need to make sure that the furniture is made of real wood. If it is not, then you may want to consider painting it a different color.
Second, you need to make sure that the furniture is not too old. If it is, then the paint may not stick to the wood very well.
Finally, you need to make sure that the furniture is in good condition. If it is not, then you may want to consider refinishing it before you paint it.
Step by step on how to paint wood furniture black:
1. Choose the right type of paint. You will want to use latex or oil-based paint for your wood furniture.
2. Prepare the surface of the furniture. You will want to sand down the furniture so that the paint will have something to adhere to.
3. Apply a primer to the furniture. This will help the paint to stick to the furniture better.
4. Paint the furniture with black paint. You will want to use several coats of paint so that the color is even.
5. Allow the paint to dry completely before you use the furniture.
How to paint wood furniture black
How to Paint Wood Furniture White
After you know about how to paint wood furniture black, next, if you want your wood furniture painting with white, here are some steps to do that:
1. Decide what color white you want to use. You can use either a primer or paint that is already white. If you use a primer, it will be easier to achieve a consistent white coat on your furniture.
2. Apply the primer or paint to the furniture using a brush or roller. Make sure to evenly cover all sides of the furniture.
3. Allow the primer or paint to dry completely before proceeding to the next step.
4. Once the primer or paint is dry, you can start painting the furniture with your chosen color white. Again, make sure to evenly cover all sides of the furniture.
5. Allow the paint to dry completely before using or placing anything on top of the furniture.
With these steps, you can easily paint your wood furniture white. Just make sure to take your time and be patient while doing so. Good luck!
Your old cabinets look tired and you want to upgrade the interior look. This is the most common story of how the project begins. Rather than ordering new cabinets that can cost a lot of money, you should consider to give it a new paint. If you follow this step, how to paint wood cabinet, you can achieve a pro-like result.
How to paint wood cabinet
Phase 1: Select Your Paint Carefully
First, you need to select the right paint for the wooden cabinets. There are important factors to consider while choosing:
You need to purchase the right supplies. Make sure to understand your cabinet. Is it laminate or solid wood?
Wooden cabinets are commonly able to be painted. To make sure that the entire surface is eligible, try scuffing it. If you can do it on the surface, it can be painted.
Check on your cabinet condition. If it is a laminated, it needs to be in good condition for a perfect repainting result.
While any paint will work great in wooden cabinets, it is recommended to buy paint with higher quality. It is also suggested for you to buy only latex based acrylic paint for the easy to clean cabinets.
While consider about the finish, it is recommended to use satin or semi gloss. It doesn’t expose mistakes and dings but it is still easy to clean later.
Phase 2: Preparation
Repainting wooden cabinets will take days. It is important for you to plan accordingly so you can really finish this project.
On this phase of how to paint wood cabinet, use appropriate safety gears, make sure to remove the doors and drawers first, and work on a well ventilated area. Then, follow these steps:
Check on Your Cabinet Condition.
If the existing painting is in good condition, it can be repainted. If it is in bad condition, you need to remove the paint first using stripping products and plastic stripper. You also need to check if there is any of the cabinet doors that needs to be fully replaced.
Disassemble the Cabinet
Remove the drawers and doors, empty the cabinet, and remove the hardware too. Don’t forget to label them, from drawers to hardware, so you can put it back to its place later when you are finished.
Clean and Fix
Using TSP cleaner, remove remaining dirt and grease. You can also fill any holes on your cabinet using wood filler. Use the putty knife to flat the surface. Make sure not to cover the hardware holes.
Protect and Sanding
If you don’t remove the cabinet from the place, it is important to protect and cover the surroundings. Cover and protect the appliances and countertop. Use painter tape for the walls surrounding the cabinet too. When you are ready, you can start sanding all surface.
Surface Cleaning
When you are done sanding, remove the dust with vacuum cleaner as well as tack cloth.
Like in makeup, primer is an integral part of repainting the cabinet. You can’t skip this phase because you need to cover the imperfections while preparing a perfect surface for the new paint. Follow these steps of how to paint wood cabinet for easy primer application.
Working the Cabinet Frame
Make sure to apply even stroke from the inside out or from the back to the front. Use brush with appropriate size to reach each corner.
Try Mini Roller
Mini roller will come in handy when you need to apply primer in a rather large and flat surface. Work on one area at a time for best result.
Laying Off
Whenever you are done covering one area with primer, take a dry brush or roller and stroke it on the surface. It will remove any buildup you make previously.
Prime the Doors and Drawers
You should remove the label you add previously but keep them nearby to prevent confusion. Start with the back and wait until it is dry. Then, you can work on the front side. Pay attention to the details, and try your best to prevent the primer from feathering out on the edges or pooling in the corners.
For drawers, painting the front part is often enough to prevent it from getting too sticky into the cabinet frame later.
Phase 4: Paint the Wooden Cabinets
If you aren’t very experienced in this type of project, you should consider applying paint using roller and brush, and leave alone the sprayer. Follow these steps for painting the cabinet:
1. Start with the Frame
You can repeat the same technique you use for applying primer on this step. Use a good quality sponge for the roller and for brushes for best application. Don’t forget to layoff the area to remove any buildup for smooth result.
2. Work with the Doors and Drawers
Do the same technique. Start with the back of the door. Leave it to dry first. Then, you can continue with the front part.
3. Second Coat
Repeat the entire same technique to give your cabinet second layer of paint. It gives better and smoother look. Make sure to do this when the previous paint is already dry entirely.
Phase 5: Refinish the Hardware
If you decide to reuse the old hardware, you may want to refinish it as well. Here are the simple steps:
You need to wash the hardware. Use dish soap and warm water, then pat with dry cloth.
Using good grade of steel wool, scuff the hardware lightly.
To make it easier for you to work with the hardware, attach it on a cupboard.
Using a sprayer, apply the primer to the hardware.
Wait until it is dry.
Apply the first coat of paint using sprayer, leave it to dry.
Reapply the paint for second layer.
It is always better to apply multiple thin layers because it gets smaller chance to create buildup.
Phase 6: Reassemble the Cabinets
Using the label, reattach the cabinet doors, drawers, and hardware to its place. Work on one cabinet at a time to make sure each one is done perfectly. Now you know about how to paint wood cabinet like a pro.
Despite of the fierce competition between furniture materials, wood still keeps its charm. For this reason, many people still look for wood furniture. Many house owners treasure their wood items and try hard to make it last as long as possible. How to make wooden furniture more durable?
How to make wooden furniture more durable
DUSTING
Even though you rarely use the wood furniture, there is good chance for it to get dusty. The air that circulates inside the house might bring fine dust particle, which then drops on the wood surface. After some times, these dusts will pile up and pull blind on the wood shine.
Make sure to dust the wood surface at least three times per week. Also, pay attention to the cleaning item. Some of you might choose feather duster or soft cloth to prevent any scratch on the surface. While they serve this purpose, they merely move the dust to the air. Pick lamb-wool duster or terry cloth instead.
CLEANING SPILL IMMEDIATELY
Just because your wood furniture has been polished, it doesn’t mean that the furniture cannot be stained! Wood finish will improve the resistance of stain. However, letting the spill sits on the furniture for a long time is not recommended either. To keep the shine, it is suggested to clean the spill as soon as it drops on the surface.
What should you use to clean this spill? Wiping with bare hands still leave some tiny drops of water. Safest option would be a soft cloth dipped in warm and soapy water. Gently wipe the surface with spilled water. Repeat the process twice to make sure the water is cleaned properly.
If this simple solution is not enough, you could apply cleaning product. Be careful while reading the purpose of the product. Don’t play safe with all-purpose cleaning product. Spend some time to read the labels meticulously.
Put back any cleaning products containing ammonia or silicone. They will ruin the polish faster. Find products that are created specifically for wood and certain finishing. Even after applying this cleaning product, you still have to dab soapy water on the wood surface. Otherwise, the residue might pile up and call for another cleaning time.
SHIELDING FROM CHANGING WEATHER
One thing you will learn as the owner of wood furniture is the respond to weather. This is part of science, taught to you in middle school. When the weather gets too hot, the wood will expand. On the other hand, it goes smaller during cold season. With this constant change, wood would easily crack without any protection.
It is important to be able to control humidity. Inside the house, the ideal temperature should be around 60 to 80 degree while the humidity hangs between 30 to 45 percent. You should also think hard about the furniture placement. Avoid direct sun, as it will alter the chemical compound in finishing layer.
HOW TO MAKE WOODEN FURNITURE MORE DURABLE
REPAIRING QUICKLY
Unlike the other alternative materials, you could repair broken wood furniture many times before enlisting it for sale. Those who own sofa made from wood and fabric combination could replace the fabric three to five times before asking for new wood frame. It is possible as long as you don’t forget one important rule: repair any damage immediately!
RINGS
Do you ever find the culprit for several white rings on the wood surface? It is easy. Remember the last time you put hot or cold beverage on it? Both heat and cold could seep into the finishing layer. This is the source of your rings.
Thankfully, there are plenty remedies. You might try to heat the area with hair dryer. Still not working? Then apply car wax or toothpaste on the affected surface. Rub in circular motion while applying light pressure. Then, wipe with damp cloth.
INK STAIN
So, someone accidentally spill ink on your wood area. Easy, you could remove this trouble stain. For furniture without finishing layer, make a mix of water and baking soda. Rub the paste on the ink stained area only. For furniture with finishing layer, mix water and dish washing liquid. This solution works better.
CHEWING GUM
You need to look under the table or hidden corner to spot the chewed gum. It is sticky, dirty and definitely could ruin your wood furniture. Surely, the gum had stuck in that particular spot for a while before you notice. Remove as many gums as you can. For the residue, apply cold compress for ten minutes. Then, scrape with blunt object such as butter knife.
SCRATCH
Define your scratch first. Is it big or small? For small scratch, the best available option is marker or drawing pen. Bigger scratch could be covered with shoe polish or coffee ground. Pick either one and start working. Don’t forget to find the closest colour to the wood surface. Also, follow the scratch’s direction while applying the remedy.
PROVIDING COVER
From the previous explanation, you could conclude that wood furniture is the most vulnerable to stains. Thus, prevention steps are important. One thing you could do is providing covers. Wood table should have tablecloth, dining table should be covered in plastic layer, etc.
This step is particularly important during holiday season or gathering occasion. You never know what, when and who could spill something on the wood surface. The cover will prevent the spill to touch the wood surface directly, acting as barrier.
Not all of you buy new wood furniture. In many cases, second hand store has pretty items for cheap price. Who cloud resist such offer? If you belong to this group, then make sure to apply extra protection. Wood furniture sold in second hand store must have marks or scratch. Displaying them won’t be good.
You have two options; paint them or apply another finishing layer. Neither is hard work. Before you start the project, lightly sand the surface. It helps the wood furniture to absorb solution better. After applying paint or finishing layer, dry your furniture thoroughly. Now look at the result; isn’t is worth all the time and work?
How to make wood furniture more durable with extra protection. Image
Who don’t want a piece of wood furniture in their house? It is fancy, and never gets old. Since the wood is often used as vocal point, you don’t want it to look shabby. Sadly, many people often forget to ask the type of finishing for the wood furniture and how to clean wood furniture with vinegar to make it look new. Don’t worry, you still have time to catch up.
How to clean wood furniture with vinegar
Basic Knowledge
Cleaning is not everyone’s favorite job. For this reason, many people tend to do unnecessary mistakes while trying to clean up something. You want to be delicate while dealing with wood material. While it has sturdy forms, its surface is prone to stains. Unless you don’t mind the dull and blots, it is better to use proper tools.
When you go to cleaning item aisle in the market, find microfiber cloth. It absorbs water well yet has smooth surface. Using this cloth to clean up the wood will leave no scratch mark. Don’t just grab any used clothes unless you are sure that the fiber is soft enough.
Another thing; never take all-purpose cleaner to your shopping bag. It works only on wood surface covered by plastic. If you are not sure about the finishing, the all-purpose cleaner will not work well. You might also want to buy some furniture polish. It is essential to make your old wood new.
Cleaning Steps
How often do you clean your wood furniture? If you cannot remember well, then be ready to do all the steps needed for your wood furniture.
Dusting
To start your cleaning, dust of the wood furniture. You could pick one of the following options to do the job.
1. Feather Duster
It works perfectly well for delicate surface such as lampshade, picture frame and any other fragile items. You might want to feel the surface to check its smoothness. Frequently used feather duster might have some sharp cuts.
2. Used Clothes
If you notice that the dust layer is quite thick, then the best tool for dusting is used cloth. It could sweep all the dust layer smoothly. Apply slight pressure while cleaning. You could also dip it in water and wring it nicely before use.
3. Terry Towel
As the final stage in dusting steps, you want the wood surface to dry. Thus, having a terry towel on your hand will be handy.
Deep Cleaning
In some houses, wood furniture has a lot of functions. They are also exposed to constant temperature change. As the result, the wood surface might have more than dust on it. Make sure to perform deep cleaning routine.
Easiest homemade cleaner for grime would be oil soap and water. Mix them well. You could either dip cloth on the mixture or splash the mixture on the surface. Either way, you should clean and dry up immediately. If the surface is not cleaned up yet, you need stronger cleaner to help.
There is a commercial product made specifically to clean wood surface. Some of them are formulated to clean only solvent-based or oil-based residues. If possible, find one that could eliminate both. You could tell the difference; the liquid has milky texture and color. Resist the idea of applying linseed oil or white vinegar! They are calling for dusts.
Polishing
Now it is time to bring back the shine of your wood furniture. As mentioned before, you should grab one commercial polishing product. It helps to protect the wood furniture. There are two kinds of polishing; paste wax and liquid wax. It is easier to apply liquid wax, but you might need to apply it periodically. Paste wax last longer, but it depends on how well you apply the wax.
The rule of applying polish liquid is simple. You need to damp the cloth, not spraying the liquid on the surface. Then apply the polish in circular motion, starting from the edge. Repeat the process until all surface is covered. For perfect result, you could use lamb’s wool pad attached to power drill for final touch.
Freshening Up
You have done all the cleaning steps. Now you get a better-looking wood furniture. However, something smells and you cannot figure out why. Don’t worry, it is normal for vintage furniture. There are simple ways to fix these problems.
First, bring the furniture out in a warm day. Make sure it is not raining. Also, you cannot let direct sunlight shines on the wood. Put on some shades or better, just put the wood furniture on the terrace. If it doesn’t help, pour some talcum powder to absorb the funny smell. Rub it softly on the surface then clean up the powder.
The smell on your furniture might come from the drawer. To fix this, you could put charcoal briquettes inside the drawers. Make sure to pour them on top of a lid or plate.
How to Clean Wood Furniture With Vinegar
Using vinegar, you can clean your wood furniture and get rid of dirt, dust, and grime build-up quickly and easily. All you need is a cloth or sponge, some vinegar, and some water.
First, mix equal parts vinegar and water in a bowl. Then, dip your cloth or sponge into the mixture and wipe down your furniture.
For tough stains, you may need to scrub a bit harder. But be careful not to damage the finish on your furniture.
Once you’re finished cleaning, rinse the vinegar off with some clean water and dry your furniture with a soft cloth. And that’s it! Your wood furniture will be looking like new in no time.
Thanks to vinegar, cleaning wood furniture is now easier than ever. Try it for yourself and see!
Simple tips how to clean wood furniture with vinegar. Image
Cleaning Tips For Special Surfaces
Not all wood surface is made from real wood. Some of them are made rom fabricated materials. Of course, they need special treatment.
1. Laminate
In case you don’t know, laminate products are usually using 100% synthetic materials. You need to clean it on daily basis and also pay attention to its surface. The use of commercial cleaning product on laminate surface is 100% prohibited. It will leave stain you cannot remove. Moreover, these products tend to create layers on laminate furniture.
The best way to clean laminate products is using damp clothes dipped in warm water. Before you wipe down the surface, make sure that you already clean the surface from any debris. If you want your laminate products to last longer, don’t leave it under direct sunlight. This condition will make the color fades quickly.
2. Wood Veneer
You could buy wood furniture for cheap price if you choose wood veneer. It is not made from real wood; at least not all of them. The surface is thin wood. The rest is composed of particle board. Just like laminate furniture, it cannot stand heat and moisture. Make sure to install it on shady area.
It is also important to lay a cover on the surface. You are not suggested to use any chemical products to clean wood veneer. Stay safe by using warm fiber cloth to clean up the mess. To cover any scratch mark, you could apply wax or polishing product.
How to clean wood furniture with vinegar to make it look new
You had a brand new bathroom faucets white porcelain handles installed just several days ago. If the installation process, you don’t have to think about anything at least weeks ahead.
When time comes, a slight worry might cross your mind: how to maintain the handle? Is it good enough for your bathroom? Learning today will skip your worry later.
One thing separates this faucet from the others: combination of porcelain and base material such as chopper or nickel.
Buyers cannot take their eyes off it glamorous look and will immediately grab one for their bathroom. Also, you could pick a pair of sink and porcelain faucet to get balanced look.
2. Modern Construction
In the manual book, you will find the explanation about faucet construction. Since most porcelain faucet has double handle, you could expect either ceramic disc or compression valves.
Both has the best performance and durability. If you have the single hand one, probably it also has ceramic disc valve installed.
The ceramic disc valves are the latest technology for water flow inside a faucet.
It has two disks inside sealed cylinder which control the water flow when you switch the water temperature. There will be almost no leakage, thanks to the neoprene seals at the water inlets.
Regular Maintenance
It would be a big lie if you don’t see any gunk or debris on the faucet layer after a month passed. Before it turns into too much work, do regular cleaning at your own schedule.
1. Wipe Clean
Use a clean and soft cloth and dry up the porcelain handle. Avoid using steel or iron material to clean the faucet. It may break the outer layer and later on cut your hand.
2. Soap Cleaning
For cleaner and more hygiene check, once in a week or maximum once in a month, you need to rinse the spout and handle with soap solution.
Take a soft sponge or soft brush to clean the area. Don’t forget to pour water and dry up after rinsing. You don’t want a slippery handle, right?
3. Commercial Product
It is not fair if the porcelain is the only one that get proper maintenance. Since the handle is not made from 100% porcelain, you need to pay attention to the other material, too.
Once a while, spray the commercial product to the base material and wipe it clean with soft cloth.
Simple DIY Repair
You grab the handle and twist it more than ten times a day. No matter how tough the material is, the screw will get loose.
Find where the screw is installed, and use a wrench to tighten the grip. If it doesn’t help, then unplug the stem. Wrap the inside with pipe thread tape and put it back to its place.
Its elegant look and style is probably the first reason for you to install it on the sink with similar pattern. Who knows that there are more great reasons to admire it?
To get the beauty last for the longest period possible, don’t forget to maintain it. Also, do the bathroom faucets porcelain handles repair yourself when the screw loose.
Bathroom Faucets White Porcelain Handles
Bathroom faucets white porcelain handles are an easy and affordable way to update the look of your bathroom. It has a sleek and simple design that can give your bathroom a modern feel.
Plus, the white porcelain handles are easy to clean and will complement any bathroom décor. Installation is easy, and this product comes with a lifetime warranty.
So, if you’re looking for an easy and affordable way to update your bathroom, bathroom faucets white porcelain handles are the perfect solution.
If you want to find this product, just search for bathroom faucets white porcelain handles on your favorite search engine. You’ll be sure to find a style that fits your bathroom perfectly. So, don’t wait any longer, update your bathroom today with bathroom faucets white porcelain handles.
The tips for choosing bathroom faucets are:
Try to find a bathroom faucet that has the same finish as your bathroom fixtures. This will help to tie the look of your bathroom together and give it a more polished appearance.
Also, make sure to choose a bathroom faucet that is the right size for your sink. You don’t want a bathroom faucet that is too small or too big for your sink.
Another tip is to make sure that the bathroom faucet you choose has a lifetime warranty. This will help to protect your investment and ensure that you are getting a quality product.
When you are ready to purchase bathroom faucets white porcelain handles, keep these tips in mind to help you choose the perfect product for your bathroom.
Bathroom Faucets White Porcelain Handles. Image: Etsy
Originally posted 2022-09-26 01:13:00.
Manage Cookie Consent
To provide the best experiences, we use technologies like cookies to store and/or access device information. Consenting to these technologies will allow us to process data such as browsing behavior or unique IDs on this site. Not consenting or withdrawing consent, may adversely affect certain features and functions.
Functional
Always active
The technical storage or access is strictly necessary for the legitimate purpose of enabling the use of a specific service explicitly requested by the subscriber or user, or for the sole purpose of carrying out the transmission of a communication over an electronic communications network.
Preferences
The technical storage or access is necessary for the legitimate purpose of storing preferences that are not requested by the subscriber or user.
Statistics
The technical storage or access that is used exclusively for statistical purposes.The technical storage or access that is used exclusively for anonymous statistical purposes. Without a subpoena, voluntary compliance on the part of your Internet Service Provider, or additional records from a third party, information stored or retrieved for this purpose alone cannot usually be used to identify you.
Marketing
The technical storage or access is required to create user profiles to send advertising, or to track the user on a website or across several websites for similar marketing purposes.