Tag: Decor and design

  • 10 Most Popular Bathroom Vanity Mirrors Ideas

    10 Most Popular Bathroom Vanity Mirrors Ideas

    Bathroom is the second personal space after bedroom. No wonder, most people always try their best to decorate the bathroom, either by redecorating or renovating it.

    Luckily, you could get drastic look only by changing the mirror style. This focal point of the bathroom could refresh the whole atmosphere with its fancy look.

    MOST POPULAR BATHROOM VANITY MIRROR IDEAS

    1. Minimalist Twins

    Keep things clean and minimalistic but elegant and classy with double mirror. Grab two identical size mirrors and paint the edges with black color.

    Hang them above the sink, just a few inches above the faucet. It works best with plain or brick background.

    2. Wood Frame

    Bring a little bit of nature inside your house. It doesn’t have to be a pot of plant, but a wood framed mirror.

    Leaving the frame unfinished will highlight its natural look. Remember not to choose the oversize one for small sink: it will over power the bathroom.

    3. Fancy Round Mirror

    If you want to give contemporary look, find one round mirror with thin wood frame. The frame is narrow on the top and getting wider on the bottom.

    The space on the bottom could be functioned as personal item’s storage. Arrange the lamp to hang right on top of the mirror for blazing effect.

    4. Arch Model

    It is okay to add a touch of luxury to a simple bathroom. The arch model will create accent to the bathroom with it curves and edges.

    Try to coordinate the color with the wall. If you have marbling floor tile, then you need a glossy paint to paint the mirror frame.

    5. Venetian Style

    Mirror belongs to wall decoration, which should also serve the art purpose. Made mostly by metallic material, there is nothing more enchanting than the unique pattern on its round frame.

    On the top of the mirror, you can see the leaf-like crown, polishing its elegance.

    6. Glitwood Mirror

    Now you can be the emperor in your own house; at least in the bathroom. Try to hang the glitwood mirror above your sink.

    See how the glistening color and carved pattern amazed you. This type of mirror is suitable for those who love vintage concept.

    7. French Mirror

    Another choice for antique style is the French mirror. It has golden frame and look like a pillar. You will love how it hangs on the wall and gives off the enchanting vibe.

    8. American Tramp Frame

    If you rely heavily to the mirror as the only decoration in the bathroom, then grab the American tramp frame and nail it on your wall. It has three lines on the edges and twist in the middle.

    9. Silver Leaf

    White colored wall fits well with almost all colors, no exception for the silver leaf framed mirror. Instead of nailing the mirror to the wall, you could hang the mirror with rustic chain from the ceiling. It will entice the new look.

    10. Art Mirror

    You want something classic and artistic in one mirror? Don’t worry about it, you have your wish covered. A round mirror with a crown like decoration starting from half to above will be perfect.

    Allow yourself to relax with a refreshing bath and get energized when you look at yourself in the mirror. A plain reflector will not help much: probably it is time to redecorate. Pick something fun and exciting from the list and see how it could brighten your day. Start your decorating plan carefully, but start from the most important first: mirror.

    Originally posted 2020-01-07 07:10:43.

  • Reasons to Choose Bathroom Vanity With Glass Top

    Reasons to Choose Bathroom Vanity With Glass Top

    When you say you are going to purchase a bathroom vanity, you already find a lot of choices.

    Among them, glass top vanity recently gains the attention in the market.

    Why don’t you learn more about the popular products? It might be just the perfect item you need for the bathroom.

    THE REASON WHY USING BATHROOM VANITY WITH GLASS TOP

    1. Tempered Vs Laminated Glass

    There are two types of glass that commonly used as a part of furniture: tempered and laminated. Each of them is made through different process, thus presenting material with different quality and purpose.

    It will explain why most manufacturers prefer to use laminated glass then the tempered one.

    Tempered glass is obviously stronger, approximately five to ten times than the standard glass. It could hold more weight on the surface and not easily scratched.

    The outer layer gets compression, while the middle layer is being tensed. As the result, tempered glass will break into sandy crumb than sharp pieces.

    On the other side, laminated glass has two glass pressed into one. Even if the glass break, it will not scatter into pointy pieces.

    The glass will stay together in the frame instead, assuring you and your family’s safety. If a thief try to remove this glass from your door, he will make a lot of noises and wake you up.

    White bathroom vanity with glass top

    Read also: How to make your own bathroom vanities without tops

    2. Why People Love It

    Glass is generally known as the fragile item. For this reason only, people turn their head when seeing a glass top vanity. Fortunately, the one made for bathroom purpose has more advantages you might not know yet:

    • Sturdy

    Manufacturers have produced a tempered glass that will not break easily. Unless you give worst treatment, no need to worry about broken glass.

    If the member of the house is mostly adult, then glass top would be the best choice you can make.

    • Glamorous

    There are a lot of eye catching colors and pattern you can choose for a glass top: semi opaque, transparent, high gloss, leather-like, etc.

    You could also find classic and soft color on the display. Pick the one that coordinates well with your bathroom interior.

    As the manufacturing technology develops, the appearance is sometimes better than a tile. Surprisingly, some items are almost as similar as the natural stone or granite.

    • Quality

    There are five best materials for vanity top counter: tile, laminated glass, solid, granite and quartz top. In the list, glass is entitled as the good to better material, having an upper hand than tile.

    • Easy Maintenance

    When you ask about cleaning, there is no better material than laminated glass. Even when you leave the water or lotion spill on it, a spray of cleaning product will be enough to wipe the stain.

    Dust and debris cannot stick on its surface, either. In short, this item requires very low maintenance compared to the other materials.

    Nowadays many people pick glass top for their bathroom vanity. Besides from the quality, its price and maintenance add some good points of this product.

    In addition, one variation of colors and patterns should fit into your taste. If the mentioned facts could meet your criteria, there is no need to resist the quality of glass top, right?

    Black bathroom vanity with glass top

    Originally posted 2020-01-06 15:23:30.

  • 5 Benefits of Outdoor Porch Shades and Blinds

    5 Benefits of Outdoor Porch Shades and Blinds

    Owning outdoor blind and shade are very beneficial for those who love to spend their time outdoor.

    If you are about to install a porch shade, then you can also consider installing a blind to compliment the porch shade.

    So, what are the advantages of porch shade and blind for you and your surrounding? Then, check these following explanations.

    WHY USING OUTDOOR PORCH SHADES AND BLINDS

    1. Energy Savings

    The first benefit of outdoor shade and blind is that it provides energy savings. You can find that the use of air conditioning costs will decrease frequently as you own outdoor shade and blind. The percentage of energy saving can be huge. In some cases, it can be more than 50%.

    Porch shades and blinds

    Read also: Tips for maintaining quality outside porch sun shades

    2. Comfort

    You can also find comfort when you are enjoying your time on your porch. This comfy feeling is achieved if you install a blind as well to your porch shade.

    Therefore, the sun will be blocked to a certain percentage depending on your preference, then you should be cooler.

    Moreover, glare may also become less of an issue as you choose a bamboo or woven fabric for your porch shade and blind materials. You will still have good air circulation, though.

    3. Furnishing Protection

    The porch shade and blind will decrease the damaging sun rays, or in other words, the scorching sunlight will be limited. Besides, you can also find that the furnishings of your porch shade and blind last longer.

    If you choose quality porch shade and blind, there won’t be as much fabric deterioration. So, colors should remain vibrant and brighter for longer.

    However, darker colors are often more effective when speaking of reducing glare and keeping heat out. Besides, you can experience better visibility to the outdoor view with darker shades as well.

    4. Atmosphere

    The atmosphere provided by your porch shade and blind will also play important role. Therefore, it will be more beneficial to your surrounding if you choose the atmosphere you desire.

    You can play with colors and textures. Perhaps you like natural wood look or you prefer an airy and light feel of sophistication.

    Another option for the atmosphere is bright colors and patterns to give your porch shade and blind more attractive look.

    You will find your own preference if you are eager to take your time choosing the matching texture and colors for your porch shade and blind.

    However, if you can afford something more expensive, then Sunsetter Awnings may be your choice.

    5. Privacy

    How about getting your own privacy while still being able to enjoy the view? This can be done by owning porch shade and blind.

    The blind has function to provide you with some privacy and you can adjust the levels of openness, so you don’t have to worry about the privacy levels.

    In conclusion, there are many benefits by owning porch shade and blind. They provide you with many things including privacy, comfort, protection, energy savings, and even the look of your surrounding.

    Always keep in mind that outdoor porch blind and shade make a good match when it comes to make you feel more enjoyable on your porch.

    Exterior porch shades and blinds

    Originally posted 2020-01-04 02:34:55.

  • Why Choosing Outside Bamboo Blinds?

    Why Choosing Outside Bamboo Blinds?

    Enjoying your afternoon on porch could be a little bit overwhelming when you have too much lights on your table.

    You need something to block the lights without skipping the exotic view. For this case, people usually install a blind on the ceiling.

    Since you share similar problem, why don’t you try this option?

    THE REASON WHY USING OUTSIDE BAMBOO BLINDS

    Bamboo Roman Shade Vs Blinds

    When you first see it, you might not know which is which. Both are made from dried bamboo, with almost similar choice of colors: tan, light brown to golden hue.

    If you take a look at it closely, roman shades take bamboo as its frame, while the whole structure is covered by soft bamboo fiber. It is usually installed inside the house: on the window to be exact.

    Bamboo roman shades allow the sun light to pass. Bamboo blinds, on the other hand, is composed from several thin bamboo layers. It completely blocks the light, but you can adjust its height by pulling the attached strings.

    Read also: How to install outside mount blinds with window trim

    The Reasons to Choose Bamboo Blinds

    There is no need to explain the reason if you are a nature and DIY person. For those who need convincing logic, the following facts might be some in the list.

    • Green Choice

    A bamboo plant is easy to get. It is quite durable if you consider the fact that it is a natural product. Also, the plant will regrow the other bamboo shoots that will grow tall in no time.

    • Cheap Price

    You could buy the raw material and the finished product in the store for quite low price. This way, you will have more time to save money. Thus, planning for your big renovation project.

    • Easy Installation

    You don’t need luxurious tool to start the installation. The standard tools like hammer and nails will do. You just need to make sure the roll is not in the frontier.

    • Simple Maintenance

    Don’t forget about this point. You could brag about those hundred dollars items, but you could only sigh when the care cost too much. Bamboo blinds only need simple dusting or occasional wiping.

    Porch bamboo roll up blinds

    Tips To Buy the Blinds

    Before you grab your jacket and head to the nearest store, you need one last thing: tips to choose the best product. Since a lot of manufacturers offer different prices for one item, some must have the top hand. Learn how you could tell the difference.

    • Durability

    Check the weather in your area for the whole year. Make sure you buy the one that could stand the whole year. Some brands should be unmounted during winter.

    • Installation Area

    Read the manual or ask the staff where the blinds should be installed. Several blinds factories set their products to be installed on screened porch. It must be a burden if don’t have the screened porch yet.

    • Weather Resistant Rail And Pulley

    You are looking for outdoor stuff, so don’t forget to ask for the weather resistant products. For rail products, pick the one with treated tropical hardwood label. For the pulley, ask for the one made from combination of nylon plastic and brass.

    Among all choices, you could say that bamboo blinds is almost perfect. It accommodates more than half of of great items criteria: affordable price, easy installation, nature friendly, and easy operation. Not to mention, its color and shape that could fit almost any porch exterior. What more could you ask?.

    Porch blinds bamboo

    Originally posted 2020-01-02 02:57:30.

  • 4 Porch Glider Plans

    4 Porch Glider Plans

    Some people need a relaxation spot in their house, and they choose porch glider. Glider is different with swing; it is a bench that is mostly found in garden, yard, or park.

    More than just a bench, it is suspended from the base by a pair of arm-like brackets. There are many plans that you can choose for your porch glider.

    Here is a list of porch glider designs plans that may be suitable for yours.

    Read also: Porch Glider Swings.

    1. Freestanding Arbor Swing

    Freestanding Arbor Swing

    Freestanding arbor swing can be considered for the porch that does not have the structure for a porch swing. You can place the freestanding arbor swing in your yard.

    However, you should consider the shade, sun, placement and space that you will be set for swinging. To have the freestanding arbor swings, you need hoe, ladder, power auger, 4×4 posts, carriage bolts, and nuts.

    Here are the steps for making freestanding arbor swing.

    1. Dig deep holes for each post. Make sure that each post can be put well in each hole.
    2. Fill the surrounding of the hole with concrete until its level is the same with the ground.
    3. After the concrete is dry, measure each post then make sure that the posts levels are similar with each other. Then, cut the posts based on the mark.
    4. Set the crossbeams by leveling it to the top of the posts. You have to make sure that the levels of the beams are similar and lined up. Repeat this step for the other crossbeams. Then, place the trim vertical to the beams.
    5. Add swing supports and hardware.
    6. Measure and cut the lumber for the swing seat.

    2. Hanging Porch Swing

    Hanging porch swing bed

    Hanging porch swing is very familiar glider that most people use. It has the classic taste which is suitable for up to two people.

    It practically hangs on the ceiling or its frame. Today, this design is wildly adapted to a more revolutionized design with certain level of sophistication.

    You can actually get the same kind of glider on many styles from classic to extra modern. Added with cushioned seat, it is a perfect piece for relaxation.

    3. Fancy Swing Structure with Trellis for Flowers

    Porch or outdoor garden Fancy swing with with Trellis for Flowers

    This kind of glider has the magical feeling that makes you feel like it is the best place to spend your time with. It gives you a real touch of the outdoor while remains aesthetic.

    It will take a long time to make it by yourself because you need a lot of things to be done with.

    For instance, you need the pattern and you have to deal with paintbrush which is hard to deal with. It is better to order or buy one.

    4. The Four-Seater Canopied Glider

    Outdoor glider with canopy for 4

    This plan may have high cost because you need to pay at least more than $1,000 to have this kind of porch glider.

    However, it may worth the price because it can accommodate more than one people with even all the members of a small family in it.

    All those four glider plans may be your options in choosing the glider for your porch. Make sure that you have the space and make sure that you choose based on your needs and preference.

    MOST POPULAR PORCH GLIDER PLANS

    Originally posted 2019-12-31 01:14:07.

  • 3 Recommended Porch Gate Ideas

    3 Recommended Porch Gate Ideas

    Adding gate to porch always becomes a challenge for all house owners. It will cost you some money but once you get the right design or idea, it will really worth it.

    Some house owners like to add gate to their porch for some reasons. Different reasons can lead you to different ideas.

    Hence, here are some gate ideas that you may try in your porch.

    Read also: How to Build Porch Gate for Dogs.

    DO YOU WANT TO BUILD PORCH GATE. YOU SHOULD KNOW THESE PORCH GATE TYPES

    1. Babies Gate Porch

    The first gate ideas that you may try is a babies’ gate porch. This kind of gate will really useful for all house owners who have babies.

    Wood is the best material you can use in building the gate. Build the gate at the spot where your babies like the most. Keep your baby safe by building special gate for them.

    Outdoor baby gate for porch

    The specific size of the gate will absolutely up to you since it will depend on the placement and how much baby you have. Don’t forget to add any latches to your gate to keep it safer.

    Adding the latches will minimize the possibilities for your babies to jump out from your porch without your control and permission. Always lock your gate whenever your babies are playing in the porch.

    See also: How to Maintain Front Porch Gate.

    2. Pets Gate Porch

    This next porch idea actually has the same concept with the previous one. The difference is this time you are going to build the gate for your pets.

    Building gate for your pets will be more flexible then building the gate for your babies. Start from the size, it will normally smaller than babies gate since you probably own any cats or dogs in your house. This kind of gate will also help you train your pets.

    Pet gate for porch

    You can teach or command them to always go in and go out through the gate. Make them get used to the gate which is specially built for them.

    Giving them routine such command will inure them to good and controlled habit. Since every pet may have different type of gate, make sure you really understand how active and how big your pets are.

    3. Sliding Gate Porch

    Another recommended idea sliding gate porch. This kind of porch offers you a different way in operating and maintaining your porch. Using sliding gate will give you flexibility since it can be useful for both your babies and pets.

    Sliding gate for porch

    Build the gate with proper size which will guarantee you safety for your babies. Make sure that the gate is higher than them to keep them safe in your porch.

    So does with the pets the sliding gate must be higher than them. Don’t create too many space or cavity on the gate to prevent your pets from easily getting out and getting in.

    Read also: How to Build Porch Gate for Dogs.

    There are actually so many designs of porch gate ideas that you can use. But if you are looking for ideas that will functionally work as gate, then those three ideas will be the top of the list. Then if you are done applying those ideas, you can freely add any decor you like on the gate.

    Originally posted 2019-12-20 01:09:05.

  • Elevate Your Space: Dive Deep into Terracotta Living Room Decor

    Elevate Your Space: Dive Deep into Terracotta Living Room Decor

    Terracotta, a name derived from the Italian words “terra” and “cotta” meaning “baked earth,” has been a staple in design and architecture for centuries. Its warm, earthy hues and natural texture evoke feelings of coziness and comfort. But, how do you incorporate this timeless material into your living room decor? 🤔 Let’s embark on a journey to discover the magic of terracotta living room decor and how it can transform your space into a warm and inviting haven.

    How to Create  Terracotta Living Room Decor

    🌟 The Magic of Terracotta in Living Room Decor

    Terracotta, often seen in pottery and tiles, is a natural clay-based material. Its rich, warm hue adds depth and character to any space. In living room decor, terracotta serves as a neutral base, which means it can be paired with various colors and styles.

    Why choose terracotta?

    1. Natural Vibes: Terracotta brings a touch of nature into your living room. Its organic texture and color are reminiscent of the earth, making it perfect for creating a grounded atmosphere.
    2. Versatility: From rustic to contemporary, terracotta seamlessly fits into a variety of design aesthetics.
    3. Warmth: Its warm undertones make any space feel cozy and inviting, which is perfect for a living room where relaxation and comfort are key.

    🎨 Pairing Terracotta with Other Colors

    When it comes to color pairings, terracotta is surprisingly versatile. Here are some colors that go beautifully with terracotta:

    ColorDescription
    IvoryA soft, neutral shade that complements the warmth of terracotta.
    Deep GreensThe lushness of green contrasts beautifully with terracotta’s earthiness.
    Soft BluesA calm and serene shade that balances the warmth of terracotta.
    Burnt OrangesA bolder choice, enhancing the richness of terracotta.

    Important Note: When pairing terracotta with other colors, it’s essential to maintain balance. Avoid overwhelming the space with too many vibrant hues.

    🛋️ Terracotta Furniture Choices

    Sofas and Chairs: Terracotta-colored sofas or chairs can be the centerpiece of your living room. Choose fabrics like velvet or linen to add texture.

    Coffee Tables: Opt for a terracotta-tiled coffee table or one with a terracotta base. It serves as a functional piece while enhancing the room’s aesthetic.

    Shelves: Wooden shelves with terracotta accents or backdrops can add a touch of warmth and character to your living room.

    🖼️ Terracotta-Themed Wall Decor

    Walls provide a blank canvas to showcase the beauty of terracotta.

    Wall Paint: A terracotta accent wall can be a striking addition. If you’re not ready to commit to painting a whole wall, consider terracotta-patterned wallpaper.

    Art Pieces: Look for artwork that incorporates terracotta hues. Abstract pieces or landscapes can add depth to your decor.

    Wall Hangings: Terracotta-hued tapestries or wall hangings with earthy patterns can be a stunning addition.

    🌱 Adding Greenery to Your Terracotta Living Room

    Plants and terracotta are a match made in heaven! 🌿

    Potted Plants: Use terracotta pots for your indoor plants. They provide a natural and organic look.

    Hanging Planters: Terracotta hanging planters are both functional and decorative. They add levels to your living room decor.

    Plant Stands: Wooden or metal stands with terracotta pots can be strategically placed to enhance the beauty of your living space.

    🌟 Final Thoughts on Terracotta Living Room Decor

    Embracing terracotta in your living room decor is about more than just following a trend. It’s about creating a space that resonates warmth, comfort, and timeless beauty. Whether you choose to incorporate terracotta through furniture, walls, or accessories, the key is to blend it harmoniously with other elements in the room. So, the next time you think of revamping your living room, remember the magic of terracotta and let it guide your design choices.

    Remember, home decor is an expression of your personal style. Let terracotta inspire you, but always add your unique touch to make the space truly yours. Happy decorating! 🎉

    Originally posted 2023-10-17 02:17:01.

  • DIY Stone Porch Posts Wraps

    DIY Stone Porch Posts Wraps

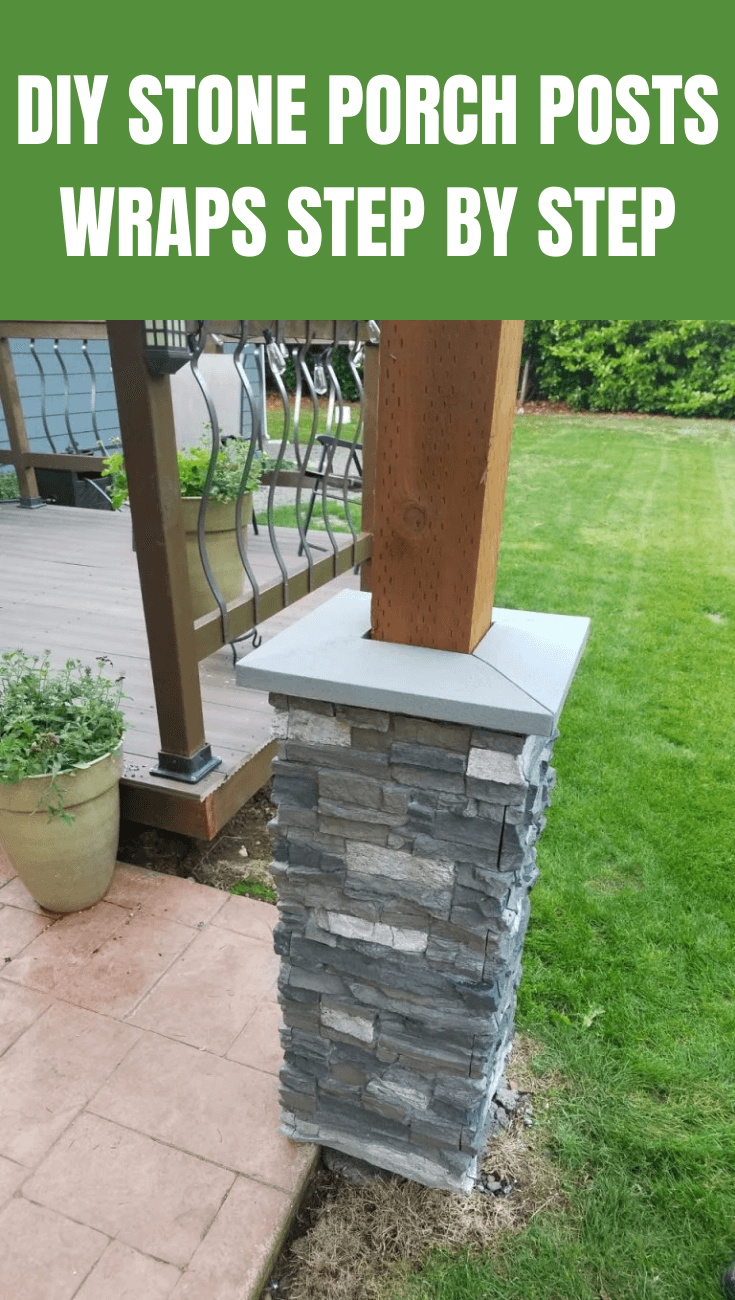
    How do you like the look of your porch? Plain PVC will show its boring view sooner or later.

    Plan your new project to decorate your porch without replacing the whole posts.

    It could be done by creating a faux stone base on your installed posts. Learn the steps to do it.

    See also: Small Front Porch Decorating Ideas.

    DIY STONE PORCH POSTS WRAPS STEP BY STEP

    1. Preparing the Base

    The first thing to do is to cover the base with plywood, setting the shape of the stone base. Add two layers of ply tar paper around the plywood.

    The mortar could not attach well on the ply wood, because it could expand and shrink due to the changing temperature. You will also need a sheet of metal lathe.

    It helps the stone to stick tightly to the frame. The ridges side should face to the tar paper and overlap around 4 inches on the horizontal beam. Nail it to the plywood so it will stay on position.

    2. Coating with Mortar

    The next awaiting job is applying the mortar. While preparing the mortar, it is better to add minimum water, since you can always add more later.

    Cake up the base with mortar and tidy up the surface with whisk broom. The wavy and rough surface helps the stone to stick better.

    If you have problem with frosting mortar, use finishing trowel and mason trowel to break the frost. Defrost from the inside, then go with circular motion to the outer side. It needs at least two hours to dry again.

    Contemporary cedar porch post wraps
    Image: houzz.com

    3. Placing the Stones

    Here it comes the fun part: arranging the stones. You need to start with the corner. Fill up the back of the stone with mortar and set it on its place immediately.

    Hold it while fixing its place for around five to ten seconds to get proper adhesion. Repeat the same process for each corner.

    Then, you move to the center stone. Set some stones on their places and fill the gap with mortar. If needed, you could use hammer to cut the stones to get the proper size.

    Step back and see the final result. Scrape down the excessive mortar with sharp object. If you need to do more trimming on the corner stone, do it with a saw. Remember, you need flat surface on the top.

    4. Setting the Top Beam

    The last step is to create the top beam of the stone base. You need to cut the stone to 45 degree angle by using a cut-off saw.

    Lay a thick mortar bed on the top and place the capstones. Make sure to slightly bend the stone, so water can run off. Bring together the corner with mortar, starting from the bottom to the top.

    Proceed by filling the gap with mortar. Leave no space between the capstone and the pillar. Otherwise, the water could slip in and break the bond. Get ready to change the face of your standard porch. Call for help and mark a day in your calendar to finish this project.

    With cut stones and mortar, you will do the projects. Follow the instruction above carefully and minimize the errors. Get a fancier style with minimum cost!.

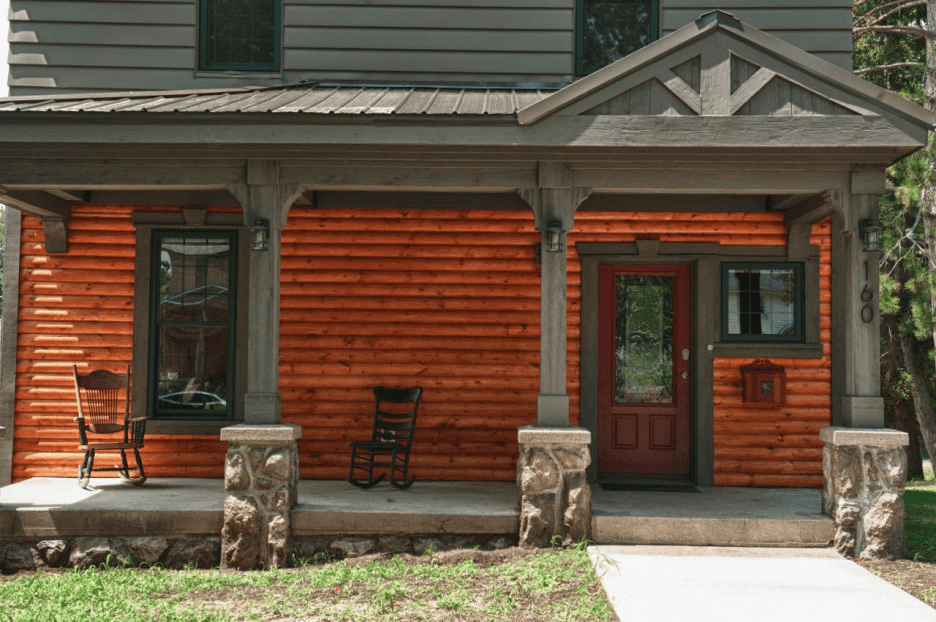
    Rustic wooden brown front porch column wraps

    Originally posted 2019-12-15 05:18:32.

  • Front Porch Column Brackets

    Front Porch Column Brackets

    Looking for something that can spice up your porch column? Stop yourself from total renovation; small decoration like a bracket could make things different.

    It is obviously far more affordable than conducting a renovation. Hands up if you like the idea! Now it is time to learn a little bit more about this item.

    Read also: How to Build Front Porch Columns using Wooden Material.

    WHY USING FRONT PORCH COLUMN BRACKETS

    Bracket vs Corbel

    Both items may come up together when you type their name on search engine. However, these two are not similar in and appearance. Its function, on the other hand, is similar. Both are made for decoration inside the room, outdoor and under the furniture.

    Corbel is usually made from stone, wood, or brick. It looks like supporting the cornice with its thick appearance. You usually find this on a large building or under the kitchen table.

    Bracket has slight different material base: wood, timber, or polyurethane. It could be found almost anywhere: window, porch, under the shelf, etc. Some creative people could even make a simple book end by using this bracket.

    Standard Types of Bracket

    Typically, the function of a bracket is to decorate the structure of a building. There are several decorative options to fill the space between the support and roof, creating an enchanting visual of the porch.

    1. Post Face

    This style fits to the house with flat and protruding top. After the installation, you will see a part of the bracket is holding the top.

    Some styles of the post face are Kirby, Cupid Key, Ruffled Swan, Meredith, Bailey and Jasmine. If you prefer customized size, discuss it with the staff.

    2. Victorian Style

    As mentioned in its name, the Victorian bracket is copying the style of its era. Some give it a nickname Gingerbread due to the habit of using gingerbread as decoration at that period.

    Thus, it created the beauty of scroll look on Victorian bracket. Some owners could even slip their name between the scrolls.

    3. Fan Bracket

    Just like how you read it, you will know it when you see it. The shape resembles a fan, with variations on the inner frame only.

    Three most popular variations are Ball, Spool and Spindle fan brackets. People add it in the corner or the porch column, or sometimes in the middle of the porch, creating half circle.

    Wooden Victorian Style Front Porch Column Brackets
    Image: hgtv.com

    Combined Brackets

    A bracket in the corner of the porch is not enough for you? Then you could take a look at the other options. They combine the bracket with something charming.

    1. Porch Spandrels

    It has the look of a railing, but up hanging on the ceiling. Some prefer to install Spandrels in the center without fretwork.

    If you have tall column, the bracket is installed under the Spandrels to shorten the gap from the floor. For those houses with narrow top, the Spandrels is installed next to the bracket.

    2. Running Trim

    The running trim connects columns. It has three basic shapes: rounded, edgy, and wavy. Two materials are available for this style: wood PVC and Polyurethane.

    Bracket is the cheap option to decorate your front porch. Even if it is quite affordable, the final result is not shabby at all. Moreover, you have more than a dozen of bracket choices in the list. If you want, you could also switch your pattern each year. Go and find your style!.

    White Artistic Victorian porch spandrels

    Front Porch Image Gallery:

    Originally posted 2019-12-14 00:04:39.