Category: Kitchen

  • Choose Your Kitchen Cabinet Toe Kick Ideas

    Choose Your Kitchen Cabinet Toe Kick Ideas

    As a part of cabinet, you just cannot ignore the toe kick of your cabinet.

    Even it is placed down there and not really noticeable as the cabinet surface, the toe kick of your cabinet takes some important part in keeping your stuffs.

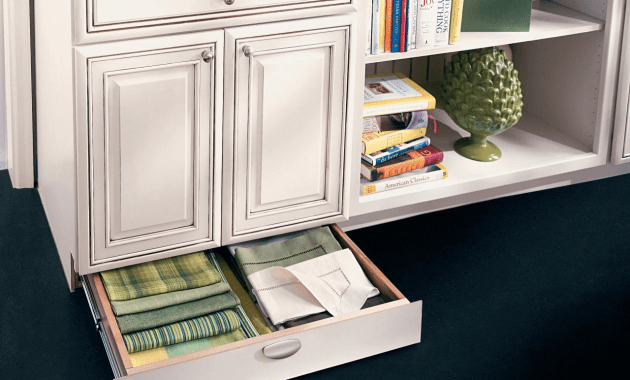
    When your cabinet is already full, you can move all things to the toe kick.

    Here are some toe kick designs that you can choose.

    Read also: How to Match Kitchen Cabinet Countertops and Flooring Combinations.

    BEST IDEAS TO CHOOSE KITCHEN CABINET TOE KICK

    1. Colorful Toe Kick

    To start the list, you can try to apply a colorful toe kick. Paint your cabinet toe kick with bright and shining color to cheer your kitchen. Yellow or blue can be the right color if you want to apply colorful toe kick.

    One thing you should note if you want to try this style is this style might only match with kitchen on dominant plain colors. It means that you cannot freely apply this style to all kitchens. It is better not to use this style if you already have specific theme about your kitchen.

    2. Black Toe Kick

    Going more specific about color, you can simply apply total black toe kick. Bring the dark island nuance with the strong black stripe at the bottom of your cabinet.

    Add more height to bring stronger nuance. More than bringing dark island nuance, the black stripe will also create nice proportion of a very tall room.

    3. Black and White Toe Kick

    Still discussing about color, this time you can bring the combination of black and white in your kitchen. It will be great when you wrap it up from the floor.

    So, it will be black and white checkered tile. Paint your color as well as your toe kick to create a chess atmosphere inside your kitchen.

    White kitchen cabinet toe kick ideas design

    4. Wood Toe Kick

    This kind of toe kick is probably can match with any kind of kitchen design, but it will be better if it is applied in a rustic theme kitchen. The wood itself will bring a warm touch to your kitchen.

    To add more prominence, you can increase the height of the wood toe kick, but you might lose some inches of your lower cabinet.

    5. Mirrored Toe Kick

    If you want to add some luxury touch, you can try to apply mirrored toe kick. This kind of toe kick will match well with any kind of kitchen design. A luxury look is guaranteed.

    6. Coffee Toe Kick

    For the last one, you can try to combine white and brown color, as it will look like a coffee shop. This style is more suitable to be applied when you use wood as your main material of the cabinet. This doesn’t only look warm, it looks stylish and young at the same time too.

    Brown kitchen cabinets toe kick

    Read also: Most Popular Kitchen Cabinet Door Design.

    Some people usually do not give enough attention to their cabinet toe kick as they can put all things inside the cabinet. Once the cabinet is full, toe kick can be very useful in keeping some small kitchen staffs. Therefore, it is not too late to design your toe kick as good as possible.

    Other kitchen cabinet design ideas:

    Originally posted 2019-09-19 02:47:31.

  • Designing Your Kitchen Cabinet Liner Ideas

    Designing Your Kitchen Cabinet Liner Ideas

    For the sake of look, people usually like to apply liner to their kitchen cabinet. Applying kitchen cabinet liner also prevents you from spending much money for designing expensive cabinet stuffs.

    More than that, cabinet liner is also safer since it also prevents you from direct contact with your cabinet material.

    If you are about to use cabinet liner, here are some choices of kitchen cabinet liner you should consider.

    MOST POPULAR KITCHEN CABINET LINER DESIGN IDEAS

    1. Laminate Squares

    Local dollar stores usually provide an economical liner which is durable for your kitchen cabinets. It is also supported by adhesive-backed to stick the liner to your cabinet. The good thing is this liner can also be applied to floor.

    The material of laminate squares are very easy to cut with cutter or scissor and it requires simple application. This liner also easily cleans with wet rag whenever you need it.

    It will be very easy to match with your kitchen décor since this liner comes in so many choices of color. The best part is even though this liner can be removed easily, it will last for years.

    2. Plastic Canvas

    When the first time you hear that plastic canvas can be used for liner, you will find it hard to believe it. The fact is some people already use it as their kitchen cabinet liner and everything is going well. Plastic canvas will give you all convenient that you might not predict before.

    The first one is you will find yourself convenient in measuring and cutting this plastic canvas. It is really simple to execute it.

    Plastic canvas is also available in several colors, which will look good for your kitchen cabinets. It will keep everything off when all crumbs fall through spaces.

    The second one is plastic canvas and it is really easy to wash. Even though it will last forever, it does not cost too much since plastic canvas is cheap. It is available at any craft store and you can buy it for packs or one sheet only.

    Kitchen cabinet gallery

    3. Linoleum

    Another material that is easy to clean up is linoleum. Lining your sink base cabinet with linoleum will give you advantage in cleaning it.

    You will no longer have to deal with any complicated installation since it can be removed and cleaned up easily. Some people even prefer to apply linoleum inside their cabinets instead of shelf paper because of its simplicity.

    4. Non Adhesive-Backed

    For some cases, people also prefer to apply non adhesive-backed liner, especially when you use your cabinet for keeping medicine. Your cabinet needs to keep sterile, so non adhesive-backed liner is more recommended.

    This kind of liner will also match well with wooden cabinet. You can freely remove and clean the liner whenever it needs to be cleaned up.

    Read also: How to Remove Mold from Kitchen Cabinet.

    Using a cabinet liner is not only about making it looks good, but also about its cleanness. Liner will also keep all things inside the cabinet from dust. Start applying liner to make your cabinet cleaner.

    Kitchen cabinet liners ideas

    Originally posted 2019-09-18 04:34:32.

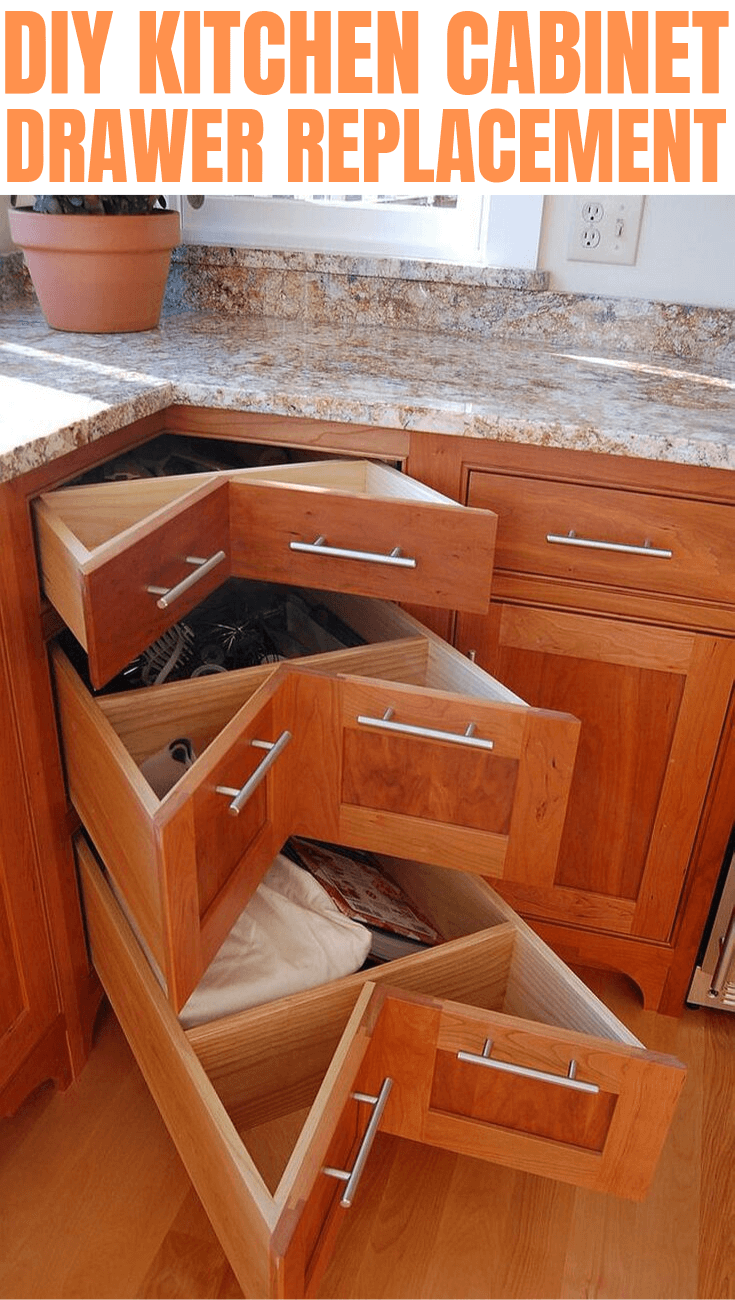
  • DIY Kitchen Cabinets Drawers Replacement

    DIY Kitchen Cabinets Drawers Replacement

    Kitchen cabinets and its drawers need to be in good condition all the time since we use it to keep all kitchen equipment.

    When there is something wrong happen to your cabinet drawers, it is time for you to replace it.

    For those who still have no idea about how to do it, you may follow the instructions below.

    Read also: Kitchen Cabinets Refacing Before and After.

    DIY KITCHEN CABINET DRAWER REPLACEMENT
    Image: Decoist.com

    1. Remove All Things Inside Drawers

    First of all, surely you need to remove all contents inside your drawers. Pull it out until the maximum limit. Lift the front drawer then pull it free out of the cabinets. Put the drawer on the countertop above the opened drawer.

    2. Remove the Drawer Slides

    After removing all things inside the drawer, now you have to remove the drawer slides. Unscrew the mounting screw on each slide of the drawer.

    With the same manner, remove each glide from the inside of the cabinet. You also need to remove all old drawer slide hardware from the cabinet.

    3. Separate Left and Right Drawer Slides

    The next step is you need to separate your both slides of drawer then put each half on the surface by following the proper drawer sides.

    Using your pencil, make a mark on both rear edges and front side of the drawer halfway up in one side. Use a straight-edge to guide you in drawing a line between the two marks. Do the same steps and process on the opposite side of the drawer.

    4. Drill the Drawer

    After separating the left and right slides, it is time to center the left drawer. To make it accurate, use the reference line as a guide.

    Using a pencil, mark places where you mean to be the locations for the holes to support the mounting screws. Drill the drawer with a proper sized diameter to make a hole for each screw.

    Supply wood screw onto the left-side drawer side using drill with a screw bit. Do the same process to the right-side drawer slide.

    5. Make It Center

    Make a mark on the center point by measuring the height of left-side opened drawer with a tape measure. Center on the mark and place the left cabinet slide into the cabinet. Remove the slide level and mark the holes locations using pencil.

    6. Mount the Cabinet Slide

    The next step is mounting the left cabinet slide with mounting screws. Do the same mounting to the right-side drawer slide.

    7. Lower the Drawer

    Place the drawer right in front of opened angle, so the rollers on the rear drawer slides can slip cleanly into cabinet slides. Put the front drawer into lower position and mitigate the drawer into cabinet slides.

    8. Put All Back in Position

    Try to open and close the drawer to test the sliding. It should open and close easily. Prevent it from being pulled out of the cabinet too.

    Read also: Kitchen Cabinets Long Island for Wonderful Display.

    Replacing cabinets drawers needs to be done sometime, especially when the old drawers are broken or do not work well. You can easily practice the steps above without spending any cost and surely it takes less energy and time.

    Kitchen cabinet drawer design ideas:

    Originally posted 2019-09-17 10:09:20.

  • How to Finish Unfinished Kitchen Cabinets

    How to Finish Unfinished Kitchen Cabinets

    As parts of kitchen, cabinets are really useful to keep any equipment inside it. We need to take care of our cabinets as much as we take care of any other parts of our kitchen.

    Some people find difficulty in dealing with unfinished kitchen cabinets. They need the finishing touch to make it perfect.

    So, here are some steps you may try to finish your unfinished kitchen cabinets.

    Read also: All about bathroom vanity base cabinet unfinished.

    HOW TO FINISH UNFINISHED KITCHEN CABINETS

    1. Sanding and Staining

    The first step you have to do is setting up an area where you will sand and stain which is fairly consistent with weather wise. Lay plastic on your kitchen and make it simple, so you do not need to move a lot during the process.

    2. Removing Necessary Parts

    In order to make you stain and treat all faces of the cabinets, it is a must that you remove all drawers and cabinet doors first.

    It will allow you to stain and treat the back of your cabinet doors as well. Remove the parts that really need to be removed, so you can work effectively.

    Unfinished kitchen cabinets oak

    3. Giving Light Sanding

    Before you start applying the conditioner, make sure that you give light sanding to all surfaces of your drawers and cabinet doors. It will make the conditioner work maximally.

    4. Applying the Conditioner

    Use foam brush to apply light conditioner. It will draw out the grain of the wood and ensure more coat of stain to the whole surfaces of your cabinets. So you will not find it blotchy.

    5. Let the Conditioner Works

    After applying the conditioner, leave it for 15 about minutes to let it works until dry. One thing you should note is that the previous smooth wood is now fairly rough. Sand all surfaces to make it smooth then wipe it using cloth to remove any dust.

    Unfinished kitchen cabinets with glass doors

    6. Applying the Coat

    Apply the same amount of coat to remove any stain across all surfaces. Make sure that you do not leave any drips on it since it will cause some minor problems for you. Wait for view minutes before you move to the next step.

    7. Wait for the Stain

    In this step you need to wait until the stain are removed. You have to be able to see the grain well and now the wood may not look stained anymore to you. If you think that the surfaces are not stained anymore, you can stop right there. If you want darker look, wait for any longer.

    8. Clean All the Surfaces

    Finally for the last step, add at least 2 coats of urethane to protect and seal the cabinet. Make sure you add the coat balanced to make your cabinets look great.

    Read also: How to Remove Mold from Kitchen Cabinets.

    Those are the steps that you may apply in your house to finish your unfinished kitchen cabinets. As the finishing process, you have to be really sure about any factors related with your cabinets since it is really the last work you do on your cabinets. A proper finishing will save your time and energy.

    Kitchen cabinet picture galleries: 

    Originally posted 2019-09-16 21:41:49.

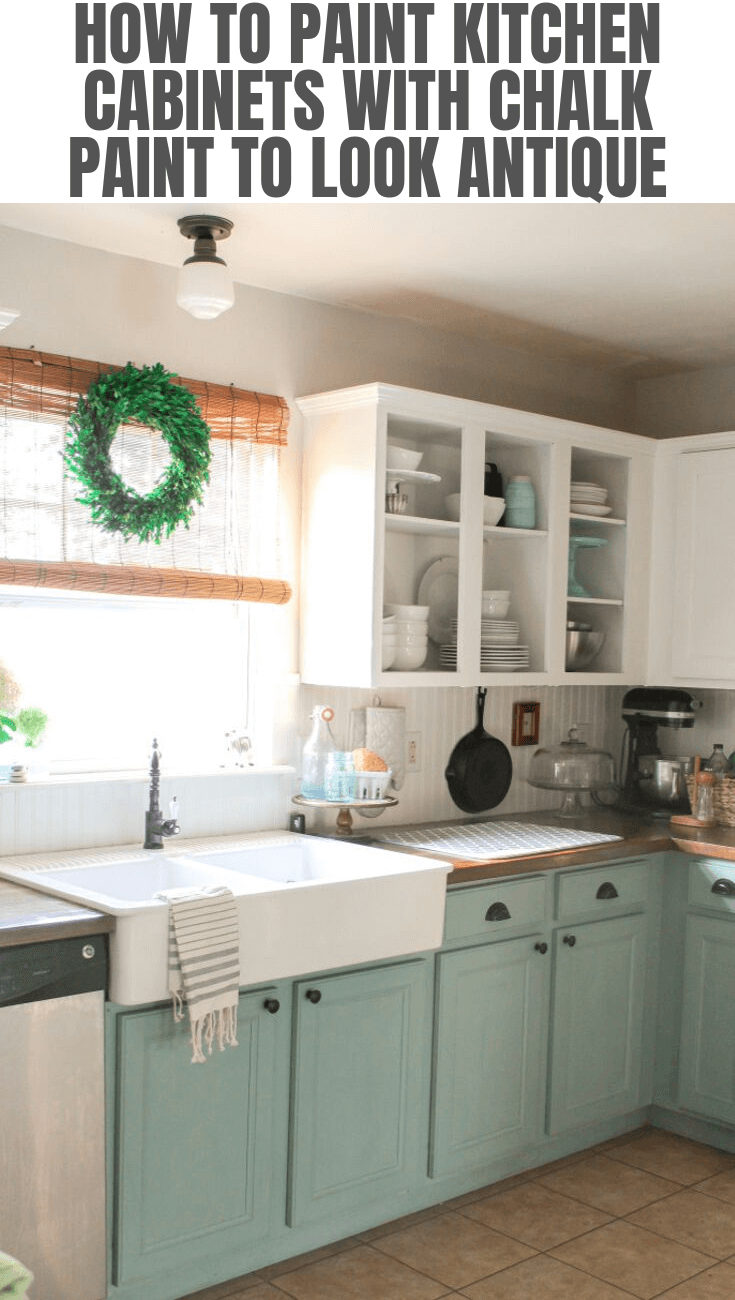
  • How to Paint Kitchen Cabinets with Chalk Paint to Look Antique

    How to Paint Kitchen Cabinets with Chalk Paint to Look Antique

    There are so many ways that people can use to paint their kitchen cabinets. One of the ways is by using chalk paint.

    You can also make your kitchen cabinets to look antique using this paint.

    The problem is not all of us know how to paint kitchen cabinets using chalk paint.

    Here are some steps that you may try to make your kitchen cabinets look antique.

    Read also: Kitchen Cabinet Long Island.

    HOW TO PAINT KITCHEN CABINETS WITH CHALK PAINT TO LOOK ANTIQUE
    Image: ourstoriedhome.com

    1. Wipe Your Cabinets

    The very first thing you need to do is wipe all of the cabinets using a cleaner. You can choose any product that you want. This first step is needed to be done to remove any stain from your cabinets.

    Make sure that your cabinets are also clean from oils and grease before you start the painting. It is suggested that you do this step while the cabinets are still hanging.

    2. Remove All Hardware

    Not only hardware, you also need to take all of the doors and drawers in your kitchen. Keep the hardware in the reachable place to help you find it when you will put it back again.

    Kitchen cabinet chalk paint white color ideas
    Image: slmdesigninteriors.com

    3. Add Enough Coats

    Flip the brush a few times to clean it from bristles. You can try to mix pure white color and old white color of paint as long as you shake them well before you open the can.

    The first coat may look strange but keep it that way because the mixing takes time to work. You will find it works on the second or third coat. Wait until each coat was dry before you put another coat.

    Make sure that you put enough coat to make sure that it really works to your kitchen. Save your energy by working effectively.

    Get antique impression with Kitchen cabinet chalk paint white color ideas
    Image: wenamedia.com

    4. Put It Back Together

    After the surface is painted, it is time to put all things back before you wax all of the drawers, doors and cabinets. You can choose any product of waxing. It is suggested that you apply the wax in small sections, for example 2 x 2 ft. sections.

    Purchase the wax brush to make the process easier and more effective. Dip the tip of the brush only into clear wax and do it in circular motions to get all of the crannies and nooks of your piece.

    Take a rymplecloth and use it to wipe the excess wax off. Your drawers, doors and cabinets should not be coated by wax. We use wax as a sealer only. More than sealing your cabinets, it also gives a wonderful matte appearance.

    5. Polish the Wax

    This can be the step that needs the longest process. You will need to put wax and polish it for many times until you think that your kitchen looks antique enough.

    One thing you should note is an antique look does not always need a long process, so it depends on how satisfy you are about the look of your kitchen.

    Read also: 10×10 Kitchen Cabinet Design Ideas.

    Having an antique look kitchen can be done in so many ways. Those are the steps that you may try if you would like to have an antique look kitchen using chalk painting.

    Red kitchen cabinets with chalk paint

    Kitchen cabinets gallery:

    Originally posted 2019-09-16 05:36:14.

  • 8 Steps How to Paint Kitchen Cabinets without Sanding

    8 Steps How to Paint Kitchen Cabinets without Sanding

    The older the age of your kitchen is, the more scratches and corrosion you will find.

    There are so many things you can do to make your kitchen bright again. One of them is by painting it. Usually we need to do the sanding before start painting. It will surely spend much time.

    Therefore, here are some tips to paint the kitchen without sanding.

    Read also: Kitchen Countertop Paint Color Ideas.

    HOW TO PAINT KITCHEN CABINET WITHOUT SANDING

    1. Removing All Hardware

    You are going need to remove all hardware in your kitchen to make your job easier. Put them in some place near your kitchen, so you can easily reach them whenever you need during the process.

    2. Removing Doors and Drawers

    If you want to paint your entire kitchen, you need to remove your doors and drawers. They will be painted separately outside the kitchen.

    You also have to empty the drawers to keep everything inside it clean, but everything can stay inside the cabinets since the glass will protect them from the paint droplets.

    3. Paint Your Hinges

    Again, if you want to paint the entire kitchen, you need to go until the hinges. You can spray paint the hinges rather than buying new ones. It will save your money. You can also choose the color you want if you spray paint them by yourself.

    4. Patching Any Holes

    It is better for you to patch all holes that you think you are not going to use anymore using spackle appropriately.

    5. Wiping Down

    Before you start painting, wipe down all drawers, doors and cabinet first to remove any grime and dirt. It is recommended that you use Lysol wipes to make it more effective.

    After that, wipe again all the drawers, doors and cabinets liquid glosser. Do not scrub the old finish on your cabinets because it will not look any different after the wiping.

    6. Do the Painting

    If you finish with the wiping, it is time to do the painting. When you already decided the product of the paint, prepare the equipment. Use a paint brush to paint any detail and small parts.

    Then for larger surfaces, it will be more effective if you use a dense foam roller. Make sure that you do not miss every single part of your kitchen.

    7. Applying the Coat

    If you think that your painting is dry enough after some time, it is time to add a high performance coat to all surfaces of your doors, drawers and cabinets. It will make them look brighter. Then after putting the coats, replace your drawers and re-hang your doors once everything is dry.

    8. Attach the Hardware

    Finally the last step is attaching your hardware that you remove at the first step. Put them back in the position and do the last cleaning in your kitchen.

    Read also: How to Stain Wood Cabinet without Sanding.

    Actually, sanding process in painting should not be avoided, but some people just like to paint their kitchen without sanding. Those are the steps that you can try to apply to your kitchen. It will not need any sanding, so you can save your time for another activity.

    How to Paint Kitchen Cabinets without Sanding

    Originally posted 2019-09-15 13:15:44.

  • The Benefits of Using KitchenAid Mixer Glass Bowl

    The Benefits of Using KitchenAid Mixer Glass Bowl

    As one of kitchen equipments, kitchen aid mixer has some crucial parts in preparing your meal or food.

    The problem is when you need to decide whether you are going to use glass or stainless mixer bowl.

    Here are some comparisons that you need to consider before you choose between glass and stainless mixer bowls.

    Read also: Kitchenaid Mixer Care Guide.

    THE BENEFITS OF USING KITCHENAID MIXER GLASS BOWLS

    1. Practical Uses

    Even a kitchen aid mixer can be made of some materials, and each kind of mixer has to be handled differently. In this case, glass mixer will be heavier than the stainless one when you are about to pour ingredients from the bowl.

    However, you can see the ingredient quantity by marking the bowl since you can see through the glass while you will not be able to do the marking on the stainless one because you cannot see through it. That is why you will find glass bowl is more practical than stainless bowl.

    Kitchenaid mixer glass bowl replacement

    2. Expense

    It is not a secret that usually kitchen aid mixer glass bowl is more expensive than the stainless one. As you will find any kind of price range, stainless mixer bowl is still less expensive than the glass.

    Even the most expensive stainless mixer bowl sometime has the same price tag with an ordinary glass mixer bowl which is not categorized as an expensive one.

    There are some reasons behind this price tag. One of them is because glass mixer bowl will match with any design of kitchen. The fact that we can see through glass make it perfect in any design of kitchen interior.

    3. Aesthetics

    Correlating with the previous factors, glass mixer bowl also has an aesthetics point that stainless do not have. Usually stainless mixer bowls are only match with kitchen with vintage style, but it will be strange if you have it in your rustic kitchen for example.

    Meanwhile, glass mixer bowls will match with almost all design of the kitchen because of its transparency. Its transparency will not ruin the design of kitchen that you already have.

    4. Useful Features

    The last but not least, glass mixer bowls have some useful features that stainless mixer bowls do not have. Even some stainless mixer bowls are made with measuring lines that will ease you to follow a recipe. Sometime, the measuring lines do not work really well.

    A different recipe will affect the taste of your meal or food. If you use glass, the measuring lines will work perfectly since you can also see the ingredients through glass.

    Glass mixer bowls provide more various levels of measuring lines which will help you to be more accurate. Glass bowl can also be put into microwave to heat chocolate or butter. It is clearly something that you cannot do with stainless bowl.

    Kitchenaid mixer stainless steel bowl

    Read also: Kitchenaid Mixer Recipes.

    Basically, each type of bowl has its benefits. Being sure of what meal you are going to cook and prepare is actually more important than thinking about what style that will match with your kitchen. It will be much better if you can get and combine both factors.

    Kitchenaid Mixer pictures gallery:


    Originally posted 2019-09-14 05:20:46.

  • Which Kitchen Aid Mixer Size/Dimensions You Like to Use?

    Which Kitchen Aid Mixer Size/Dimensions You Like to Use?

    As one of kitchen aid, mixers are really useful in helping our kitchen’s daily job. We can almost prepare any kind of meal with this kind of kitchen aid.

    To specialize their function, there are some size or dimensions of mixer based on their utility.

    Here are the common dimensions you usually find.

    Read also: DIY Kitchen Island Drop Leaf.

    MOST POPULAR KITCHENAID SIZE AND DIMENSIONS

    3.5 Quart Kitchen Aid Mixer

    The smallest size of a mixer that you will find is a 3.5 quart kitchen aid mixer. With the 3.5 quart size, this mixer is usually used to mix at least 5 dozen cookies in a single batch.

    This size of mixer has 10 optimized speeds that you can control depends on what kind of food you want to mix inside it. Avoid putting too much food because 3.5 quarts are the smallest size of the mixer.

    3.5 kitchenaid mixer dimension mini

    4.5 Quart Kitchen Aid Mixer

    Move to the bigger size, there is a 4.5 kitchen aid mixer. Basically, this size is just a little bit bigger than the previous one.

    This size of mixer will allow you to mix for about 6 dozen of cookies or any other ingredients in a single process. A 4.5 quart kitchen aid mixer also has 10 optimized speeds that you can control in the mixing process.

    5 Quart Kitchen Aid Mixer

    Even it only has 0.5 quart gaps with the previous size, a 5 quart kitchen aid mixer gives a significant difference in the quantity of ingredients you can mix inside it.

    This size of mixer can cook until 9 dozen of cookies or any other food ingredients in a single mixing process. It also has 10 optimized speed control depending on what ingredients you mix.

    Read also: Kitchenaid mixer recipes

    6 Quart Kitchen Aid Mixer

    The next one is 6 quart kitchen aid mixer. With this kind of dimension, you will able to mix for about 13 dozen of cookies and any food ingredients in a single batch.

    Still with 10 optimized speeds, 6 quart kitchen aid mixer also has 10 optional powered attachments to be mixed inside this mixer. It will allow you to mix a lot of food ingredients.

    7 Quart Kitchen Aid Mixer

    With 1.3 powerful horsepower motor, this kind of mixer can handle until 18 dozen of cookies and any other food ingredients in a single mixing. The 10 optimized speeds are supported with more than 10 optional attachments that you can mix inside this mixer.

    7 kitchenaid mixer KSM7586PCA candy aple red

    8 Quart Kitchen Aid Mixer

    The biggest size of a mixer is 8 quart kitchen aid mixer. With this kind of dimension, you will able to mix more than 20 dozen of cookies and any other food ingredients in a single time. 8 quart kitchen aid mixer is also supported with 1.3 horsepower motor and allow you to mix more food ingredients inside it.

    Read also: How to Install Kitchen Island Hood.

    Choosing a kitchen aid mixer that you are going to use will be easier when you are definitely sure about what meal or food you are going to prepare. The most important thing is the quantity of your food ingredients. As long as you count it well, any kind of mixer will support your process.

    Kitchenaid mixer gallery:

    Originally posted 2019-09-14 01:52:47.

  • Kitchenaid Mixer Recipes

    Kitchenaid Mixer Recipes

    Kitchenaid is famous with its mixer and cooking appliances, but who knows that it also provides food recipe on its website? Among these recipes, there are some recipes that need a mixer to make.

    Therefore, these are the best and the most delicious mixer recipe you need to check out:

    Read also: Most Popular Kitchenaid Mixer.

    THE BEST KITCHENAID MIXER RECIPES
    THE BEST KITCHENAID MIXER RECIPES

    Cheesecake Pancakes Recipe

    Have you ever made a cheesecake pancake? It is delicious and fun to bake. To make this recipe, prepare the Kitchenaid mixer, 1 egg, 1 tablespoon of sugar, 250 grams of cheese, lemon zest, 3 tablespoons of all-purpose flour, some berries, some coconut oil, and 1 tablespoon of raisin, thick sour cream and agave syrup.

    First of all, put the egg and sugar into the mixing bowl and whisk it until it is fluffy. Then, remove the hub and replace it with grinder for grinding the cheese. Put the cheese, lemon zest, flour and raisins into the mixing bowl and mix it well until the dough is done.

    After that, take out the dough from the mixing bowl and make it into shape. When you’re done with it, pour some coconut oil into the frying pan and set the fire to medium heat. Then, put the dough into the pan and fry it until the color turns brown.

    Next, make the sauce by heating the agave syrup along with the berries on the frying pan. Pour the sauce onto the pancake and garnish it with some berries. The cheesecake pancake is ready to be served.

    Banana Loaf

    Banana loaf pictures

    Baking a banana loaf is simple, fun, and it will be great to be eaten at tea time. Prepare your Kitchenaid mixer, 2 bananas, 2 Eggs, 3 teaspoon ground cinnamon, 2 tablespoons of milk, 225 grams of self raising flour, 1 teaspoon of baking powder, 190 grams of caster sugar, and 100 grams of unsalted butter. Now, let’s begin.

    First of all, mix 1 teaspoon of ground cinnamon and 30 grams of sugar. Then, sprinkle the cinnamon sugar mixture inside the loaf tin. After that, set the oven to 180 degrees Celsius to pre-heat it.

    Then, mash the 2 bananas and put it into the mixing bowl. Whisk it for a while, then put in the remaining ingredients (eggs, 1 teaspoon of ground cinnamon, milk, flour, baking powder, 160 gram of caster sugar, and the unsalted butter) into the mixing bowl and whisk them up until the dough is done.

    Take the loaf tin and pour the dough into the tin, then distribute it evenly. Sprinkle the remaining ground cinnamon on the dough then put the tin into the oven for 55 minutes. When it’s done, you can serve it together with tea or milk.

    These desserts surely have great taste and texture when it is done. Kitchenaid is not only giving you great offers of their great products but also the recipes as proofs that the mixer products from Kitcheaids can make the baking process easier and faster. Kitchenaid is surely the best solution for your kitchen needs.

    You must have:

    Originally posted 2019-09-13 01:19:43.