Category: Home tips

  • The Best Natural Swimming Pool Designs: How to Have it in Your Own Home

    The Best Natural Swimming Pool Designs: How to Have it in Your Own Home

    The Natural Swimming Pool is getting more popular nowadays.

    Since the natural swimming pool will give more natural ambience and will blend with your home landscape.

    Here is the information about the natural swimming pool and how to build it in your own home.

    Read also: Best Tiny Houses You Can Buy on Amazon

    1. The Characteristic of Natural Swimming Pool

    The Natural Swimming Pool will contain less of chemical additives and manufactured materials which could be found in the common swimming pool. The natural swimming pool will also use clay and gravel stones as well as the aquatic plants which will give the oxygen to the pool.

    Since the natural swimming pool has the aquatic plants, it will have a self-cleaning mini-ecosystem which means you don’t need any chemicals such as chlorine to maintain the crystal-clear water when it is managed properly.

    The natural swimming pool will be more suitable to be installed in the house instead of public pools. The proper design of a natural pool has very little risk of dangerous contamination and with the self-cleaning mini ecosystem and no chemicals in the pool, it will create a better sustainable environment.

    The natural swimming pool could be divided into separated areas such as a zone with planted aquatic vegetation which will be the biological filter of the pool and having a small waterfall will also a good option to add the ambience and to keep the water fresh. Some of the pool company also offer UV sterilizer to kill the germs in the pool.

    The best natural swimming pool design ideas
    Image: proudhomedecor.com

    2. Many Natural Swimming Pools Could be Found in Europe

    Even though the idea of natural swimming pools come recently in the United States, apparently it is already quite common in Europe. In Munich, Germany for example, the natural swimming pool has been used in a large public pool and Europeans have the experience of this natural swimming pools already for decades.

    3. The Best Natural Swimming Pool Designs

    There are several designs of the natural swimming pools that you could do as a reference. For example, Green Pool design which could be applied by converting a conventional swimming pool to the natural swimming pool by adding a shallow plant area around the pool.

    This will help as the natural purification of the pool. You also could divide it into two areas, so you still have the original swimming area. Another design that you could use is the Asian-theme green pool with the water feature and the plants surrounding the area.

    Natural swimming green pool design ideas

    Another option that you could use is the rustic looks with some rocks and plants that will add the ambience of the natural swimming pool.

    The designs of the natural swimming pool designs will depend on your preference as well as your house design. If you contact the natural swimming pool contractors, they will have plenty of images of the natural swimming pools that you can choose.

    Natural swimming pool with stones around it
    Image: passionpoolandpond.com

    Before choosing the design of the pool, make sure that you check first with the space of the pool that you will have and consult with your constructor if it will be suitable with your home design. Remember, the more complicated design will be more expensive than the simple one, therefore consider your budget when choosing the design for the natural pool.

    Other factors that you need to keep in mind when choosing the design is the depth of the pool, make sure to have it 1.8 or less since it will need less of reinforcement. You also need to consider the good drainage plan since the good drainage channels surround your pool will give you the best result of natural pools maintenance.

    HOW TO BUILD YOUR NATURAL SWIMMING POOL

    4. How to Build it in Your Own Home

    If you are going to create a natural swimming pool in your own home, you will need to dig the hole and make sure the sides slope. You will also need to make sure to reserve a half area of the pool surface for the shallow plants.

    You will also need to have separate areas for the swimming, filtration and plant zone. In the plant zone, you will need to have it deeper and reach around 18 inches depth near the swimming area.

    One of the most important parts of the natural swimming pool is the filtration of the pool. Please note that you will need to have the water to be able to circulate continuously and have adequate oxygen. The water treatment is the most important part of the natural pool.

    You will need to have water quality properly and to have a proper filter system installation. Since this is quite a complicated procedure, it is advisable for you to use the pool company to install the filtration or water treatment to get the right system for your pool.

    To seal the pool after you dig the hole, you could choose from several options depending on the condition of the soil. You can use Bentonite, or Ethylene propylene diene monomer for the liner, or you could use cement or rastra block if you consider for the concrete option.

    Read also: Easy Tips on How to Clean Pool Walls

    5. How to Select the Plants

    When coming on selecting the plants for the pool, make sure that you check with a native-plant company in order to get the information about the plants that are suitable for the climate in your region. In order to keep the water quality and to give the right amount of oxygen in the pool, you can choose the rooted plants and the floating plants.

    The other plants will help to make the pool looks greener and to maintain the complex living ecosystem. Choose the aquatic plants such as rushes, sedges, cattails, arrowhead or water primroses.

    If you are having an algae problem in your natural swimming pool, make sure that your pool is free from the factors that could make the algae grow such as the fertilizers and urine. Avoid putting any chemical additives that claimed able to kill algae since it could ruin the balanced ecosystem of your natural swimming pool.

    Therefore, either you will go with the Asian theme, simple or more advanced designs with the waterfall, make sure that you consult first with the constructor and to find if it’s suitable with the landscape and your budget. The natural swimming pool will not only make your backyard look greener and beautiful but it also friendlier with the environment.

    How to Select the Plants for natural swimming pools

    Originally posted 2021-03-13 04:58:00.

  • Want to Get Rid of Your Ugly Floor Tiles? Paint It!

    Want to Get Rid of Your Ugly Floor Tiles? Paint It!

    When you are buying a house, there must be some parts of the house that you want to change or redesign.

    For example, the floor tiles in the living room look so ugly and you want to hide it from your guests.

    Well, instead of spending lots of money on changing the tile floors, you can just paint it! here are some simple tips for painted floor tiles which cover from how to have it until how to take care of it.

    Read also: How to Remove Mold from Basement Walls

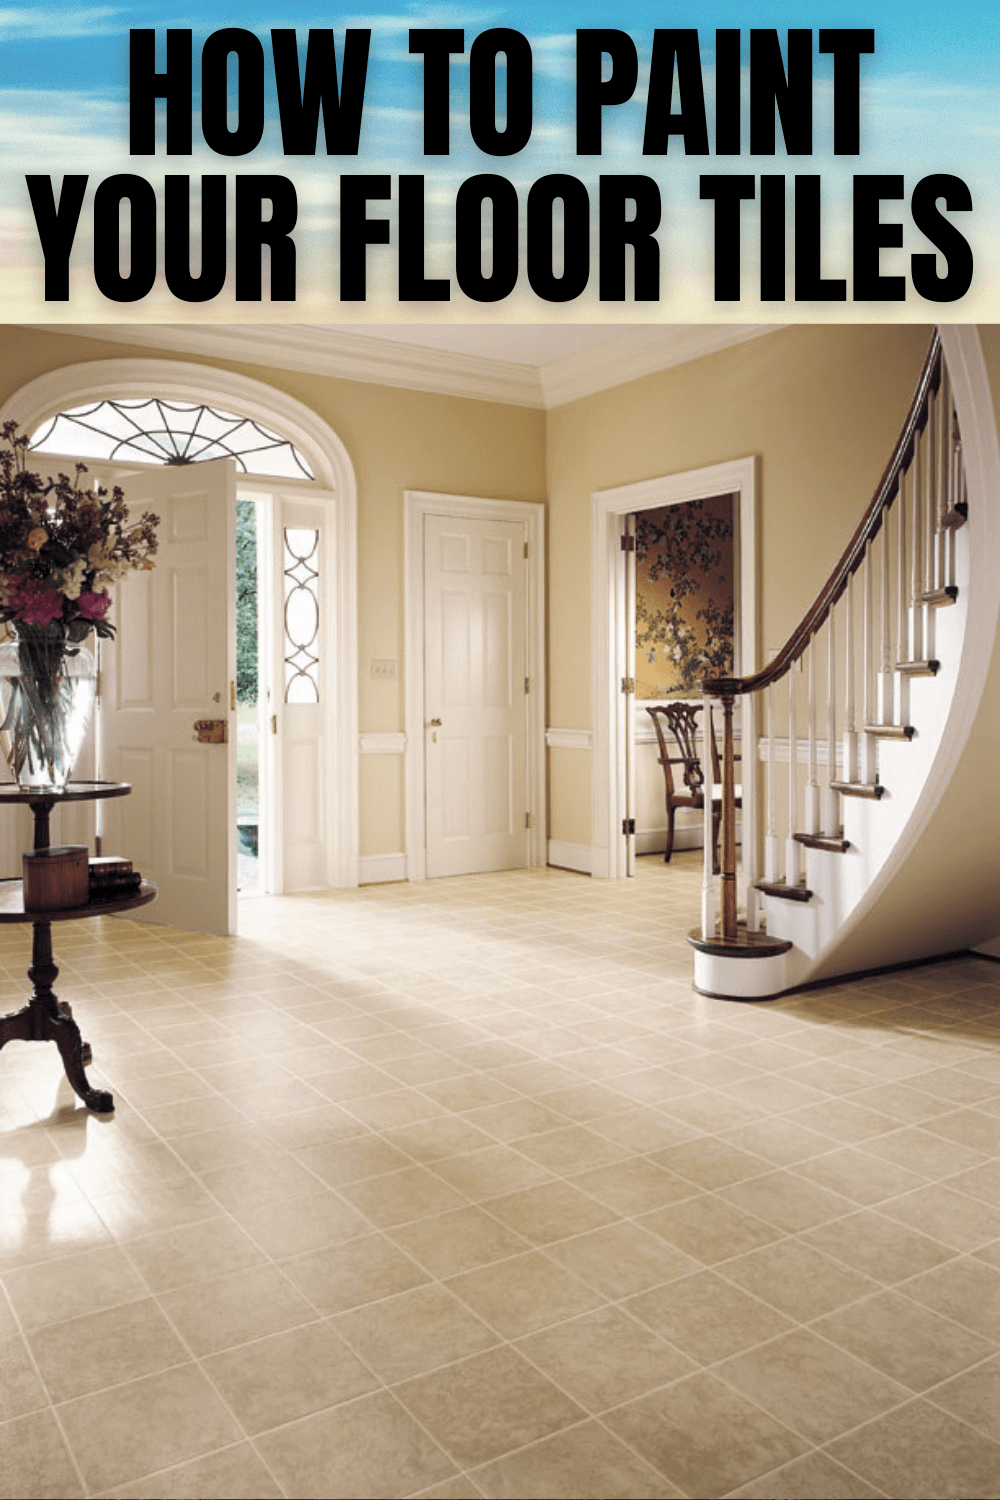
    HOW TO PAINT YOUR FLOOR TILES

    1. Sanding the Floor Tiles

    The first step that you will need to do is to sand the tile. This step will make it easier for the primer adhere. Instead of using the sandpaper and do it manually, you could use the hand-held electric sander (180-220 grit) such as aluminum oxide or silicon carbide which will be so much easier for you. the electric sander will also be able to get into the corners of the tiles easily because of the angled head.

    2. Do Deep Cleaning of Your Floor

    Once you have done on sanding the floor tiles, you will need to vacuum the debris as well all the dust from the first step. Once the floor is clean from all of the dust and debris, you will need to do a deep cleaning of the floors. Use the heavy-duty cleaner like TSP with a mop through all the floor then let it for about 15 minutes before you start to scrub it.

    Next step is to clean it with warm water and if you feel that the floor is not clean yet, you could repeat the process. When you find any visible cracks or grout on the floor, you need to repair it first with caulk. Make sure that you let it sit for 48 hours before you move to the next step.

    3. Use the Painter’s Tape

    Before you start to apply the primer in the floor tiles, you will need to use the painter’s tape in order to protect the area that you don’t want it to get painted. Put the tape on the floor trim, and if you paint the bathroom floor tiles, tape off the border of the toilet, vanity, tub and others that you feel that you need to protect from the paint. If you feel that you want to keep the original colour of the grout lines, you also can cover it using the acrylic masking tape.

    Bathroom painted floor tile ideas
    Image: remingtonavenue.com

    4. Apply the Primer

    Before you apply the primer, please note that you don’t need to use a primer if you use the chalk paint for your floor tiles. Choose the high-quality primer because it is one of the main factors to get the success result for painting the tiles.

    Use a brush to apply the primer for the grout lines, tile edges and vanity, toilet, bathtub etc if it’s the bathroom floor that you need to paint. Use the roller for the rest area that needs to be primed.

    Let the primer dry before you do the next step or if you want to apply the second coat of the primer. Primer usually will dry for about 3 hours depending on the temperature and humidity.

    5. Choose the Right Paint

    There are three kinds of paint that you could consider using for the floor tiles. First, you can use the chalk paint which is water-paint and will give you a matte white finish. This type of paint will be perfect if you want to have it as a base coat before you put a pattern on the floor tiles. Second, you can choose the latex paint which is the most common type.

    The latex paint will be fast drying and have several options such as semi-gloss or high-gloss for a finished look. The third option is the oil-based paint which will be more resistant to be damaged than the latex paint. But there are several disadvantages of the oil-based paint including take longer to dry, very expensive and the worst part it could harm the environment.

    6. Paint the Floor Tiles

    Once you have decided which paint that you want to use, you could start to paint the floor tiles with a similar method when you apply the primer. Start first with the edges and grout lines with the paintbrush and then do the rest of the area with the roller brush.

    Let it dry first and if you are not sure you could check first the instruction on how long it will dry and apply another coat. Repeat this step until you get the colour that you want. After you finish, make sure to let it dry until 2 or three days before you step on the floor or put any furniture.

    How to paint tile floor with roller brush
    Image: drivenbydecor.com

    7. Adding the Pattern

    This is an optional step if you want to have a pattern on the tiles you could use a stencil. Use the painter’s tape to tape the stencil to one tile that you want to put a pattern and use a roller to paint the stencil. Remember to not put excessive paint in the roller since you don’t want to have a too thick and runny mess.

    8. Apply the Water-Based Polyurethane

    Use the water-based polyurethane to seal the paint. Apply a thin coat and let it dry for six hours before you apply the next coat. Use around two up to three coats for the best result.

    9. How to Maintain the Painted Floor Tiles

    Once you have done the entire process, it is important to not put the wet object such as the damp rug for a long period that could ruin the paint. The floor tiles in the dry area such as laundry room, living room or kitchen will last longer than in the bathroom. If you want to clean the floors, do not use any harsh chemicals and use the mild cleaners instead.

    So, painting the floor tiles is not impossible and it is cheaper rather than changing the whole tiles. You also could do it by yourself and follow all the instructions above. Have fun on giving the new look of your floor tiles!

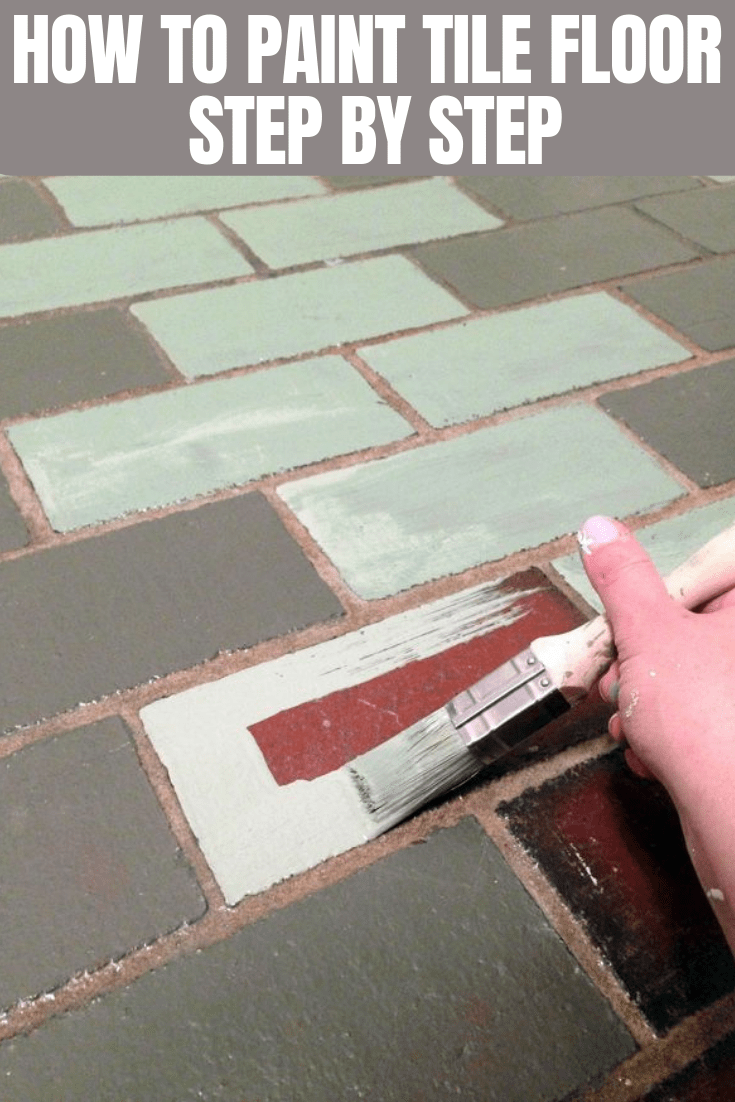
    HOW TO PAINT TILE FLOOR STEP BY STEP

    Originally posted 2021-03-10 23:14:00.

  • DIY Textile Art Wall Hanging Ideas

    DIY Textile Art Wall Hanging Ideas

    Each individuals has their own ways to express themselves.

    They might not realize, but someone’s styles and preference are reflected through the furniture, wall painting, and even simplest house decoration.

    Some people love to buy what others think pretty. There is another option though: make less favorite material into an astonishing work of art.

    Read also: Great Tips for Indoor Hanging Potted Plants

    1. Faux Fur Hanging Decoration

    It would be a big lie if none of the family member owns faux fur jacket. This material is popular for its great imitation of real fur. Plus, any clothes made from faux fur is a perfect choice in winter; it keeps the person warm.

    Sooner or later, the pretty jacket or shirt will wear out. Don’t throw it out just yet. With thread, needle, glue gun, woven thread, and beads, a nice wall decoration could be made.

    1. Cut the clothes into one big pieces and several small pieces. Make sure to angle the scissors and slip it under the fur. One more thing: the small pieces should go inside the big piece. For this project, being abstract is not the goal.
    2. Put the smaller pieces on the big one. Make sure they overlap to provide volume to the finishing product.
    3. Sew the small pieces using sewing machine or thread and needle. Don’t miss any pieces! If needed, put small needles to pin the pieces in place.
    4. Take the woven thread and make a loop for 20-30 times. Make a knot on both ends, then cut the loop parts. Again, sew the tassel-like decoration to the fur.
    5. Attach a big string on the top and allow it to drops down. Arrange the beads on the sting and knot the tail. There is no fixed rules, but contrasting the colors will make bold statement. In the other hand, similar color tone shouts “warm” and “cozy”.
    6. Glue the finished product to a roller. Make sure to put enough glue, so the decoration is strong enough. Then, let it sit until the glue is hardened perfectly.
    7. Tie black thread on both ends, not too long nor too short. Now it time to hang the decoration on the wall!.

    Here some ideas for faux wall hanging decorations:

    2. Textile Pennant

    While buying the textile, there are some who seek for comfortable material. Some others are drawn by the printed pattern or picture on the textile.

    Those who belong to the second category must be a little sad when the pretty cloth has lots of holes. Before throwing it away, why don’t cut a little part to keep the picture? The process is not difficult to follow.

    To make the cute pennant, the materials needed are not too hard to find. In fact, these materials are part of households. They are used clothes, scissors, ruler, iron, twig, glue and wool thread. Want to be a little more creative? Add ink, brush and stamp to the lists.

    1. Most pennant has triangle shape. Therefore, the first step is marking the clothes. Try to find a part that could be cut into a nice triangle. For a cloth with medium sized pattern, this step shouldn’t be too difficult. If the clothes has small sized pattern, any part would be fine. Then, mark it with a pencil
    2. Cut the triangle part from the clothes. Make sure the pencil mark is not seen. If it does, try to erase is using the normal eraser.
    3. Iron the cloth. It will prevent any wrinkle and make the cut tidier. If needed, spray it with some softener agent to help the ironing process.
    4. It is time to be creative. If the cut looks too plain, add some motives using the ink and stamp. Those who are confident with their own drawing or writing could take the ink and brush instead.
    5. Grab the glue and the fabric cut. Flip the fabric, so the back side is facing up. Put glue on the opposite side of the triangle top. For this purpose, it will be better to use fabric glue instead of paper glue.
    6. Don’t wait the glue to dry. Put twig on the glued side and roll the fabric. Give gentle pressure to help the fabric stick to the twig.
    7. Take the thread and measure the length. Cut the thread and tie it on both ends. The pennant will be prettier if the thread has similar color to the fabric. For safe color, take white or black thread.

    Here is some ideas for textile pennant decor wall hangings you can adopt:

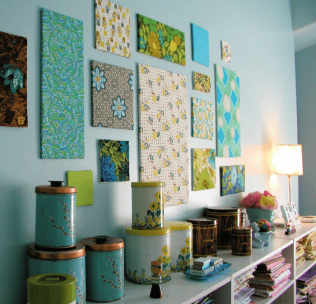
    3. Framed Fabric

    Another trick to make use of the used clothes is the framed fabric. The final product should look like regular wall painting. The trick could fool any guest who pay a visit to the house.

    In order to make the craft, there are several preparation to make. Don’t forget to bring either canvas or empty picture frame, scissors, glue or stapler.

    How many frame should be prepared? As many as the used clothes the person have.

    1. Measure the clothes to fit the frame. Some people might use the ruler, but the easiest way is covering the frame with the clothes. Take pencil and mark the area. Make sure it covers the side parts, unless the cut goes into the picture frame.
    2. Cut the marked area. Be careful so there is no loose fabric on the side.
    3. For those who work with canvas, put the fabric cut on empty canvas. Start from the top part; pull the fabric and push stapler to keep it in place. Go to the opposite side and repeat the process. Then go to the other sides to do similar steps. Make sure the fabric is not loose in the surface.
    4. Those who choose the picture frame has less hustle. There are two options: covering the whole frame with fabric or leave some empty space in the frame. For the first option, the fabric need to be glued to the back. For the second option, slowly put the cover on top of the fabric to prevent any wrinkle.

    Now the leftover textile has found its new purpose. There are ways to make it into something pretty for display. In fact, the guests might admire it even more after learning that you put minimum effort on the process. Is there any reason to refuse it?

    DIY TEXTILE ART WALL HANGING IDEAS

    Originally posted 2021-03-07 02:48:00.

  • Contemporary Fireplace Design Ideas for All Cozy Feels

    Contemporary Fireplace Design Ideas for All Cozy Feels

    Fireplace is often something people avoid when it comes to contemporary decoration. It seems too bulky and huge for minimalist room.

    Meanwhile, a fireplace effectively elevates the value of a room when you know what you need.

    Of course, you need to work on the design and layout so it is a compatible addition in your room.

    Check out the following designs of contemporary fireplace for inspiration.

    Read also: How to Light Gas Fireplace Pilot without Ignitor

    1. Corner Blend

    While most fireplaces take the center space on one of your walls, you can also try placing it on one of the room corners. While making it discreet, you should consider using stones with charcoal color and texture on the surface for minimalist yet grand look.

    Corner fireplace living room ideas
    Image: homedit.com

    2. Make It Rustic

    Sometimes, a fireplace is already simple enough. If you want a little accent on the design, you should consider going simple. One of the best ways include naked wall exposing the bricks on the background a pile of woods on one side.

    Contemporary brick fireplace ideas
    Image: hgtv.com

    3. Marbled Fireplace

    If you want a completion on your modern room, consider refinishing your fireplace with white marble. Pick a shade of white that is consistent with your wall on the background. For sophisticated final touch, add matte black mantel for it. Now you have perfect fireplace.

    White marble contemporary fireplace
    Image: Decoist.com

    4. Brick in Metallic Finish

    If your room has plenty of natural light, you should consider reflecting it. While leaving the fireplace in matte finish is great, layering the surface with metallic bricks is way better. It looks shiny which makes the entire fireplace looks more sophisticated.

    Metal brick fireplace contemporary design ideas

    5. Black Marble

    Black marble is one of the most recommended materials to make a statement. Cover the background wall of your fireplace with this. While it looks sophisticated, it instantly makes your fireplace the center of attention again. It delivers bold and elegant look at the same time indeed.

    Black marble fireplace modern

    6. Nested

    This is maybe one of the most forgotten designs. The lines and layers make it a more interesting design while it is still being simple and minimalist. You can finish it in any color or material and it will still look contemporary.

    Modern fireplace montana ski chalet
    Image: Elledecor.com

    7. Marble

    Marble fireplace delivers elegant as well as divine finish for a fireplace. This can be infused in simple design, which makes perfect combination for a rich look. You can combine it with wood, plain wall, or anything else you can imagine. You can even go wild with pattern.

    Contemporary marble fireplace mantels
    Image: marblefireplace.co.uk

    8. Herringbone Pattern

    Let’s try something different and fun. While the frame of your fireplace will be finished in any color you like, you can prefer darker and bolder color for the inside. Yes, finish it unique color and don’t forget to add herringbone pattern on it before refinishing.

    Marble harringbone fireplace living room contemporary design ideas
    Image: decorpad.com

    9. Steel Fireplace Blackened

    Steel fireplace is always considered charming today for being naturally simple, modern, and black. Black is closely associated with contemporary style. For a more bolder look, frame the fireplace with light colored wall, maybe using bricks for additional accent.

    Black steel fireplace surround

    10. Wood Burning Stove

    This may sound like a rustic idea but it isn’t. Instead of using the ordinary fireplace, you can use the wood burning stove as your fireplace. Being small, it is perfect for modern look. For more contemporary feeling, refinish the stove with sleek paint in single color.

    Wood Burning Stove fireplace ideas

    11. Outdoor Fireplace

    Outdoor fireplace has the right form for being contemporary. With additional properties, it makes perfect indoor fireplace as well. For contemporary feeling, keep it simple and minimalist. Stack the wood pile on one side and keeping it light. Combine with low sofas for ultimate cozyness.

    Outdoor fireplace contemporary patio

    12. Black and Gold

    Black makes almost any fireplace looks modern and contemporary. Of course, you need simpler design as well. Meanwhile, a touch of gold will make it a perfect fireplace with smooth lines and elegance at the same time. Be minimal on the gold for ultimate contemporary look.

    Black and gold fireplace decor ideas

    13. Inset Fireplace

    This fireplace is perfect for both indoor and outdoor space. It gives you a perfect shape that fits every room. It doesn’t take a lot of room and it is totally clean and tidy. You only need to consider the finish to make sure the contemporary look is well presented.

    Inset fireplace modern design ideas
    Image: stovax.com

    14. Floor to Ceiling

    Of course we don’t mean to make such big fireplace. The fireplace will on the common dimensions while the wall should vertically touch the ceiling. This wall refers to one covering the chimney. It gives roomier look and it allows you to get contemporary and elegant design at once.

    Floor to ceiling fireplace modern

    15. Monochromatic

    Monochromatic is something new and modern. It makes a perfect design for contemporary room. You can opt for smaller or bigger size of fireplace. However, you need to finish it in monochrome shade. It changes the room into a more modern space instantly. Be simple yet playful in decorating.

    Monochromatic fireplace and wall contemporary room design
    Image: decorpad.com

    16. Line with Black Brick

    You don’t need to change a lot when it comes to contemporary fireplace. Finish it in any color the wall is right now. It gives consistent and simple finish on the fireplace. For firmer shape, line the frame with brick covered in matte black paint.

    Black brick fireplace painted for contemporary room design ideas
    Image: brightgreendoor.com

    17. Oversized with Glass

    Oversized fireplace is very popular today. This is more a stretched rectangular fireplace. It goes horizontally and it makes a sophisticated focal point. To add the contemporary feeling, finish it with black and cover with shiny glass in black film. It looks expensive.

    Modern glass fireplace design ideas

    18. Narrow and Covered

    If you room isn’t exactly large, you should consider smaller size. A narrow fireplace with modern line of design will be perfect for contemporary look. Meanwhile, you can add it with cover in different materials and color. For example, finish the frame with sandy color then bolder blue.

    Modern narrow fireplace covered

    19. Sleek, Small, and White

    If your room is finished mostly in white, you can try adding a fireplace with the same consistent finish. It should be white. Choose a small and sleek modern fireplace to complete the room look. Place it as the focal point. While it gives you more room on the wall for pictures, it looks sophisticated and compact.

    Small white fireplace decor cozy living contemporary design ideas

    Originally posted 2021-03-05 05:06:00.

  • Mustard Yellow Home Décor Ideas

    Mustard Yellow Home Décor Ideas

    What is the perfect color for a house? Some house owners loves pastel colors, keeping the tone soft.

    Several others prefer to follow the trend, and frequently change the decoration.

    One popular color that becomes the talk of the town is mustard yellow.

    What could be done to add the color without messing the overall concept of the room?

    Read also: Yellow Bathroom Tile Ideas

    1. Purchasing Cloth and Utensils

    Unless the house owners are willing to buy the entire furniture, the easiest way to add mustard yellow tone is buying cloth and utensils.

    Of course, the color must be mustard yellow. Don’t forget to list the items that should be bought. For the living room, get one or two pillow covers and table cloth.

    Mustard yellow living room decor ideas

    If the house owners also want to spice up the kitchen, add napkins, glass, bowls or small plates on the list. Later when preparing for the dinner, contrasting yellow mustard bowl and white or black plate will emit different vibe.

    Mustard yellow kitchen decor ideas

    Thinking about the items for bedroom? Simply add yellow mustard blanket or curtain. So easy to do that, right!

    Mustard yellow bedroom decor inspiration

    2. Combining Colors

    Many house owners will agree that mustard yellow doesn’t go well with any colors. Thus, a very serious thought should be given for those who plan to add this warm tone to the house.

    The first safe pairing is light blue. This could be the wall paint or even any decorations. It would be great to give a touch of gray.

    Mustard yellow and blue living room
    mustard yellow and blue living room. Image: sophierobinson.co.uk

    Another perfect pair for mustard yellow is plain white. Adding the color makes the space warmer and more lively. Want more option? Try to pair the warm tone with muted colors shade for the wall painting. A touch of emerald green will go well in the frame, too.

    Mustard yellow and white bedroom decor ideas
    Mustard yellow and white bedroom decor ideas. Image: DESIGNLOVESDETAIL.COM

    For bold statement, nothing could beat blue navy. It serves as the contrast pairing, especially when the gray blue is added as the shade.

    These three colors might seem as if they try to dominate each other. Don’t worry, the view would be perfect with thin line of gold.

    3. Adding Wallpaper

    The plan to have yellow mustard as permanent color in the house is not for everyone. Some people want it for certain period, then they will replace it with new color.

    In this case, the perfect solution for them is using wallpaper. There are lots of choices available, both for plain yellow mustard and patterned wallpaper.

    In addition to the color, the house owner must worry about the impact of the pattern as well. For example, adding too much yellow (making it dominant) might not work in a room with strong color.

    It would be different for a room that has yellow hue in the beginning. The mustard tone would be a perfect puzzle piece.

    Those who plan to add patterned wallpaper must decide the effect of it. Choosing folk print? Then the room will get garden feel. Taking abstract pattern like jacquard? Be prepared to summon the luxury vibe.

    Mustard yellow living room wallpaper
    Mustard yellow living room wallpaper

    Mustard yellow bedroom wallpaper
    Mustard yellow bedroom wallpaper

    4. Finding the Matching Pair

    If there is one season that matches well with yellow mustard, it will be autumn. During this season, the weather is starting to get cold, so adding warm tone will make the space more comfortable than before. The house owner could make things better by pairing yellow mustard with its perfect match.

    a). Autumn Wreath

    The beginning of autumn season could be seen from the brown leaves and less colorful flowers. Create simple wreath from garden plants or simply order it. Hang on the front door to prepare the guest of the yellow mustard tone surprise inside.

    Yellow Wreaths for Front Door

    b). Table Setting

    Make the dinner special with the matching utensils; yellow bowl, copper edged plates and silver cutlery. Don’t forget the cream napkin wrapped in twigs or autumn grass. These items are available in any super market.

    Mustard yellow table setting

    5. Making Monogram Letter

    For those house owners who are into DIY project, then the monogram letter will be the best choice. Prepare the materials first before starting the project.

    They are thin wood, brush, blue tack or velco square, mustard yellow latex paint, and brown acrylic paint. All of these could be bought in material shop nearby. Ask help from local carpenter to cut the thin wood into the wanted initial. Make sure the surface is smooth enough.

    Otherwise, the result won’t be pretty. Sand the wood if needed. Stick the velcro on the back side.  Grab the brush and apply two layers of latex paint. It should be enough to cover the wood. Allow to dry before coating it with brown acrylic paint. Let it dry thoroughly. Stick it to the wall.

    Wood mustard yellow monogram letters for wall

    6. Giving Stencil Look to the Shelf

    For a statement, the house owner need something bold, or at least eye catching for the visitors. With a little effort of painting, the boring book shelf could be the center piece of the room. To make the process easier, it is better to purchase the stencil tools. It helps a lot to prevent the leak and the tool could be used again in another project.

    The other materials are easy to get: yellow mustard paint, roller, foam brush, small brush. If there is no bookshelves in the house, just take any furniture with wide plain space for the project.

    Those who never work with stencil tools before should watch the video. In short, the right way to stencil is overlapping the previous work. The more they practice, the bigger chance to get smooth and tidy result.

    The first tool to use is the roller. It will cover most surface. Then take the small brush to fill the empty dots, especially in the corner. If there is any stuck debris or dirt, slightly dab with the foam brush.

    Cover the crook by gently tapping on the crack. Repeat the process by flipping the stencil tools. After all parts have been painted, allow the shelf to dry.

    Mustard yellow shelves living room decor ideas

    7. Create Mustard yellow Boho-Chick Decor

    Combine yellow, gold, and ochre for Bohemian living room decor. Flower pot and painting art will be good combination.

    Mustard yellow and gold for Boho Chick living room decor ideas

    The color trend of the year is constantly rotating. Now, it is the era of yellow mustard! Hanging between deep orange and soft sunset color, mustard yellow successfully steals many people’s attention. Are you interested to give it a try, too?

    Originally posted 2021-03-03 01:02:00.

  • How to Remove Mold from Basement Walls

    How to Remove Mold from Basement Walls

    Growing mold on basement walls is natural, a basement is a humid place and there is lots of moisture.

    Not much sunlight can get through a basement because the room itself is underground.

    In this article we will discuss how to remove the mold from basement walls using 3 steps: observe the room, prepare the things, and executing the plan.

    Read also: How to Clean Concrete Floor in Basement?

    1. Observe the Room

    Mold only grows if there is water for it to feed on. Basements are lack of sunlight, causing the room temperature goes low and cold, which makes the walls get humid and full of moistures that later will be turned into water that feeds the mold, allowing it to grow.

    Some basements are used for a place where plumbing pipes go down to, make it a great potential for mold to grow if any of the pipes is leaking. It would be disastrous and intensive precautions need to be made.

    how to remove mold from basement walls

    2. Prepare the Things

    The things needed for removing the mold and cleaning the basement walls are bleach, detergent, anti-mold paint, water hose, water bucket, liquid soap, warm water, sponge/scrub brush, and dry cloth.

    There are many chemicals that can be used to remove mold on walls like borax, bleach, hydrogen peroxide, ammonia, baking soda, and vinegar.

    But the one that has the strongest disinfectant and antibacterial is bleach, causing the fungus on mold to dissolve quickly.

    For a humid place like a basement; it needs the strongest to keep the wall clean for a long period of time.

    3. Executing the Plan

    Cleaning mold in basement
    Image: pinterest.com

    Next, let’s discuss about the steps to remove the mold. First, safety glasses, mask, rubber gloves and long sleeved jacket must be put on. Why? Because the fumes produced by bleach can be dangerous for health if touched or inhaled; it may cause dizziness and also respiratory problems (for asthmatics, get help immediately if it is inhaled).

    After that, put liquid soap in the bucket, mix it with warm water. Use sponge to wipe dirt or debris on the wall, keep doing it until the wall is cleaned. Then, take out the soap water in the bucket and replace it with another warm water and mix one cup of bleach in it, do not forget to clean the sponge too. Soak the sponge or scrub brush in bleach water and use it to scrub the wall.

    Let it sit for a while. After that, clean the wall with mixed water and detergent. Detergent is known to have a good effect in erasing fumes creating by bleach. Then, rinse the wall with water and then dry it using the dry cloth. For preventing the mold to grow, it is better to repaint the wall with anti-mold paint.

    A basement is a humid place to begin with, so mold will keep growing eventually if there is no intensive precaution or cleaning routines. If there is any other way to prevent the mold from growing, it is to put some installments like windows or more ventilation so the sunlight can warm the room, killing the bacteria and decreasing humidity at the same time.

    Basement wall mold removal then decorate it becomes an attractive room
    Basement bar wall decor, Image: Pinterest.com

    If you have a basement floor that is clean, you can decorate the room according to your wishes. Here are some interesting decor to a basement.

    HOW TO REMOVE MOLD FROM BASEMENT WALLS

    Originally posted 2021-02-24 00:03:00.

  • How to Clean Granite Table Top Easily

    How to Clean Granite Table Top Easily

    When you have great furniture in your house, it means that you should have some regular activities in cleaning and taking care of them, such as How to clean granite table top. It is known as beautiful furniture to complete the look of your lovely house.

    Besides, it is also popular as the well-known brand of countertops that has lots of patterns and styles. Moreover, it is also known as great furniture that is able to beauty your beloved house’s outlook.

    However, when it comes to the one activity, that is cleaning, you should make sure that you are able to do it regularly. Particularly, when you want the look of your granite table top still beautiful and best in its durability.

    Stubborn stains on your granite table tops dining rooms.Here's what you should do

    Therefore, in helping you with this idea we are helping you with some suggestion that you can do by yourself in few minutes. So, are you interested to know more? Here, just read by yourself.

    Read also: How to Clean Concrete Table Top that Easy to Follow

    1. Prepare Your Granite Table Top!

    The first idea that best for you to do is to prepare before you go to clean all of it. Moreover, it means that you have to remove the dirt and even dust that may adhered into your granite table top.

    The first step that you can do is by wiping up the dirt on your granite table top. Here, you can use a wet towel or soft cloth with a liquid that will help you in removing the residue.

    Furthermore, after you finish with this step you can wash it with wet towel and soapy water. These things will help you in cleaning and even removing the debris.

    If it is all done, you can try to wash the towel and then try to use soft cloth that is already washed with warm water. It will support you in drying the granite table top.

    Granite top pub table and chairs

    You also can use warm water and soapy dish cloth to make sure that the tabletop of your lovely granite is cleaned. If you try this one, make sure that you do not forget to dry it all again, and make sure that the granite table top does not like water too much because it will damage the textures or even the pattern that it has.

    Another suggestion that you can try is to use isopropyl alcohol and distilled water. These two items can you mix into one spray bottle. Spray the table top and then wait until 2 or 3 minutes. After that, wipe it with a washcloth and make sure that it dries well.

    2. Baking Soda, Best Option that you can try

    Besides trying these suggestions, you also can try this one that is to use baking soda as the cleaner. As we know, baking soda is the best and useful cleaner for our furniture, particularly since it contains sodium bicarbonate.

    Moreover, in removing the spots that adhered in the table top. To use this one, you can mix the baking soda with oil or even water. These two are believed as the best way to clean and remove the stubborn stain in your granite table top.

    In brief, those all the best and easy ways that you can do by yourself. Make sure that you are able to do it regularly, because every furniture is needed to be cleaned, at least, once a week. So, make sure that you are able to do those tips on How to clean granite table top often.

    Granite top breakfast table

    Originally posted 2021-02-19 05:38:00.

  • How to Clean Laminate Table Top: The Best Ways that You Can Do by Yourself

    How to Clean Laminate Table Top: The Best Ways that You Can Do by Yourself

    When you have great furniture in your house, it means that you should have some regular activities in cleaning and taking care of them, especially when it comes to a way about How to Clean Laminate Table Top.

    Although, it is known as an easy-clean surface that does not extra care and able to make your house beautiful with its outlook it is also has its differences.

    Yet, it is also popular as the well-known brand of laminate countertops that has lots of patterns and styles. Moreover, it is also known as great furniture that is able to beauty your beloved house’s outlook.

    Read also: How to Clean Formica Table Top in Few Minutes!

    However, when it comes to the one activity, that is cleaning, you should make sure that you are able to do it regularly. Particularly, when you want the look of your Laminate table top still beautiful and best in its durability.

    Therefore, in helping you with this idea we are helping you with some suggestion that you can do by yourself in few minutes. So, are you interested to know more? Here they are!

    Formica laminate table tops. Kitchen Design idea with gray countertops
    Formica laminate table tops. Kitchen Design idea with gray countertops

    1. Clean it regularly!

    The first idea that is easy to follow by you as the homeowners who has laminate table top is to clean it regularly. Moreover, the fact says that cleaning is the easy and fun activities that you can do in your house by yourself. Particularly to clean laminate table top that does not need extra energies to clean it.

    The only thing that you have to besides clean it regularly is to spray the oil-free furniture spray regularly, make sure that you also do it with a towel or even with soft cloth.

    These things will help you in cleaning the surface of your laminate table top. Furthermore, you also can do that with your children so they know and understand how to clean the furniture in your house.

    As a result, this activity will please you both! Moreover, besides cleaning it regularly and using a spray that is formulated for laminate table, you can go and try to the next step. So, what is that? To know and understand it deeper, let us check them out from these following information!

    Laminate table top with wood edge
    Laminate table top with wood edge

    2. Warm and Soapy Water

    We know that warm water it best way to clean our furniture from dust and stain. Besides, you also can use another alternative such as soapy water. These things will help you in cleaning your lovely laminate table top.

    The reason because warm and soapy water has an extra energy that will support you to clean and keep it away from dust and stains.

    Moreover, you also can use a mixture of liquid soap and warm water; these two things will give you best result in cleaning the table top of laminate.

    Furthermore, to wash laminate table top, you also can rinse cold water and dry with soft cloth or paper towel. Make sure that you always rinse the towel or soft cloth after you cleaning the table.

    In conclusion, we know that when it comes to laminate furniture we have to be ready for it consequences. For example, to clean it regularly and make it into fun activity that you can do with your beloved one.

    The last one, you can keep your furniture out to keep it dry, especially to face it to the sunlight directly. This way is known as the best way related to How to Clean Laminate Table Top will make your furniture durable.

    Round laminate table tops and chair sets for dining room
    Round laminate table tops and chair sets

    how to clean laminate table top easy

    Originally posted 2021-02-17 02:59:00.

  • How to Clean Concrete Table Top that Easy to Follow

    How to Clean Concrete Table Top that Easy to Follow

    Concrete table top is popular with its durability and it is quite confusing when it comes to How to Clean Concrete Table Top. Since it is popular with its advantage, durability, many people love this.

    It is also known as the one that is able to support the outlook of your room in the house, so you can beautify the look of your house by adding these styles and interior into your house.

    On the other hand, concrete table top is also known as furniture that is easy to be stained. The reason, because concrete countertop needs regular cleaning.

    Read also: How to clean concrete walls before painting?

    As a result, for the home owners who has this furniture or even interior should do some regular activity, such as cleaning the dust and remove the stains.

    Therefore, since there are many issues that makes people confused, we provide you some best tips and suggestion that will work to your problems. Here they are!

    Concrete top outdoor dining table

    1. Use Soap and Warm Water

    The first simple things that you can do by yourself in few minutes is to utilize soap and warm water. These things will work out to your problems, especially in removing stains and keep it clean. Furthermore, I suggest you to choose soap that is liquid one.

    The reason because it is easy for you to consider the calculation or even the percentage about the liquid soap. Furthermore, you can add two tablespoons of soap liquid to the warm water. The percentage for the warm water itself is approximately in the medium size container.

    After it is ready, you can use cloth or even towel to scrub to the place that need to be cleaned. If it is not enough for you to remove the stains and make it clean, you can do this tip regularly.

    How to clean concrete table top easy to follow

    2. Use Detergent and Stain Remover

    Besides using soap and warm water, you also can try to use detergent and stain remover. These items will help you to remove the stains or even keep your concrete to stay clean.

    For the procedure that you can do with these two items is to start by using the stain remover, it is better if you completed it with towel or cloth and then scrub gently into the part that you think is needed to be cleaned. Moreover, you can wait a minute to make sure that the remover is working to clean the stain.

    Besides, you can following the detergent into the place that needed to be cleaned from the stains. When you do this step, you can do it with using a towel and even cloth.

    Related: How to clean concrete floor in basement?

    3. Use Concrete Specific Cleaning Product

    The last idea that you can follow easily to remove stains and keep it clean is by using concrete specific cleaning product. One of the is to use PH balanced that is formulated best for concrete’s cleaning stains.

    This product is also popular as the product that is able to be used in protecting your concrete for damage. So, it will help you to keep the durability of your concrete.

    Last but not the least, those are the best ideas that you can follow easily. On the other hand, you have to make sure that you are responsible to keep your concrete to stay clean and durable. The reason because tips and How to Clean Concrete Table Top will not work well if you are not ever trying to do it regularly.

    Concrete top dining table round

    Originally posted 2021-02-15 01:18:00.