Author: Taufiqul Hasan

  • How to Choose Inexpensive Porch Railing Ideas

    How to Choose Inexpensive Porch Railing Ideas

    Building your porch railing is one of the most important parts of your decor process. As the amount of money you need to spend is not small, you have to manage it really well.

    Pressing the amount of building the porch railing can be a wise solution. Hence, here some tips that you can consider in choosing inexpensive porch railing ideas.

    Read also: Different Types of Porch Railings.

    HOW TO CHOOSE INEXPENSIVE PORCH RAILING IDEAS

    1. Recycled Materials

    When it goes to inexpensive or cheap porch railing ideas, there is always a place for recycled materials.

    In fact, it will be the main part or ingredient on your porch railing project since you don’t need to buy anything new. Don’t be confused if you want to work this idea out. It’s sure there are a lot of recycled things around you.

    The simplest example is by hanging pallets around your porch. Build the railing first with the design you like. After you are dealing with the railing, hang these pallets around your porch as its inexpensive decorations.

    It’s almost effortless and inexpensive, but makes sure that you hang these pallets well to make your porch look better.

    Modern deck outdoor porch railing ideas
    Image: montrealoutdoorliving.com

    2. Concern About the Look

    This tip is related with the previous one. Although you plan to maximize the use of recycled materials, never forget about how your porch will look, because it’s the point of building or decorating your porch.

    Be really selective in selecting what kind of recycled materials that you are planning to use. Choose the materials that are still good on the eye and are still decent to be used.

    It’s your luck for you if you have ever had a wagon or cart. You can maximize them by taking it wheels and recreate it as your porch railing.

    It’s going to be a long and probably tiring DIY porch railing project, but the result will never disappoint you. This kind of porch railing will look better when you add a little rustic charm to the design.

    Read also: Different Types of Porch Railings

    Tips to Choose Inexpensive Porch Railing Ideas

    3. Environmentally Friendly

    The one important thing that you need to remember in maximizing recycled materials is about its characteristic. Although it’s cheap and recommended to use recycled materials, make sure that the materials that you are planning to use are environmentally friendly.

    Otherwise, it will only make your porch look unpleasing and probably unhealthy. Avoid those two things before you do a DIY project using recycled materials.

    The clearest example that you can try is by using branch in building your deck railing. This is really simple yet challenging idea to do since you are going to need many branches and makes sure all of it has the same length.

    Start from building the main deck as usual then put the branches on it like normal spindles. This idea will allow you to utilize all branches that are hanging around your house.

    Although building a porch railing is one of the important parts of decorating a house, it has never to be expensive. Moreover, you can utilize all the unused things around your house then make it as the main recycled materials to press your budget.

    Deck private and porch railing ideas diy decorations

    Porch Railing Ideas Gallery:

    Originally posted 2020-04-13 02:00:25.

  • Unleash Your Creativity: Gingerbread House Painting Ideas That Will Amaze

    Unleash Your Creativity: Gingerbread House Painting Ideas That Will Amaze

    Welcome to the enchanting world of gingerbread house painting! This delightful activity combines the joy of baking with the thrill of artistic expression. Whether you’re a seasoned baker or a novice artist, there’s something incredibly satisfying about transforming a simple gingerbread house into a stunning work of art. In this post, we’ll explore various gingerbread house painting ideas that will inspire you to create your own edible masterpiece. 🎨🏠

    Gingerbread House Painting Ideas

    The Magic Begins: Choosing Your Palette

    Exploring Color Schemes

    When it comes to painting your gingerbread house, the color palette you choose sets the tone for your creation. Opt for traditional holiday colors like red, green, and gold for a classic look, or experiment with pastel shades for a whimsical effect. Consider using natural food coloring for a more organic feel. 🌈

    Innovative Use of Icing

    Icing isn’t just for holding your gingerbread house together; it’s a fantastic medium for adding color and texture. Royal icing, in particular, is excellent for detailed work. You can thin it to create a paint-like consistency or keep it thick for adding 3D effects like snowdrifts or shingles.

    Adding Detail: Techniques and Tips

    Brushwork and Piping

    Mastering brushwork and piping skills can elevate your gingerbread house to a work of art. Use fine brushes for delicate details like window frames and door designs. Piping bags with various nozzles offer endless possibilities for creating patterns and textures. 🖌️

    Edible Glitters and Sprinkles

    Edible glitters and sprinkles can add a magical sparkle to your gingerbread house. Strategically place them on the roof, walls, or as landscaping details to mimic the glimmer of snow or the twinkle of Christmas lights.

    Beyond Paint: Innovative Materials

    Candies and Edibles

    Incorporating candies and other edible items can add color and dimension. Think gumdrops for roof tiles, pretzel sticks for log cabins, or shredded coconut for a snowy effect. The only limit is your imagination!

    Natural Elements

    For a rustic look, consider using natural elements like nuts and seeds. These can provide an interesting texture and color contrast to your gingerbread house. 🌰🍂

    Setting the Scene: Landscape Ideas

    Creating a Winter Wonderland

    A snowy landscape can transform your gingerbread house into a winter wonderland. Use powdered sugar for a simple snow effect, or sculpt snowmen and trees from marzipan or fondant.

    Festive Gardens and Pathways

    Craft a festive garden or pathway using colored icing, sprinkles, or crushed candy. This not only enhances the visual appeal but also adds to the story of your gingerbread house.

    Important Note

    “Remember, the best gingerbread house is one that reflects your unique creativity and joy. Don’t be afraid to experiment and let your imagination run wild!” 🌟

    Bringing It All Together: Final Touches

    Lighting It Up

    Adding lighting to your gingerbread house can create a warm, inviting glow. Use small LED lights or edible luminescent paint for an enchanting effect.

    Attention to Detail

    Pay attention to the small details. Adding a tiny wreath, a miniature mailbox, or footprints in the snow can make your gingerbread house come alive.

    Gingerbread House Painting: A Table of Ideas

    ElementIdeasMaterials Used
    RoofShingled pattern, Snow effect, GlittersIcing, Candies, Edible glitters
    WallsBrickwork, Murals, Textured icingColored icing, Food coloring
    Windows and DoorsStained glass effect, Wood-like textureGelatin sheets, Pretzel sticks
    LandscapeSnowmen, Pathways, GardensFondant, Crushed candy, Sprinkles

    Conclusion

    Gingerbread house painting is more than just a holiday activity; it’s an opportunity to unleash your inner artist and create something truly special. Whether you’re aiming for a traditional design or something more avant-garde, the key is to have fun and let your creativity shine. So grab your icing, gather your materials, and get ready to transform a simple gingerbread house into an extraordinary work of art. Happy painting! 🏠🎉

    Originally posted 2023-12-20 10:56:42.

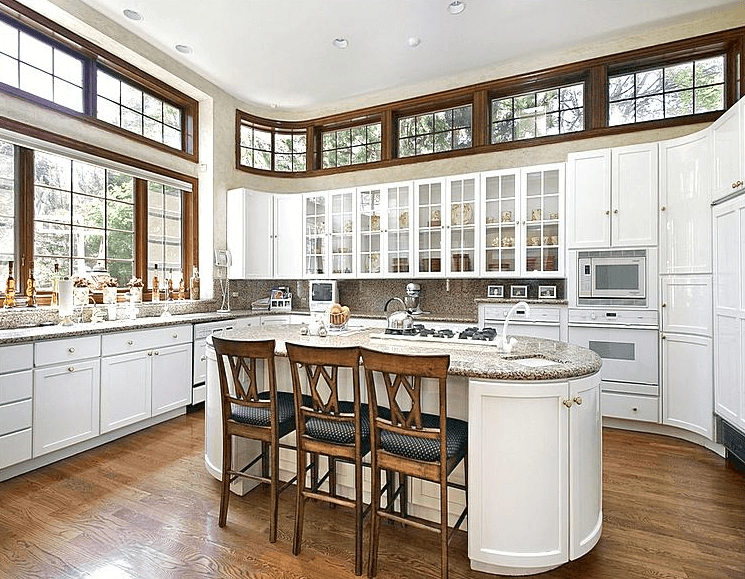
  • Kitchen Island with Stove Top, Seating, Sink, and Oven Ranges

    Kitchen Island with Stove Top, Seating, Sink, and Oven Ranges

    Designing kitchen islands in the house are one way to show off your taste. You can decorate the kitchen island, according to your preference of its utility.

    Here are the steps to make the kitchen island looks perfect in your house.

    Read also: DIY Kitchen Island Drop Leaf.

    1. Planning the Design

    The first step to do is to plan the concept. It will be different if you want to make a long kitchen island or a round kitchen island.

    The features that you want to add in the kitchen islands also become one of the considerations.

    If you like the Chicago model, just use the Algonquin style. This style applies the perfect mix between the cooking tools, prepping studs, and the seating. It can be both use as the supper bar or cocktail party.

    If you like the modern taste, you can try the Vancouver home design. Use this design by putting the stove in the corner of the islands. It can have two chairs as the seating and maybe more with the appropriate setting. It totally gives the minimalism atmosphere in the kitchen.

    Using the monochrome colors is also recommended. The contrast colors between black and white from the stuffs will make the kitchen look classier and more elegant.

    Kitchen island with stove and sink

    2. Creating the Spacious Room

    The second step to decorating the kitchen island is making the space. This approach is useful especially if you want to combine the kitchen islands with seating, stove top, oven ranges, and sink. In order to add those features, you need to make the design as simple as possible.

    Begin with adding and creating counter spaces. Lots of counter space gives you enough place to prepare meals. The space can also become an eating place and cooking area. The spacious room also allows you to make some drawers or shelves to put the dishes.

    The stove top can be placed in the middle while the oven should be right below it. It is more convenient and practical. With counter spaces on the right and the left side, cooking will be easier to do. However, take one side for the sink so everything is within your reach.

    Read also: How to design large kitchen island with seating for 4

    Simple Tips Using Kitchen Island with Stove Top, Seating, Sink, and Oven Ranges

    3. Adding More Seats

    The third step is adding the seating. There are options for you while add the seating, you can add the seating in many models like the bar style, low profile style, or minimalism style.

    The recommended version is the bar style. This style allows you to have more room in the kitchen. In addition, you can push the chairs below the table if it is not in use. It will make the kitchen tidier than before.

    The best seating position will be on the opposite of the cooking area with different level for the counters. It makes distinctive areas between cooking and dining so it is safe as well.

    Kitchen island with stove and oven ranges

    4. More Tips

    The final step in designing the kitchen is adding the stuffs. If you want to add the stovetop and the sink, it is highly recommended if you make it in the same level. It maximizes the function, especially when you want to cook.

    In sum, a kitchen island which is completed with the entire features is a valuable addition to the kitchen. It improves your productivity while it elevates the kitchen value too. Make sure it is not too crowded, so it remains safe and fully functional.

    THE TIPS IF YOU USING KITCHEN ISLAND WITH STOVE TOP, SEATING, SINK, AND OVEN RANGES

    Originally posted 2020-04-12 01:11:21.

  • How to Decorate First Birthday Girl Party for your Little Lady

    How to Decorate First Birthday Girl Party for your Little Lady

    The first year in parenthood is not an easy things yet it is wonderful. It is important that your baby girl turns one year old.

    But, when it comes to party, where to start? Make the party into the most beautiful moment of your family.

    One important thing to remember is take a lot of photo. It will be beautiful and funny memory that your little lady can see when she grows up.

    Of course many other tips to decorate and set up your child birthday party, and it should be considered. Here is 6 tips and nail it!

    Read also: How to decorate a dining room table with candles?

    6 Tips How to Decorate First Birthday Girl Party

    1. Write Special Massage to Your Beloved One

    You can use super simple and sweet method to express the love itself. One year in a flash, you realize how the time flew so fast.

    Now, let the others know how did you feel, make cute background with gorgeous photo display of your daughter. Everyone will amaze at how you put attention of such details.

    2. Work on Indoor and Outdoor Camp

    Imagine that summer camp invades the house. Make the kiddos’ camp and make the playground for friends. You can combine it with the southern picnic concept. It is the time for the families to come together.

    Using backyard as outdoor camp will be the great things to do. Do not forget to add the tent, lunch tray, and lumberjack cake.

    Turn the campground into the wonderful cake station. The butter cream and bacon toping will light the little lady girl.

    Outdoor first bday party places
    Image: pinterest.com

    3. Hold a Circus Party

    You can give the baby girl the best gift. There are a million things to do but you can start with being a clown. Make your own circus for a day rather than paying someone else to do it worth a million.

    Add a circus tent in the backyard, lots of cottons candy, popcorn, and animal sugar cookies. This idea will be the mind-blowing parade for your little girl!

    4. Add Some Shining and Shimmering

    Beyond the beautiful and perfect details, pay attention to your baby’s interest. If your girl likes flowers, make the amazing floral birthday bash for her. Add lovely backdrops with butterflies and layers of wild flowers.

    You can combine it with the glitter pattern a scope of something sparkle. Pay attention to the invitation card and let the others catch the glimpse of the bash. The guests will instantly falling head over heels with this design.

    HOW TO DECORATE FIRST BIRTHDAY GIRL PARTY FOR YOUR LITTLE LADY

    5. Work the Princess Concept

    Invite your family and friend into the Disney world where the birthday’s girls is the princess. If your princess likes the mermaid, let her become Ariel for a day.

    You can provide the castle cake, balloons, seaweed, and the desserts in the seashells on the table covers, sugar cookies and the floating Olaf.

    6. Pose a Modern Bash

    Grasp the taste of modernity. If you like a very modern-looking pattern, just use this concept. Add colorful candies, chocolates milk shots, and the miniaturized version of the city for the kiddos to play. You can combine the small city with the food stations and pancake bars.

    There are so many concept that you can use for the birthday bash. Let the first party become the guarantee for your love and support.  Let the birthday’s girl smile happily with every effort that you put in the details and make the bash unforgettable celebration ever.

    Baby girl first birthday party theme ideas
    Baby girl first birthday party theme ideas, image: pinterest.com

    Originally posted 2020-04-11 01:54:17.

  • Best 10 Bathroom Decorating Ideas for Small Spaces

    Best 10 Bathroom Decorating Ideas for Small Spaces

    Sometimes, we have to put a bathroom in narrow or small area. Maybe, the size of our home is narrow overall. It make us to build small bathroom.

    Get bathroom to be close to the bedroom, often also make us build the bathroom with small sizes. Maybe we not build both room in the same time.

    If all of that has happened, I thinks it is no problem. Next we can do is given a beautiful decoration. It aims to make us comfortable in the bathroom.

    Read also: How to decorate bathroom vanity with sink?

    HOW TO DECORATE BATHROOM SMALL SPACE

    1. Small spaces bathroom decorations using shower curtain

    White shower curtain is great idea. It show the bathroom impression that clean and well maintained. Small or narrow space bathroom size, it is no problem. The point is clean and maintained.

    A good shower curtain is not damaged by water easily. Usually, it made waterproof with special materials, such as PVC.

    Small bathroom decorating ideas using shower curtains

    2. Small bathroom decoration using mirror

    Add mirror at wall is great ideas. Its function is also to give a broader impression. Important things, choosing a thin mirror attached to the wall is highly recommended.

    Add mirror ideas to decorate bathroom small spaces

    Read also: 10 most popular bathroom vanity mirror ideas

    3. Striking bright wall color for small bathroom decorations

    Bright color gives attractive impressions and happy. Yes, although the room is cramped. This is important. Bathing is an activity that should be fun and happy. Bathing is an refreshing, relaxation, and eliminate fatigue after activity all the day.

    Yellow bright wall color for small bathroom decorations

    Read also: Creative way how to decorate a bathroom wall

    4. Wooden shelves to store towels and toiletries for decorating small bathroom

    It provides multiple functions. Not only for organizing, but also to put a variety of other decoration accessories, such as flower pots, or your favorite collection.

    Wooden shelves for small bathroom decorations
    Image: homedit.com

    5. Indoor flower pots for narrow spaces bathroom decorations

    In this case, more advisable to use a suitable plant indoor like snake plants and others. It is because some plants can work well to provide more oxygen. They can also absorb odors well.

    Indoor plant flower pots for narrow space bathroom decorations

    6. Narrow bathroom decor with antique lamp ornaments

    For bathroom, lighting is important. Generally, bathroom narrow space does not get maximum light from window. Thus, it is necessary to provide good lighting from best lamp.

    Choosing a suitable lamp can give desired bathroom atmosphere. We need comfortable at this area.

    Unique lamp, hanging lamps, and other lighting decoration can good ideas for bathroom.

    Unique lamp ornament for small space bathroom decorations

    7. Wide window ideas for small bathroom decorations

    If possible, you can using a wide window. It will make small bathroom feel more spacious. Of course you need adding some accessories to decorate windows.

    For that, you can use windows curtains. It will helpful for our decorations.

    Wide windows for bathroom small spaces

    8. Natural stone wall to for small space bathroom

    It gives cool impression. This idea make artistic impression highlighted.

    You should choose right ceramic pattern as option if can not get natural stone.

    Not only that, efficiency bathroom design need to be considered.

    Natural stone or rustic tile for wall bathroom small space decorations

    9. Beautiful frescoes for decorate narrow bathroom

    If you love art, especially wall painting, frescoes, and others, using these decoration is good ideas. It provide an artistic and elegant bathroom impressions.

    You need to adjust the type of fresco with the bathroom decoration theme.

    For protect from water, you should use protective coating on the painting.

    Frescoes for wall bathroom decorations

    10. Bathroom decoration with small cabinets

    It is multifunctional for storing toiletries. Your soap, toothpaste, toothbrush, even towels can be stored neatly.

    In addition, wall cabinet also give elegance impression for appearance of the bathroom as a whole.

    Small wall cabinet for bathroom decor

    Actually, there are many other bathroom decoration ideas that we can do. It really depends on the creativity of each person.

    Blending functioanlity and aesthetics for decorating the room is an important thing. You should pay attention to this.

    For post in this time, that’s the 10 best decorating ideas for bathroom small spaces. I think you might adopt. Hope can be useful for you. Thanks.

    Bathroom small space decoration

    Originally posted 2020-04-10 08:25:16.

  • How to Decorate a Wall behind a Couch as your Own Gallery

    How to Decorate a Wall behind a Couch as your Own Gallery

    What do you want to console behind your couch? Do not leave it empty. The wall behind is the most focal point.

    You have to pay attention to it. Spell the magic from your own home and make the people adore it.

    1. Choose Your Artwork

    If you want to impress your guest, gallery wall can be the way to show it. Make the wall as your own gallery. The first thing that you have to do is choose what you want to hang there.

    There are many options to display the art. If you like photography, hang the photos there. If you like painting, show the people your taste and put your collection in the wall.

    Read also: How to decorate a wall with photos?

    2. Hang It Perfectly

    After you choose the artwork, the second step is learning how to hang it. Pay attention to the way you put the collection, it is matter.

    You can go vertical or horizontal as long as it matches the taste. If you like the concept of the only one wall, put one large piece of art.

    Stick with the symmetrical pattern if you choose this concept, it will make your guest stay focus while enjoying the art. Use clockwise design when you like to emphasize the change of season in the photos.

    Read also: How to decorate stairs and landing for upgraded look?

    3. Matching It with the Colors

    Establish the mood of your work. You can go with the plain white or gray if you like minimalist and monochrome design. But if you like to take a challenge and experience the power of the colors, paint the walls with more bright colors.

    For example, you can use the mix of green and blue to make the atmosphere more relaxing. Charlie Cosby, the head of creative designer state that the color that you select should make the artwork really pop.

    Therefore, to make it as a highlight, you can paint the gallery different from the other wall.

    How to Decorate a Wall behind a Couch as your Own Gallery

    4. Add Mirrors

    Do you like the reflection of yourself? Put the mirrors on the wall. There are various styles of the mirrors, choose the one with the frames. It will look artistic to blend with the displays of the photos or the paint.

    If you want the taste of the Manhattan interior, try to create panels of antique mirrored-glass like the designer Todd Romano. It blends well with the paint of Louis XVI. If you like sculpture, you can use mirrors panels to create the vintage sense in the wall.

    Add mirror to decorate a wall behind a couch

    5. Match It with the Furniture

    Blend the wall with other things like end tables where you can put the table lamp and flowers. If you like music, show off your collection by putting the guitar or violin in the corner of the wall. You also can match it with book shelves to display books.

    Gallery in the living room will be the best idea to show the people about your sense. Make the people impress on how you pay attention to the placement of every detail. Utilize the wall and establish the new mood while lying down on the couch.

    HOW TO DECORATE A WALL BEHIND A COUCH AS YOUR OWN GALLERY

    Originally posted 2020-04-09 21:15:08.

  • How to Clean Bluestone Table in One Touch Only

    How to Clean Bluestone Table in One Touch Only

    Cleaning Bluestone is not as easy as we ever thought before, especially related to How to Clean Bluestone Table.

    Why? The reason, because there are many things that we have to consider and even remember.

    One of them is related to the important ideas about the area where Bluestone came.

    As we know, that Bluestone is one of many types of natural stone that best as home décor. It is also good and best for us to use Bluestone as parts of our house; such as used Bluestone as the materials for flooring, countertops, and other usages in our houses.

    Read also: How to clean faux marble table top of stains easily?

    HOW TO CLEAN BLUESTONE TABLE IN ONE TOUCH ONLY

    However, since it is able to beautify the outlook of our house, we also have to remember that keeping it clean and maintain it is not easy.

    We have to do it regularly without ever forget to do it, at least, once a week. Particularly, since it is located and used as the materials for your table in the house.

    So, we know that there will be many stains that will adhere or even glutinous on the surface of your table. Hence, we know that cleaning is the best way to keep it clean and beautiful, so without further talking we provide you as follow.

    Here they are the best tips to clean Bluestone in one touch only.

    How to Clean Bluestone Table easily

    Cleaning bluestone table

    Be Ready with Some Important Materials!

    Before you start to clean up your beautiful Bluestone in the table, you have to make sure that you have some supporting elements or tools that will help you in doing your job, cleaning! The first one is to go check your wardrobe. Are you already having these all?

    The first one that is essential is soft cleaning cloths that later will help you in cleaning the surface of Bluestone table. This one is very easy for you to find, because you can choose and use the cloth that is no longer used in your house, but make sure that it has soft textures that is possible to be used as the tool to scrub the surface of your lovely blue stone table.

    The second one is a bucket that will help and support your activity in cleaning the blue stone table. Besides, you also have to prepare and ready with four drops mild dishwashing detergent that later we are going to use as the one that is able to clean and wash the stain that is adhered in your Bluestone table.

    Bluestone round dining table

    Let us go to clean it!

    After all the preparations and tools are ready, you can go to the next step! You can remove the dirt or even stain that is adhered in the surface of your Bluestone table. To clean it, you can use soft cloth that is already prepared before you do this step.

    In addition, make sure that the soft cloth that you are using is dry and without water. This will help you to clean the dust from the surface of your Bluestone table.

    Besides, it has also helped you to keep your Bluestone table to stay durable, because it is not using the harmful one and it will prevent your Bluestone table from dirt buildup.

    Read also: How to clean granite table top easily?

    After those beginning processes are done, you can ready to go to the next part, that is to use a bucket. Just prepare the bucket with one-gallon warm water and mix it with four drops mild dishwashing detergent that will help you in cleaning the table later.

    Then, use wet soft cloth to clean the surface of the table. Scrub gently into the Bluestone table and wash it again until you think it is clean.

    In short, when we have beautiful interior such as Bluestone table it means that we have a responsibility to keep it clean and durable. Those ways are the simple tips about How to Clean Bluestone Table that you can do by yourself easily. Good luck!

    Bluestone table top care

    Originally posted 2020-04-08 07:17:17.

  • How to Get the Right Unfinished Vanity Base Cabinets

    How to Get the Right Unfinished Vanity Base Cabinets

    Buying unfinished vanity base cabinets is now preferable for almost all customers, expect for the very busy one who prefers ready to use items.

    It offers more affordable rate, modifiable design, and freedom for finishing.

    If you are thinking the same way, the following guide will lead you to the right option.

    1. Get the Right Measurement

    Measurement needed to make the right decision includes the space where you want to put the cabinet and measurement on the unfinished vanity base cabinets that you want to buy.

    All details are important. You need exact measure on its length, width, and height. In addition to it, you may also consider the gaps needed between furniture and other important measurement to consider.

    Exact measurement allows you to get fitting cabinets without any further issue on getting too large or too small cabinets. If it’s meant for your kids, make sure to include your kids height on consideration.

    Related:

    Unfinished bathroom vanity drawer base cabinet 12

    2. Consider the Needed Designs

    What are you going to do with the cabinets? If it is used to store your clothes, you may need more drawers than usual. If you want to use the cabinets for bathroom vanity, you may want to consider more shelves to store extra towels and toiletries.

    If you want to use it as kitchen cabinet, you may want to have bigger shelves in it so you can store your cooking tools and small amenities in it. If you are going to attach sink on it, consider how the plumbing fits as well in it.

    3. Compare Quality to Price to Budget

    Being unfinished, it is easier for you to decide if the cabinet is made of good wood or not. Good wood is preferable for stronger build and longer service. Better quality commonly costs more money.

    However being unfinished, the cabinet is commonly offered in much cheaper price than the usual base cabinet.

    Before deciding on any cabinet, it will be important to stick on your budget as well. In most cases, it is possible for you to buy better cabinet with more affordable rate. When the three factors are counted, you are ready to make your choice.

    4 Simple tips to Get the Right Unfinished Vanity Base Cabinets

    4. Decide on Targeted Look

    It is often needed to decide on the targeted look before you decide on certain cabinet to buy.

    First, not every wood is modifiable. So if you think you need some alteration, consider your wood options.

    Second, you may want to add marble counter top or sink on top of the cabinet, so wood strength and assembling will be crucial to check.

    Third, several wood varieties will need additional treatment before you can paint it.

    Meanwhile, several others can be painted immediately. The amount of finishing steps will affect your budget as well so decide it first before shopping.

    Unfinished vanity base cabinets offer you several benefits from freedom to modify to more affordable price to pay. However, applying the appropriate steps in choosing and buying will be necessary to ensure you get the best on your budget. Apply it and see what you can secure.

    HOW TO GET THE RIGHT UNFINISHED VANITY BASE CABINETS

    Originally posted 2020-04-07 02:36:26.

  • How to Choose the Right Unfinished Vanity Bench?

    How to Choose the Right Unfinished Vanity Bench?

    Completing your vanity with the right bench will be very essential.

    It makes sure both items can be collaborated ultimately, and you have the best comfort and access while using it.

    Several vanities like kitchen vanity and dressing room vanity do require bench sometimes.

    This is how you should choose it.

    Read also:

    HOW TO CHOOSE THE RIGHT UNFINISHED VANITY BENCH

    1. Measure the Vanity and Your Need

    This includes measuring almost everything related to the bench. First you need to measure the vanity bench. The bench height should be appropriate so that people can sit comfortably and accessing the vanity from there nicely. It is important to consider your kids as well if they are going to use it too.

    In addition to the height, you also need to be specific on the gaps between each bench if you want multiple of it. Its distance to the vanity will affect the design as well so measure them all carefully. Be exact on it.

    2. Decide on the Right Wood

    Many unfinished furniture items are now available on so many options and the varieties lie on the material as well. The options available are very vast, from oak to mahogany.

    The option should affect the price you need to pay as well. In addition to it, each wood will offer different look, patterns, and texture.

    So if you plan to alter the bench as well, you will need to consider the texture and toughness. Several varieties of wood are better to be left without altering it as it takes too much effort to do it yourself.

    Several other woods are already great the way it is as well. Most importantly, it is recommended to choose the same wood as your vanity.

    Unfinished wood vanity bench
    Image: dutchcrafters.com

    3. Decide on How You Will Finish It

    The unfinished condition is many as well. You can get the assembled or pre assembled. If you plan to alter the design, the pre assembled is a better choice. However, if you only need to coat it, the assembled one is better and faster to finish.

    Several woods will need some more treatment before coating while the other is ready to paint immediately. If you plan to finish it on certain colors, check the paint properties and make sure they fit well for the bench material. It prevents you from unnecessary expense.

    See also: How to finishing the unfinished vanity cabinets

    4. Compare Quality to Price

    Normally, unfinished vanity bench is much more affordable comparing to the finished one. However, it doesn’t mean that you don’t need to check the quality. Check on how it is made and how all parts are assembled. Is the assembling good and strong enough? Does it use good enough quality of wood?

    Cheap bench may have several flaws you need to be aware of. For example, it isn’t sturdy enough, or the wood isn’t capable of heavy weight. Generally, more expensive price also means better quality yet it isn’t always anymore. So double check the bench.

    This guide should lead you to the right bench to purchase. Make sure to do every step carefully and don’t make decision in a rush to prevent missing details. Happy shopping!

    Originally posted 2020-04-06 01:40:30.